

Homemade Hummingbird Nectar Recipe: 4 parts water to 1 part suga
Homemade Hummingbird Nectar Recipe: The Ultimate Guide for Backyard Bird Enthusiasts
Are you eager to attract more hummingbirds to your garden? Look no further! This comprehensive guide will teach you how to make the perfect homemade hummingbird nectar. By following our simple recipe and tips, you’ll soon have these tiny, vibrant visitors flocking to your backyard. Let’s dive in and discover the secrets to creating irresistible hummingbird food.
We love hummingbirds and love to watch them throughout the day, especially after a long day, relaxing in our backyard nature retreat.
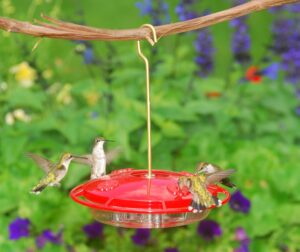
We have 4 feeders that are strategically located throughout our gardens. The red, hummingbird nectar feeders ( red attracts hummingbirds) are placed in areas that are naturally defined “territories” ( as you know, hummingbirds are very territorial) which helps cut down on the fighting.
Our homemade hummingbird nectar recipe is derived from the old standard recipe, but please be aware that a lot of research has gone into making sure that we are providing the most beneficial source of hummingbird food replacement.
The Importance of Homemade Hummingbird Nectar
Before we get to the recipe, let’s understand why making your own nectar is so beneficial. Store-bought options might seem convenient, but homemade nectar offers several advantages.
Why Make Your Own Nectar?
First and foremost, creating your own hummingbird nectar is cost-effective. You’ll save money in the long run by using simple, inexpensive ingredients. Moreover, you have complete control over what goes into the nectar. This means you can avoid harmful additives that some commercial products might contain.
Another significant benefit is freshness. Homemade nectar is always fresh when you make it in small batches. Hummingbirds prefer fresh nectar, and it’s better for their health too. By making your own, you’re ensuring these delightful birds get the best possible nourishment.
Benefits for Hummingbirds
Hummingbirds have incredibly high metabolisms. In fact, their hearts can beat up to 1,260 times per minute during flight! This means they need a lot of energy to sustain their active lifestyle. Homemade nectar provides essential energy to fuel their high-speed activities.
Additionally, proper nutrition supports hummingbirds during crucial times like migration and breeding seasons. While nectar isn’t their sole food source, it complements their natural diet of insects and flower nectar perfectly. By offering homemade nectar, you’re helping these tiny birds thrive.
Our homemade hummingbird nectar recipe starts with cane sugar. As you know, there are two sources of sugar: cane sugar and beet sugar, of which 70% of the world’s supply comes from cane sugar. Both are chemically “sucrose” and fall into the carbohydrate family. Carbohydrates are easily digested and provide the immediate “energy boost” that hummingbirds need to sustain their incredibly high metabolism. (Comment: I guess if we humans had that kind of metabolism we wouldn’t be facing our obesity crisis! Wow…what a concept …more exercise …increased metabolic rate …burn more calories …less fat).
Sorry! Back to the topic…the second constituent our homemade hummingbird nectar recipe is water. Ever thought about the type of water you use for your hummingbird food? We have. The hummingbird’s source water comes from the naturally occurring water sources available: dew, rain water and deposits of rain water, people provided (bird baths), and finally that provided in the hummingbird’s diet.
We use our tap water in our homemade hummingbird nectar, which is supplied from our well. The water’s chemical composition is generally hard ( contains calcium and magnesium) but has a TDS ( Total Dissolved Solids) of 275 ppm with no measurable concentrations of lead or arsenic. Its safe for us to drink so the hummers get the benefits of some added minerals. We feel its better than using distilled or purified water in our homemade hummingbird nectar recipe.
Now, if you’re a city dweller, you may have chlorine or fluoride added to your water. I’d recommend boiling that water to flash off the chlorine or fluoride, 2 minutes of boiling should be sufficient.
The Perfect Hummingbird Nectar Recipe
Now, let’s get to the heart of the matter – the recipe itself. You’ll be surprised at how simple it is to make hummingbird nectar. Here’s what you need:
Ingredients
-
1 part white granulated sugar
-
4 parts water
That’s it! Just two simple ingredients. This ratio mimics the sugar content found in natural flower nectar that hummingbirds feed on in the wild.
Next ingredient ….RED COLORING….No way!
Lets look at it from a hummingbird’s perspective. They like red and are attracted to the color due to genetics and environmental stimuli … flowers. If your hummingbird feeder is red… why do you need more? If your feeder isn’t red you can attach some red ribbon or red silk flowers to help attract them.
Naturally occurring nectar is clear and odorless ( Hummingbirds are not attracted by scent). So why buy these colored or scented mixes?
The red coloring (Red #40) has been banned in countries due to its mutation properties ( can cause cancer). Why would you want to introduce chemicals into the hummingbird’s diet that are foreign to their digestive system?
Several experienced, licensed wildlife rehabilitators have reported seeing disturbing damage in hummers that were known to use dyed syrup, including tumors of the bill and liver.
Step-by-Step Instructions
-
Start by boiling the water. This step is crucial as it purifies the water, removing any potential contaminants that could harm the hummingbirds.
-
Once the water is boiling, add the sugar. Stir continuously until the sugar is completely dissolved. This usually takes about 1-2 minutes.
-
Remove the mixture from heat and allow it to cool to room temperature. Never serve hot nectar to hummingbirds as it can harm them.
-
Once cooled, your nectar is ready to use! Fill your clean hummingbird feeders with the fresh nectar.
-
Store any excess nectar in the refrigerator. It will stay fresh for up to a week when refrigerated.
Here’s a handy table to help you determine the right amounts based on your feeder size:
| Feeder Size | Sugar | Water |
|---|---|---|
| 8 oz | 1/4 cup | 1 cup |
| 16 oz | 1/2 cup | 2 cups |
| 32 oz | 1 cup | 4 cups |
Remember, it’s better to make smaller batches more frequently to ensure the nectar is always fresh.
Tips for Making and Serving Hummingbird Nectar
Now that you know the basic recipe, let’s explore some important dos and don’ts to ensure you’re providing the best possible nectar for your hummingbird visitors.
Do’s and Don’ts
Do:
-
Use only white granulated sugar. This type of sugar is safest for hummingbirds and closest to their natural food sources.
-
Clean your feeders regularly. A clean feeder prevents the growth of harmful mold and bacteria.
-
Use room temperature or slightly cool nectar. This is most appealing to hummingbirds.
Don’t:
-
Use honey, artificial sweeteners, or brown sugar. These can be harmful to hummingbirds and don’t provide the right nutrients.
-
Add red food coloring to the nectar. It’s unnecessary and potentially dangerous for the birds.
-
Use hot nectar. Always let it cool to room temperature before serving.
Best Practices
To attract and keep hummingbirds coming to your feeders, follow these best practices:
-
Change the nectar frequently. In warm weather, replace it every 2-3 days. In cooler temperatures, once a week is sufficient.
-
Place feeders in shaded areas. Direct sunlight can cause the nectar to ferment quickly, which is harmful to hummingbirds.
-
Use multiple small feeders instead of one large feeder. This reduces competition among hummingbirds and allows more birds to feed simultaneously.
-
Keep your feeders clean. Wash them with hot water and a mild detergent every time you change the nectar. Rinse thoroughly to remove any soap residue.
-
Be consistent. Once you start feeding hummingbirds, try to maintain a regular schedule. These tiny birds will come to rely on your feeders as a food source.
By following these tips, you’ll create a safe and inviting environment for hummingbirds in your backyard.
Frequently Asked Questions
As you embark on your hummingbird feeding journey, you might have some questions. Here are answers to some common queries:
Can I use brown sugar or honey instead of white sugar?
No, it’s best to stick with white granulated sugar. Brown sugar contains molasses, which can be harmful to hummingbirds. Honey, while natural, can promote the growth of a dangerous fungus that causes a fatal tongue condition in hummingbirds. White sugar is the safest option and closest to the nectar they naturally consume.
How often should I change the nectar?
The frequency depends on the weather. In hot conditions, change the nectar every 2-3 days. Warm temperatures can cause the sugar solution to ferment quickly. In cooler weather, changing it once a week is usually sufficient. Always observe the nectar and change it immediately if it looks cloudy or has visible mold.
Is red dye necessary to attract hummingbirds?
Contrary to popular belief, red dye is not necessary to attract hummingbirds. In fact, it’s best to avoid it altogether as it could be harmful to these delicate birds. Instead, choose feeders that have red parts. Hummingbirds are naturally attracted to the color red, so the feeder itself will catch their attention.
When should I put out hummingbird feeders?
The best time to put out feeders depends on your location. In most areas of the United States, it’s good to have feeders out by early spring (around mid-March to early April) to catch the first wave of migrating hummingbirds. Keep them up until late fall when the last hummingbirds have migrated south.
Can I feed hummingbirds other foods besides nectar?
While nectar is a crucial part of a hummingbird’s diet, they also need protein which they typically get from small insects. You can’t directly feed them insects, but you can create an environment that attracts insects naturally. Plant native flowers and avoid using pesticides in your garden. This will provide a well-rounded diet for your hummingbird visitors.
How can I keep ants out of my hummingbird feeder?
Ants can be a nuisance at hummingbird feeders. To deter them, use an ant moat – a small cup of water that hangs above the feeder. Ants can’t swim across the water to reach the nectar. You can also apply a thin layer of petroleum jelly around the hanger parts of your feeder, but be careful not to get it near the feeding ports.
Here is a detailed article on the easy way to keep ants and bees off of your hummingbird feeder
Do hummingbirds need nectar in the winter?
Most hummingbird species migrate to warmer climates for the winter. However, if you live in an area where hummingbirds overwinter, or if you notice some staying late into the season, it’s kind to keep a feeder out. Just be sure to check it regularly and bring it inside during freezing temperatures.
Conclusion
Creating homemade hummingbird nectar is a simple yet rewarding way to support these fascinating creatures. By following this recipe and best practices, you’re providing a safe, nutritious food source that will keep hummingbirds returning to your garden time and time again.
Remember, consistency is key. Maintain clean feeders and fresh nectar to create a reliable food source for your local hummingbird population. Not only will you be helping these tiny birds, but you’ll also be treated to the delightful sight of these iridescent flyers visiting your backyard regularly.
So why wait? Gather your ingredients, clean out those feeders, and start attracting hummingbirds to your garden today. With a little effort and care, you’ll soon be enjoying the magical presence of these remarkable birds right in your own backyard. Happy hummingbird watching!

Here is the Nectar Aid’ self measuring pitcher. It’s the quickest and easiest way to make and pour your hummingbird nectar. “Nectar Aid” is a mixing pitcher, measuring cup, microwave container, mixing spoon, funnel and storage container all rolled into one.
Below is a video about the Nectar Aid self-measuring pitcher
________________________________________________
When to change the homemade hummingbird nectar in your feeder
To keep hummingbirds returning to your feeder, you will need to keep the nectar fresh. The outside air temperature is what determines how long the hummingbird nectar will stay fresh. Heat is what causes the sugar in the nectar to ferment. Once the sugar starts to ferment mold and bacteria will start to grow in the nectar.
The hotter the temperature, the more often the nectar will have to be changed.
There are signs that will alert you to when it’s time to change the nectar. Once the nectar starts to look cloudy, it’s time to put in fresh nectar. If you see little black specks of mold in the nectar or see black mold growing on your feeder, you will know you have waited to long. Here is a chart that will show a general time frame as to how long you might have before you have to change the hummingbird nectar.
High temperatures Change nectar after
71-75 6 days
76-80 5 days
81-84 4 days
85-88 3 days
89-92 2 days
93+ change daily
Every time you change the nectar you need to clean your feeder. If you change it on time, before any mold starts to grow, all you have to do is rinse it out with hot water before you add the fresh nectar. The National Audubon Society says you should clean your hummingbird feeder once a week. They say to clean it by rinsing it with a solution of 1 part white vinegar to 4 parts water, then rinse the feeder out with clear warm water 3 times before refilling.
Don’t Wait Too Long
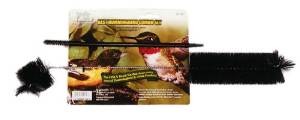
If you wait too long to change the hummingbird nectar and you notice that mold has started to grow, you will need to clean your feeder with a mild bleach solution to kill the mold and bacteria. Make a solution of 10% bleach to 90% water and submerge your entire feeder for an hour. You will also want to brush off all signs of any mold from your feeder. You may want to invest in some special hummingbird feeder brushes to make this cleaning job a lot easier. Once the feeder is cleaned you should rinse it out 3 or 4 times with running water to be sure that you have removed all traces of the bleach solution.
Below is a good video that demonstrates how to clean a hummingbird feeder.
Now that your homemade hummingbird nectar recipe is done, you will need to get a feeder that is easy to take apart and clean, and one that will also protect your hummingbird food from bees, ants and wasps.
My favorite choice of hummingbird feeders to use with the homemade hummingbird nectar recipe
This is an inexpensive feeder that has all the features that a good hummingbird feeder should have. It’s a basin type feeder, therefore it won’t
leak and attract insects to the leaking nectar. It’s easy to take apart and clean. This is a very important feature. An easy to clean feeder is one that you will be more likely to keep clean, which in turn, will assure the health of your hummingbirds and insure that they will keep using your feeder.
It also has a built-in ant moat at the base of the hanger. This little container holds water and because ants can’t swim, it keeps ants away form the nectar. The feeding ports have built-in nectar guards that keep bees, wasps and all other flying insects from reaching the nectar. The hummingbirds can easily stick their long bills through the nectar guards to feed, but the insects can’t reach the nectar. This feeder has raised feeding ports that keep out rain water and prevents it from diluting the nectar. The red color f the feeder will also attract hummingbirds to the feeder.
This mid-size nectar feeder has a 12 oz. capacity and can be hung or post mounted with hardware provided. It has four feeding ports for hummingbirds and is made of unbreakable polycarbonate.
For ease of cleaning and protection from bees, wasps and ants, this feeder can’t be beat.
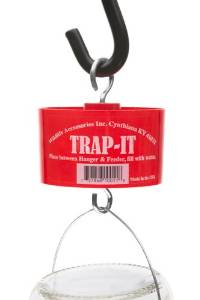
If you already have a hummingbird feeder, and you want to protect your homemade hummingbird nectar from ants and other crawling insects, the ant moat below will do the job.
Trap-It Ant Moat for Hummingbird Feeders
The Trap It ant moat will keep ants out of your hummingbird feeder. The water barrier that it provides will keep them from getting into the hummingbird nectar, drowning and decomposing and ruining the nectar.
Just place the ant moat between the hangar and the feeder and your ant problem will be solved.
If you would like to make your own ant moat, below is a video that will teach you how.
If you have an existing feeder that needs to be protected from bees and wasps, below is a video that shows how a man bee proofed his feeder using plastic mesh from an onion sack.
Now you know how to make your own homemade hummingbird nectar, when to change your nectar and how to clean your feeder.
If you found this article helpful please share it with your friends using the social bookmarking buttons on the left side of this page. Help everyone to increase their knowledge and enjoyment of feeding hummingbirds. Do it for the hummingbirds! It also helps my ranking so my information will be available to more people. The more people that see this vital information, the more the hummingbirds are helped. Thank for your help. The hummingbirds and I appreciate you very much!