

How to Make Hummingbird Feeder Nectar
Key Takeaways
-
The safest hummingbird nectar is a simple 1 part white granulated sugar to 4 parts water mixture that closely mimics natural flower nectar and fuels their high-energy lifestyle.
-
Boiling the water is optional but helps sugar dissolve faster and can slightly slow spoilage; always let nectar cool to room temperature before filling feeders.
-
Nectar must be changed frequently based on temperature—every 5–6 days in mild weather and as often as daily during extreme heat—to prevent fermentation and mold.
-
Clean feeders thoroughly with warm water, brushes, and a mild vinegar solution when needed, scrubbing all parts to remove any slime, black spots, or residue.
-
Good feeder choices, smart placement, and basic pest control (ant moats, bee-resistant designs) make it easier to keep nectar fresh and hummingbirds healthy.
Hummingbirds burn energy at an incredible rate, and one of the easiest ways to support them is with a clean feeder filled with safe, homemade nectar. You don’t need fancy mixes or dyes—just the right sugar‑to‑water ratio and a good cleaning routine.
In this guide, you’ll learn exactly how to make hummingbird nectar, how often to change it, how to keep your feeders clean, and the most common mistakes to avoid. Whether you’re new to hummingbirds or have been feeding them for years, this is your go‑to nectar reference.
Want more hummingbirds at your feeders this year—without guessing when to start or which flowers to plant? Our Hummingbird Gardening Guide for All 50 States shows you exactly when to put feeders out, when to take them down, and which native plants attract the most hummingbirds in your region. Click your state name in the guide to see feeder timing, recommended nectar‑rich plants, and the hummingbird species you can expect in your area, then follow the simple steps to turn your yard, balcony, or garden into a true hummingbird magnet.
What Is Hummingbird Nectar?
Hummingbird nectar is a simple sugar solution that mimics the natural nectar found in flowers. In the wild, hummingbirds get sugar from flower nectar to fuel their high‑energy lifestyle. Their tiny bodies burn calories quickly, so they need frequent, reliable sources of sugar.
The best feeder nectar uses just two ingredients:
- Plain white granulated sugar – provides energy.
- Clean water – dilutes the sugar to a safe, drinkable level.
Do not use honey, brown sugar, raw sugar, molasses, or artificial sweeteners. These can ferment, grow dangerous fungi, or simply fail to provide the nutrition hummingbirds need.
Simple Hummingbird Nectar Recipe (4:1 Ratio)
This is the standard recipe recommended by major bird and wildlife organizations:
Ingredients
- 1 part plain white granulated sugar
- 4 parts water
Instructions
- Measure the water. For example, use 4 cups of water and 1 cup of sugar.
- Heat or boil the water (optional but helpful). Warming the water makes the sugar dissolve faster and can reduce some impurities. Let it cool before filling the feeder.
- Dissolve the sugar. Stir until the sugar is completely dissolved—no grains left at the bottom.
- Cool completely. Let the nectar come to room temperature before pouring it into your feeder.
Any extra nectar can be stored in a covered container in the refrigerator for up to 3–5 days.
Our 4:1 ratio matches what many authorities recommend. For example, the Smithsonian National Zoo uses the same one part sugar to four parts water recipe.
This video shows you how to make hummingbird nectar and provides useful information about nectar and feeding
How Much Nectar Should You Put in a Feeder?
How much nectar to use depends on the size of the feeder and how many hummingbirds visit your yard.
- Small feeders (6–8 oz) – great for beginners or yards with a few birds.
- Medium feeders (10–16 oz) – good balance of capacity and freshness.
- Large feeders (24–32 oz) – best where you have lots of hummingbirds and can keep nectar fresh.
In general, it’s better to:
- Fill feeders partway and change nectar often, rather than fill them to the brim and let nectar sit too long.
- Start with less nectar in early spring or when you’re just getting started, and increase as traffic grows.
Best Time to Feed Hummingbirds
Most people feed hummingbirds from spring through fall, but timing depends on where you live and which species you have.
- Spring: Put feeders out shortly before hummingbirds normally arrive in your area so early migrants have food ready.
- Summer: Keep feeders full and fresh when activity is highest during nesting season.
- Fall: Maintain feeders as birds fuel up for migration; don’t take them down too early.
- Winter: In mild climates with year‑round hummingbirds, keep at least one feeder up and prevent nectar from freezing.
For more details on attracting hummingbirds throughout the season, see The Art of Attracting Hummingbirds to Your Yard.
See our guides– When To Start And When To Stop Feeding Hummingbirds and When To Feed Hummingbird: A State By State Guide
Choosing the Right Hummingbird Feeder
The design of your feeder matters almost as much as what you put in it. A good feeder should be:
- Easy to take apart and clean.
- Sturdy enough to last more than one season.
- Designed to minimize bees, wasps, and ants.
Types of Hummingbird Feeders
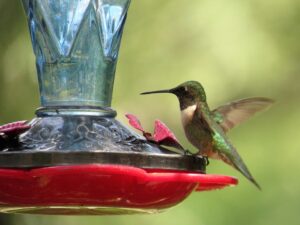
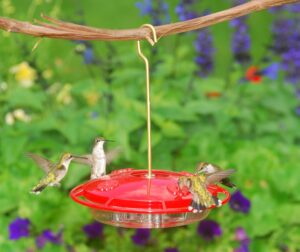
- Dish / saucer feeders: Low profile, simple, and very easy to clean; great for most people.
- Bottle feeders: Traditional “bottle over a base” style; hold more nectar but can be harder to scrub.
- Window feeders: Mount directly on glass; excellent for close‑up viewing.
One of the best Hummingbird feeders that’s ant and bee proof and easy to take apart and clean is the HummZinger Ultra.
If you’ve ever struggled to scrub sticky corners or moldy seams, this feeder is a big upgrade. The wide‑mouth reservoir and removable base give you full access inside, so a simple brush and rinse is all it takes to get everything spotless. The clearly shaped feeding ports help keep bees and wasps from taking over, while the bright color still pulls hummingbirds in from across the yard. Also has a built-in ant moat to keep out ants. Because it’s so easy to clean and refill, you’re far more likely to keep nectar fresh—which is one of the most important things you can do for hummingbird health. If you’re ready for a feeder that’s actually easy to keep clean, take a closer look at it here.
For more on choosing feeders, see the feeder section in our main attracting guide.
Where to Place Hummingbird Feeders
Placement can make the difference between a feeder birds use constantly and one they ignore.
- Near flowers: Hang feeders near nectar‑rich flowers so hummingbirds discover them naturally.
- Near cover: Place feeders within a short flight of shrubs or small trees where birds can perch and hide.
- Visible but safe: Put feeders where you can see them from a window or seating area, but away from areas where cats can lurk.
- Moderate light: Morning sun and afternoon shade help keep nectar from spoiling too quickly.
I also wrote a more in‑depth guide on how to choose the best place to hang your hummingbird feeder.Discover exactly where to hang your hummingbird feeder for the best results. This complete guide walks you through sunlight and shade, height, distance from windows, wind and predator protection, and how close to place feeders to flowers so hummingbirds feel safe and visit often. You’ll also get practical tips on window feeders, hanging hardware, cleaning schedules by temperature, and simple tricks to stop ants and other pests. Click on the above link for everything you need to turn one well‑placed feeder into a busy hummingbird hot spot.
How Often Should You Change Hummingbird Nectar?
Nectar spoils faster in warm weather. As a rule of thumb:
- 71–75°F (22–24°C): change every 5–6 days
- 76–80°F (24–27°C): change every 3–5 days
- 81–84°F (27–29°C): change every 2–4 days
- 85–88°F (29–31°C): change every 2–3 days
- 89–92°F (32–33°C): change every 1–2 days
- 93°F+ (34°C+): change daily
Always check the nectar before deciding to leave it another day. If it looks cloudy, has mold, or smells “off,” dump it, clean the feeder, and refill with fresh nectar.
How to Clean a Hummingbird Feeder
Clean feeders are just as important as the nectar recipe. Dirty feeders can grow mold and bacteria that harm hummingbirds.
Basic Cleaning Steps
- Empty the feeder. Pour out any remaining nectar.
- Rinse with warm water. Remove as much residue as you can.
- Scrub all parts. Use a small bottle brush and port brush to scrub every surface, including corners and feeding ports.
- Use a mild cleaning solution if needed. A weak vinegar‑and‑water mix works well; rinse thoroughly after.
- Rinse until clear. Make sure no soap or vinegar smell remains.
- Air‑dry or towel‑dry. Then refill with fresh nectar.
Here’s my comprehensive guide to help you clean your hummingbird feeder especially for those times when the nectar is not changed soon enough and mold starts to grow. Keeping your feeder truly clean is one of the most important—and most confusing—parts of feeding hummingbirds. This step‑by‑step guide shows you exactly how to clean a hummingbird feeder with vinegar or bleach, how often to change nectar at different temperatures, how to spot mold before it becomes a problem, and which feeder designs, brushes, and ant moats make the job much easier. It even covers how to keep bees and ants away and includes a video walk through, so if you’d like clear, simple instructions you can follow with confidence, you can learn more here.
Common Hummingbird Nectar Mistakes to Avoid
- Using honey: Honey ferments quickly and can promote fungal growth that injures hummingbirds.
- Using artificial sweeteners: These have no nutritional value for hummingbirds.
- Using brown/raw sugar or molasses: Extra minerals and impurities can be harmful.
- Adding red dye: Unnecessary and potentially harmful; let the feeder provide the color.
- Not cleaning feeders often enough: Dirty feeders can harbor mold and bacteria.
- Leaving nectar in too long: Spoiled nectar can make birds sick and drive them away.
Dealing With Ants, Bees, and Other Pests
Keeping Ants Out of Your Feeder
Ants are usually the easiest pest to control. The most effective tool is an ant moat—a small cup of water that hangs between the hook and the feeder.
- Hang the moat from your hook, then hang the feeder from the bottom of the moat.
- Keep the moat filled with water; ants can’t cross the water to reach the feeder.
- Some moats are decorative and red, which can even help attract hummingbirds.
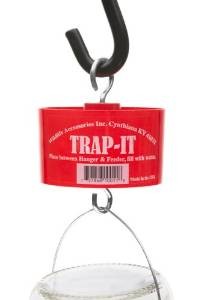
Attach an ant moat to any existing feeder and quickly solve your ant problems!
Reducing Bees and Wasps at Feeders
- Use bee guards: Some feeders come with yellow mesh guards for the feeding ports.
- Move the feeder: Relocating the feeder a few feet can confuse bees but not hummingbirds.
- Offer a “bee feeder” away from the hummingbird feeder: Use a stronger mix (1:3) at a separate station to distract them.
- Choose bee‑resistant feeder designs: Saucer feeders with nectar guards, like the HummZinger Ultra, help keep bees out.
Keep Insects Away From Your Feeder
- Bees, wasps, and ant trails can quickly take over a hummingbird feeder, but you don’t have to give up and bring the feeder in. This guide walks you through the safest, most effective ways to keep pests out of your nectar—using ant moats, bee‑resistant feeders, smarter placement, and even “decoy” feeders that draw insects away—so the sugar water stays clean and available for hummingbirds only. If you’re tired of fighting swarms on your feeders and want a simple plan that actually works, you can learn more here: How to Keep Bees and Ants Away From Your Hummingbird Feeder
Beyond Nectar: Here’s More Information to Help Your Hummingbirds Thrive
Safe nectar is only part of the picture. Hummingbirds also need flowers, insects, water, and safe cover.
- My special guide The Art of Attracting Hummingbirds to Your Yard will provide you with lists of hummingbird-attracting plants that bloom during each season: spring, summer and fall. It makes it easy for you to select plants that will provide continuous blooms for your hummingbirds during the time they are visiting your yard until the time they leave in the fall. You will also get advice on layering plants for a successful hummingbird garden. My guide also provides plant lists for sun and shade to make it easy to select plants for your particular growing conditions. Planting a “hummingbird-friendly garden” will never be easier!
- How to Use Water Features to Attract Hummingbirds – Most people focus on feeders and flowers, but the right water feature can turn your yard into a hummingbird hangout. My special guide shows you exactly which water features hummingbirds love (misters, drippers, fountains, and more), how shallow and gentle the water should be, where to place everything so birds feel safe, and how to keep it clean and affordable with simple DIY ideas. If you want hummingbirds to stick around, bathe, and put on a show where you can actually see them, you can learn more from the article.
- Hummingbird Nesting Facts – how they nest and how to keep nests safe.
- Hummingbird Facts: How They Live, Feed, and Thrive – behavior, migration, and more.
If you’d like expert background on hummingbirds and nectar, the Cornell Lab of Ornithology’s Ruby‑throated Hummingbird guide and the U.S. Fish & Wildlife Service’s Hummingbirds of North America provide excellent reference information.
Next Steps: Fine‑Tune Your Hummingbird Setup
Once your nectar recipe and cleaning routine are solid, you’re well on your way. From here, you can:
- Improve your overall hummingbird habitat with the right mix of flowers, shrubs, and perches.
- Experiment with DIY hummingbird feeders for extra fun and flexibility.