

How to Clean Hummingbird Feeders (Safely for Hummingbirds)
Key Takeaways
-
Keep nectar fresh by cleaning and refilling feeders every 3–4 days in cool weather and every 1–2 days (or even daily) in hot weather so it never has a chance to ferment or grow mold.
-
Use hot water and brushes for regular cleaning, and switch to a diluted vinegar or weak bleach solution only for tough mold, always rinsing several times until no cleaner smell remains.
-
Choose feeders that come apart easily and wipe sticky spills off the outside; easy‑to‑clean designs and dry exteriors help prevent mold, ants, bees, and wasps from taking over your hummingbird feeders.
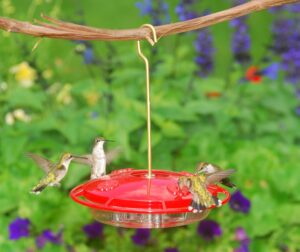
A clean hummingbird feeder is just as important as a full one. Dirty feeders can grow mold, ferment the nectar, make hummingbirds sick, and attract even more ants, bees, and wasps.
If you’re also fighting pests at your feeders, be sure to visit my main guide on pest control at the hummingbird feeder for more tips on ants, bees, wasps, squirrels, and bats.
How Often to Change Nectar
How often you clean and refill a hummingbird feeder depends a lot on temperature. Warmth and sun make sugar water spoil quickly.
-
In cool weather, aim to clean and refill feeders every 3–4 days.
-
In warm or hot weather (around 70°F and up), change nectar every 1–2 days; in extreme heat, many experts recommend daily changes.
-
Anytime nectar looks cloudy, develops “floaters,” or smells sour, dump it and clean the feeder right away instead of waiting.
Even if the feeder isn’t empty, it’s better to throw out old nectar than to risk giving the birds a spoiled, bacteria‑filled drink.
Basic Cleaning Routine (Every Refill)
A quick, regular cleaning every time you change the nectar keeps mold from getting a foothold.
-
Empty old nectar.
Pour it out away from the house and outdoor living areas so spilled sugar water doesn’t attract ants and other pests.
-
Rinse with hot water.
Use hot tap water to thoroughly rinse the reservoir and feeding ports. This helps loosen any film or sugar residue. -
Scrub all surfaces.
Use a small bottle brush for the main reservoir and tiny port brushes for the feeding holes and threads. Be sure to get into corners, seams, and any ridges where mold can hide. -
Rinse thoroughly.
Rinse with clean water several times until there’s no slippery feel or smell. If you used any mild soap at all, make sure there is no soap odor left. -
Refill with fresh nectar.
Once everything is clean and well‑rinsed, refill with fresh sugar water and reassemble the feeder.
Many wildlife and bird organizations suggest avoiding strong detergents because residue can be hard to rinse off completely, especially in tiny parts. If you do use a bit of mild dish soap, rinse extremely well so hummingbirds never get a soapy taste.
Deep Cleaning for Mold or Heavy Buildup
If you see black spots, slimy film, or you know the feeder sat too long between cleanings, it’s time for a deeper clean.
Two commonly recommended options:
1. Vinegar solution
-
Mix 1 part white vinegar with 4 parts hot water (some sources use up to 1:2 vinegar to water).
-
Soak the disassembled feeder for 30–60 minutes.
-
Scrub all surfaces with brushes, paying special attention to seams and tight corners.
-
Rinse thoroughly several times with clean water until there’s no vinegar smell left.
Vinegar is effective against many molds and mineral deposits and, when rinsed well, leaves no harmful residue.
2. Diluted bleach solution (for tough cases)
Some extension services and bird‑feeding guides allow a weak bleach solution when mold is heavy.
-
Mix about 1 part unscented household bleach to 9 parts water (roughly a 10% bleach solution).
-
Soak the feeder briefly, just long enough to loosen mold and disinfect.
-
Scrub all parts with appropriate brushes.
-
Rinse very thoroughly with clean water several times until there is absolutely no bleach smell remaining.
Bleach is powerful, so reserve it for bad mold situations and always rinse more than you think you need to.
Cleaning Different Feeder Types
Different feeder designs require slightly different tools and attention.
Bottle‑style hummingbird feeders
-
Use a narrow bottle brush for the main reservoir.
-
Clean the neck, threads, and any ridges where the bottle screws into the base—these often hide mold.
-
Use a small port brush or pipe cleaner for each feeding port.
Saucer‑style or top‑filling feeders
-
These designs are often easier to clean thoroughly because they open wide.
-
Remove the lid, scrub the shallow reservoir with a small brush or cloth, and clean ports from both sides if possible.
-
Many hummingbird enthusiasts prefer saucer‑style feeders specifically because they’re easier to keep mold‑free.
No matter which style you use, a good rule of thumb is: if you can’t easily reach every surface to clean it, it’s not a good feeder for the long term.
One of the best Hummingbird feeders that’s easy to take apart and clean is the HummZinger Ultra.
The HummZinger Ultra 12oz Saucer Feeder is one of the best choices for a hummingbird feeder that’s both easy to clean and maintain. It has patented Nectar Guard tips—flexible membranes on the feeding ports that keep flying insects out while still allowing hummingbirds to feed freely. Plus, it comes with a built-in ant moat to prevent crawling insects from reaching the nectar, and the raised flower ports help divert rain, keeping the nectar fresh.
Keep the Outside Clean and Dry
The inside of the feeder isn’t the only part that matters. Sugar water on the outside surfaces is a magnet for pests and can also grow mold.
-
After refilling, wipe the ports, perches, base, and hanger so everything is clean and dry.
-
Regularly check for sticky spots or dried nectar around seams and ports.
-
Keeping the outside dry helps reduce problems with ants, bees, and wasps and keeps the feeding area nicer for you and the birds.
For detailed help with insects and larger critters, see my pest control at the hummingbird feeder article.
Seasonal Deep Cleaning and Storage
Feeder care changes a little at the start and end of hummingbird season.
-
End of season: When you take feeders down, discard any remaining nectar, deep‑clean with vinegar or a mild bleach solution, rinse thoroughly, and let every part air dry completely.
-
Storage: Store feeders in a clean, dry place where dust, grease, or pests won’t get into them.
-
Spring startup: Before the first fill of the new season, give each feeder a quick rinse and inspection to make sure there’s no leftover residue, cracks, or mold.
A little extra effort at the end and beginning of each season sets you up for a much easier time during peak hummingbird activity.
Frequently Asked Questions About Cleaning Hummingbird Feeders
Q: How often should I clean my hummingbird feeder?
A: In cool weather, clean and refill at least every 3–4 days; in hot weather, every 1–2 days is best, and some people clean daily in very hot, sunny conditions. If the nectar looks cloudy, has floating bits, or smells sour, clean the feeder immediately, regardless of the calendar.
Q: What is the safest way to clean a hummingbird feeder?
A: The safest routine is hot water plus thorough scrubbing with a bottle brush and port brush, followed by a good rinse. For stubborn residue, use a diluted vinegar solution, then rinse several times until there’s no smell; this avoids leaving harsh chemicals where birds drink.
Q: Can I use bleach or dish soap to clean hummingbird feeders?
A: You can use a weak bleach solution or a small amount of mild dish soap for deep cleaning, but only if you rinse very thoroughly until there is no smell or slippery feel at all. Many experts prefer hot water and vinegar for routine cleaning and save bleach for heavy mold, because any leftover residue can bother or harm hummingbirds.
Q: How do I stop mold from growing in my feeder?
A: Change nectar frequently, keep feeders out of full all‑day sun when possible, and follow a regular cleaning schedule. Choosing a feeder that comes apart easily and has no hidden corners makes it much easier to scrub away tiny mold spots before they spread.
Q: Do I need to clean the outside of the feeder too?
A: Yes. Wiping away spills and sticky drips on the outside helps prevent ants, bees, and wasps from swarming the feeder and keeps perches and ports clean for the birds. It also makes it easier to see when mold or residue is starting to build up around seams.
Hummingbird Resources
For more on hummingbird habitat, health, and conservation from leading experts, see these resources from the U.S. Forest Service, major hummingbird conservation organizations, and university research programs.
-
USDA Forest Service – Hummingbird habitat guides
Main hub with regional PDFs (Eastern, California, Colorado/Wyoming/South Dakota, Alaska, etc.) that back up your habitat and native‑plant advice.
https://www.fs.usda.gov/wildflowers/pollinators/animals/hummingbird-guides.shtml
- Hummingbird Conservation Networks (formerly Hummingbird Monitoring Network)
Conservation non‑profit focused on monitoring, research, and community‑based hummingbird conservation across the Americas.
https://savehummingbirds.org -
International Hummingbird Society
Long‑running global hummingbird conservation and education group; good for big‑picture “why they matter” and habitat expansion messages.
https://www.hummingbirdsociety.org
