A Homemade Hummingbird Nectar Recipe That’s Quick and Easy to Make
Creating your own hummingbird nectar at home is a rewarding and simple process that will help attract these magical, vibrant birds to your garden. Not only does making your own nectar allow you to avoid the expense of store-bought mixes, but it’s also a healthier and safer alternative for the hummingbirds. With just a few ingredients and some basic kitchen tools, you can make a natural, sugar-based solution that mimics the sweet nectar they would naturally consume from flowers.
In this guide, we’ll walk you through a simple and effective recipe for homemade hummingbird nectar, along with some tips for feeding and caring for these incredible birds. Whether you’re new to attracting hummingbirds or looking to perfect your nectar-making technique, this guide has you covered!
Why Make Your Own Hummingbird Nectar?

While store-bought hummingbird nectar mixes might seem convenient, they often contain unnecessary additives or coloring. Some of these ingredients could even be harmful to the birds. By making your own nectar, you ensure that it’s pure, natural, and free from chemicals or artificial dyes that can cause harm. The best part is that the homemade nectar is easy to prepare, and you only need two basic ingredients: water and white sugar.
What You Need for Homemade Hummingbird Food
Ingredients:
- 1 part white granulated sugar
- 4 parts water (tap water is fine, but filtered water is preferred)
Equipment:
- A clean pot or microwave-safe container
- A spoon for stirring
- A feeder for the hummingbirds
- A storage container (such as a clean pitcher or bottle) for any leftover nectar

- A clean cloth or paper towels for cleaning up
Optional Equipment
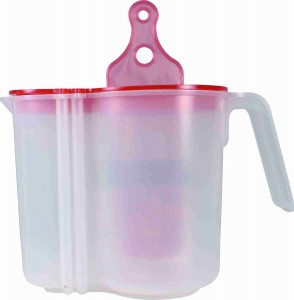
Use Songbird Essentials Nectar Aid Self Measuring Pitcher and never measure ingredients again.
Make any amount and it’s measured for you.
Directions For Making Your Hummingbird Food Recipe
Now that you know why making homemade nectar is the best choice for hummingbirds, let’s dive into the steps. You’ll be able to create fresh nectar in just a few minutes and be ready to hang your feeders in no time!
Step 1: Boil the Water
The first step is to boil the water. You can either use a stove or a microwave for this task.
- Stove top: Pour the water into a small pot and heat it over medium-high heat until it begins to boil.
- Microwave: Pour the water into a microwave-safe container and microwave it on high for about 2-3 minutes, or until it starts to boil.
Step 2: Add the Sugar
Once the water is boiling, remove it from the heat source. Stir in the white granulated sugar. You’ll need to mix in the sugar until it completely dissolves into the water.
- Tip: For the ideal nectar recipe, the ratio should always be 1 part sugar to 4 parts water. So, if you’re using 1 cup of sugar, you’ll need 4 cups of water. You can adjust the amounts based on how much nectar you need, but be sure to maintain the correct ratio.
Step 3: Stir Until Dissolved
As the sugar dissolves in the hot water, you’ll notice that the mixture begins to become clear. Continue stirring until the sugar is fully dissolved. This process should take only a minute or two.
Step 4: Let the Nectar Cool
Once the sugar is dissolved, let the nectar cool to room temperature. You can speed up the cooling process by transferring it to a heat-resistant container or simply leaving it out on the counter.
Step 5: Store or Serve
Once the nectar is cool, it’s time to either serve it to your hummingbirds or store any leftovers for later use. Use a clean feeder and fill it with the homemade nectar. If you have extra nectar, store it in the refrigerator in a designated container, such as a pitcher or bottle.
- Tip: Label your container with the date you made the nectar, so you know when it needs to be replaced.
Making hummingbird nectar
Important Tips for Making Homemade Hummingbird Nectar
While making your own nectar is simple, there are a few key considerations to ensure the best results for your feathered friends.
Avoid the Use of Food Coloring
One of the most important things to keep in mind when making homemade nectar is to avoid food coloring. While it may seem harmless, adding artificial dyes to nectar can be harmful to the birds. In fact, red dye has been linked to health problems in birds, and it is completely unnecessary to attract them. Hummingbirds are naturally drawn to the color red, so you can use red-colored feeders to lure them in without the need for added chemicals.
Never Use Honey
Another common mistake is using honey as a sweetener for hummingbird nectar. While honey may seem like a natural alternative to sugar, it can ferment quickly and cause harmful bacteria to grow. Honey is also difficult for hummingbirds to digest. Always use regular white granulated sugar for your homemade nectar.
Don’t Add Other Ingredients
Some people might suggest adding additional ingredients like molasses, brown sugar, or other sweeteners, but these should be avoided. Stick to the basic sugar and water formula for the best results. Other ingredients can change the chemical makeup of the nectar, making it less nutritious for the birds.
Storing Homemade Hummingbird Nectar
Homemade nectar can be stored for up to two weeks in the refrigerator, but it’s best to use it within a week for optimal freshness. If you make a large batch, make sure to keep it in a tightly sealed container and store it in the fridge until you’re ready to refill your feeders.
Freezing Leftover Nectar
An alternative to refrigerating leftover nectar is to freeze it for future use. This can be a great option if you prepare nectar in large batches. Simply pour the leftover nectar into a freezer-safe container, such as a plastic freezer bag, and freeze it flat. When you’re ready to use it, just thaw it in the fridge or at room temperature before filling the feeders.
What to Do if the Nectar Becomes Cloudy
It’s important to check your nectar regularly for any changes. If you notice that the nectar in the feeder has become cloudy or murky, it’s time to discard it and clean the feeder thoroughly. Cloudy nectar is a sign that it’s starting to ferment, and consuming this could be harmful to the hummingbirds.
How to Clean Hummingbird Feeders
Regularly cleaning your hummingbird feeders is crucial for the health of the birds. Bacteria and mold can build up in the feeders, especially in hot weather, and this can be dangerous for the hummingbirds.
Using this chart along with your visual observations will tell you when to change the nectar
High temperatures…………Change after
71-75……………………………6 days
76-80……………………………5 days
81-84……………………………4 days
85-88……………………………3 days
89-92……………………………2 days
93+………………………………change daily
Anytime you notice the nectar becoming cloudy, change it. If you notice it’s cloudy and notice black specks of mold in the nectar or mold on the feeder, you know you have waited too long and need to start changing it sooner. If you wait too long, yeast will ferment the sugar and mold and bacteria, that can be harmful to hummingbirds, will start to grow in the nectar and on your feeder.
Cleaning Instructions:
- Empty the Feeder: Discard any remaining nectar in the feeder.
- Clean with Hot Water and Vinegar: Fill a bowl or sink with hot water and add a few tablespoons of vinegar. Use a bottle brush or sponge to scrub all parts of the feeder, paying special attention to the feeding ports and any crevices where nectar may have dried.
- Rinse Thoroughly: Be sure to rinse the feeder thoroughly with clean water to remove any vinegar residue.
- Dry Completely: Allow the feeder to air dry completely before refilling it with fresh nectar. Here are more tips on cleaning your feeder with bleach to kill mold and keeping the nectar fresh.
Here’s a comprehensive guide to help you clean your hummingbird feeder for those times when the nectar is not changed soon enough and mold starts to grow.
Here is a good video on how to clean a hummingbird feeder
Placement of Hummingbird Feeders
The location of your hummingbird feeders can make a big difference in attracting more birds to your yard. Hummingbirds are territorial creatures, so it’s best to place feeders in spots where they won’t compete directly with each other.
Tips for Feeding Location:
- Place feeders at least 10-15 feet apart to prevent aggressive behavior.
- Try to position the feeders in areas with some shade to prevent the nectar from spoiling too quickly in the sun.
- Hanging the feeder near colorful flowers can further attract hummingbirds, as they are drawn to vibrant colors.
- If you have multiple feeders, consider placing them at varying heights to allow more hummingbirds to visit.
Here’s more in depth tips for choosing the best place to hang your hummingbird feeder.
Experimenting With Multiple Feeders
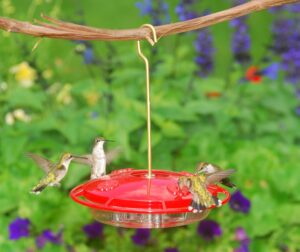
You may find that adding multiple feeders around your yard can attract more hummingbirds. It’s a fun experiment to see how they react to different feeder placements and colors. In some cases, placing several feeders near each other can even create an “all-you-can-eat buffet” for multiple hummingbirds at once. Just keep an eye on them to see how they interact, and adjust the placement if you notice aggressive behavior.
Conclusion: Enjoying Your Hummingbird Visitors
By following this simple recipe for homemade hummingbird nectar and following the tips provided, you can attract more hummingbirds to your yard and enjoy their beautiful, acrobatic displays. There’s nothing more rewarding than watching these tiny creatures flit around your garden, feeding on the nectar you’ve carefully prepared for them.
Whether you’re a beginner or an experienced bird watcher, making your own hummingbird nectar is an easy and enjoyable way to connect with nature. Keep experimenting, observing, and most importantly, enjoy the magic of having hummingbirds visit your home!________________________________________


