Fireweed: A Bold Beacon for Attracting Hummingbirds in Alaska
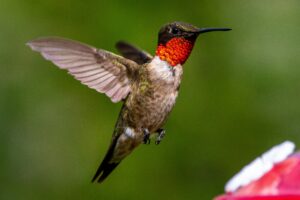
Fireweed (Chamerion angustifolium) is one of the most iconic wildflowers in Alaska. It covers hillsides and roadsides with bright magenta blooms from midsummer into early fall. This hardy perennial is more than a symbol of northern life. It is also a steady nectar source that fits perfectly into any Alaskan hummingbird gardenand helps support your local hummingbird population.
To get the most from Fireweed, you can combine it with other native flowers, shrubs, and trees described in our hummingbird gardening guide. This layered approach creates a yard that is friendly to wildlife and beautiful for you.
Key Characteristics
Zones: 2–7 (hardy in most of Alaska and other cold climates)
Height: Usually 2.5–6.5 feet, and sometimes taller in very good conditions
Bloom Time (Alaska): Early July to mid‑September, often peaking from mid‑July to mid‑August
Features: Tall spikes with many rosy‑magenta, four‑petaled flowers that open from the bottom upward, followed by silky seed “fluff” in fall
Fireweed’s tall, showy flower spikes are easy for hummingbirds to see, even from far away. The nectar‑rich blooms provide steady food through the heart of the Alaskan summer. When you plant Fireweed in groups, the bold color acts like a living beacon in your garden.
Video: Hummingbird on Fireweed in Alaska: From our Sitka archives, this incredible footage captures an Alaskan Hummingbird at the immaculate Mountain View.
Natural Habitat
Fireweed is native to the temperate Northern Hemisphere, and it is especially common in Alaska. It grows in open, sunny places such as meadows, roadsides, forest edges, and riverbanks. It also appears very quickly on burned or disturbed ground.
Because of this, people often see Fireweed as one of the first plants to return after a wildfire, landslide, or construction project. As it spreads, it adds bright color, helps protect the soil, and offers nectar to many pollinators. In this way, Fireweed plays an important role in the recovery of damaged land.
Care and Maintenance
Fireweed is easy to grow once you meet its basic needs. To grow Fireweed successfully in an Alaskan hummingbird garden, you can also combine it with clean feeders filled with proper nectar as described in our homemade hummingbird nectar guide.
Give plants full sun or light shade so they can bloom well.
Use moist, well‑drained soil with plenty of organic matter.
Space plants about 24–36 inches apart so they have room to grow and spread.
Water during dry spells, especially in the first year, so roots can establish.
Add mulch around the base to hold moisture and block weeds.
Fireweed spreads by seed and by underground rhizomes. This helps it form beautiful drifts, but it can be too strong for a small bed. To keep it under control, you can edge your beds with barriers or grow Fireweed in large containers.
Use edging or hard borders around beds to contain rhizomes.
Deadhead flower spikes before the seed fluff forms if you want fewer seedlings.
Thin out extra shoots every few years by digging up and removing the extras.
With a little care, you can enjoy Fireweed’s tall color and hummingbird appeal without letting it take over more delicate plants.
Ecological Benefits
Fireweed is a strong plant for pollinators and wildlife. Its nectar feeds hummingbirds, native bees, butterflies, moths, and other helpful insects. This is especially useful in mid to late summer, when some other flowers have already finished blooming.
The plant also helps other animals. The leaves and shoots are food for larger herbivores such as moose, deer, and rabbits. In fall, the fluffy seeds spread on the wind and may provide soft material that small birds can use in nests.
As a pioneer species, Fireweed helps heal disturbed soils. It shades bare ground, adds organic matter as it dies back, and makes it easier for other plants to move in later. In an Alaskan yard or homestead, planting Fireweed can copy this natural process and turn open or damaged spots into colorful, wildlife‑friendly patches, as highlighted by the U.S. Fish & Wildlife Service.
Why Fireweed Works in an Alaskan Hummingbird Garden
If you want to help hummingbirds in Alaska, Fireweed is a very strong choice. It offers several key benefits that work well with a northern climate.
Long, reliable bloom season: In much of Alaska, Fireweed flowers from early July through mid‑September. This covers most of the time when hummingbirds are present and actively feeding.
High nectar reward: Fireweed provides plenty of nectar and is often visited by hummingbirds where their ranges overlap.
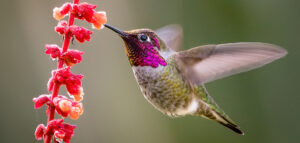
Easy‑to‑use flowers: The blooms are not very long and tubular, but their open shape and clusters still work well for birds with long tongues. Hummingbirds can move quickly along a spike and feed at many blooms in a row.
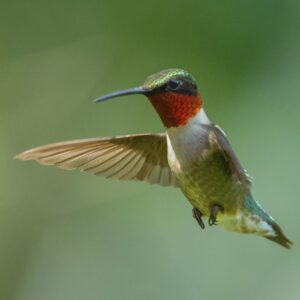
Strong visual signal: Tall, magenta flower spikes rising above the foliage act as bright signals in open areas. This helps hummingbirds spot the plants from a distance.
Good timing with migration: Fireweed blooms during midsummer and early fall, just when hummingbirds need to build energy for their trip south. This makes it a useful bridge between earlier and later nectar sources.
In an Alaskan hummingbird planting, Fireweed fits well with other native nectar plants such as lupines, columbine, and native penstemons. For more ideas on building a varied nectar garden, you can see our profile of Cardinal Flower for hummingbirds.
Planting Fireweed with other native flowers follows the same ideas recommended in hummingbird‑friendly gardening guidelines from national wildlife groups. This approach gives your yard nectar and shelter through the whole season.
What Makes Fireweed Especially Attractive to Hummingbirds?
Vivid Magenta Color
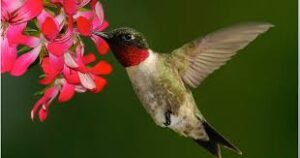
The bright purple‑pink to magenta blossoms of Fireweed stand out against green leaves and open sky. Hummingbirds are drawn to strong colors, especially reds and pinks, because these often signal rich nectar. As a result, Fireweed’s tall, colorful spikes are easy for them to notice as they search for food.
Sequential Flowering Along Tall Spikes
Each Fireweed stem can carry many individual flowers. These open from the bottom to the top over several weeks. Because of this, the plant offers new flowers and fresh nectar for a long time. Hummingbirds can return again and again and still find food.
Nectar‑Rich Flowers Suited to Long Tongues
The blossoms of Fireweed are not deeply tubular, but their shape still works very well for long‑tongued pollinators. Hummingbirds can hover and quickly probe several blooms on a spike without moving far. This means they gain a lot of energy without spending much, which makes Fireweed an efficient feeding stop.
Mid‑ to Late‑Season Fuel Source
In Alaska, Fireweed blooms from early July into September. This fits the time when hummingbirds are most active and when they need to build fat for migration. By filling the mid‑ and late‑season nectar gap, Fireweed helps birds find natural food even after many spring and early summer flowers are gone.
Why Choose Fireweed for Your Alaskan Hummingbird Garden?
For gardeners in Alaska and other cold northern regions, Fireweed checks many boxes. It is native, hardy, and colorful. It also attracts hummingbirds and many other pollinators. When you plant Fireweed, you bring the look of wild Alaskan meadows into your yard and provide reliable nectar during the height of summer and into early fall.
You can tuck a few stems into a mixed border, create a larger drift along a driveway or fence, or use Fireweed to reclaim a disturbed patch of soil. In each case, it adds drama, ecological value, and hummingbird activity to your landscape. With careful placement and occasional thinning, you can enjoy this iconic wildflower for many years while helping hummingbirds thrive in Alaska’s short but vivid growing season.
Fireweed (Chamerion angustifolium) – FAQ for Hummingbird Gardeners
Is Fireweed native to Alaska?
Yes. Fireweed (Chamerion angustifolium) is native across northern North America and is especially common in Alaska’s boreal and coastal regions. You can often see it along roadsides, forest edges, avalanche paths, wetland edges, and recently burned or disturbed areas.
Does Fireweed attract hummingbirds?
Fireweed is an excellent nectar plant for hummingbirds where their ranges overlap. Its tall spikes of bright flowers and high nectar levels make it a steady summer food source as hummingbirds forage and prepare for migration. It works even better when you combine it with other native Alaskan hummingbird plants and well‑maintained feeders from our feeder recommendations.
What hardiness zones is Fireweed suitable for?
Fireweed is hardy in about USDA Zones 2–7. It does very well in cold climates and high latitudes. This makes it a natural fit for most of Alaska and many other northern regions with long winters and short growing seasons.
When does Fireweed bloom in Alaska?
In much of Alaska, Fireweed starts blooming in early July and continues through August. In some places, flowers can last into early September, depending on the weather. The flowers open from the bottom to the top of each spike, so one stem can provide nectar for several weeks.
Is Fireweed invasive or aggressive?
Fireweed spreads quickly by seed and rhizomes and can move into open or disturbed soil, especially after fire, logging, or construction. In gardens, it may spread beyond its original patch if you do not manage it. However, within its native range it functions as an important early‑successional wildflower rather than a non‑native invasive plant. Simple steps like edging, deadheading, and thinning usually keep it in bounds.
Discover more ways to help hummingbirds
Want more hummingbirds at your feeders this year—without guessing when to start or which flowers to plant? Our Hummingbird Gardening Guide for All 50 States shows you exactly when to put feeders out, when to take them down, and which native plants attract the most hummingbirds in your region. Click your state name in the guide to see feeder timing, recommended nectar‑rich plants, and the hummingbird species you can expect in your area, then follow the simple steps to turn your yard, balcony, or garden into a true hummingbird magnet.
Hummingbirds in Wyoming: Broad‑tailed, Rufous, Feeders, and Native Plants
Wyoming’s hummingbird story centers on western mountain and high‑plains species rather than Ruby‑throateds. Broad‑tailed Hummingbirds are the most widespread breeders in the state, especially in mountain and foothill habitats, while Rufous, Calliope, and Black‑chinned Hummingbirds also occur regularly in different regions and seasons. These tiny migrants arrive from Mexico and the southwestern U.S. in late spring, use Wyoming’s meadows, canyons, and yards through the short summer, and depart again by early fall.
Key takeaways for Wyoming hummingbirds
Four hummingbird species occur regularly in Wyoming: Broad‑tailed, Rufous, Calliope, and Black‑chinned. Broad‑taileds are the primary breeding species in many mountain and foothill areas; Rufous are especially visible as late‑summer and fall migrants; Calliope and Black‑chinned occur mainly in certain parts of the state, including higher‑elevation and southern or eastern areas.
Black‑chinned and Calliope Hummingbirds typically arrive in Wyoming around the first week of May, Broad‑taileds by the end of April, and Rufous mainly appear as late‑June through mid‑September migrants. Most birds depart by late September, though a few may linger into early October. Homeowners can put feeders out by the end of April and keep them up through October, or at least two weeks after they stop seeing hummingbirds. A simple 4‑to‑1 sugar‑water mix with no red dye, changed every 1–2 days in hot spells or every 3–5 days in cool mountain weather, plus native and region‑friendly plants like penstemons, columbines, wild bergamot, and hyssop, will reliably attract hummingbirds to Wyoming yards.
Wyoming hummingbird basics
Wyoming sits in the interior West, where several hummingbird species use mountain meadows, forest edges, riparian corridors, and even high plains as breeding and migration habitat. Broad‑tailed Hummingbirds are closely associated with mountain and foothill forests, aspen groves, and meadows, often nesting at mid‑ to high elevations. Rufous Hummingbirds, famous for their feisty behavior, breed farther north and west but pass through Wyoming in numbers during migration, especially in late summer.
Calliope Hummingbirds—the smallest breeding birds in North America—use high‑country meadows, shrubby slopes, and forest edges, while Black‑chinned Hummingbirds occur mainly in lower‑elevation river corridors and canyons in the southern and eastern parts of the state. All four species depend on tubular wildflowers and flowering shrubs, plus small insects and spiders for protein. They readily use sugar‑water feeders in towns, ranch yards, and mountain communities.
Because Wyoming spans dry basins, high plateaus, and multiple mountain ranges, hummingbird timing and species mix vary with elevation and region. Low valleys and southern areas may see hummingbirds earlier in spring and later into fall, while high elevations concentrate birds into a brief, intense summer when wildflowers and feeders are both abundant.
What hummingbirds do you get in Wyoming?
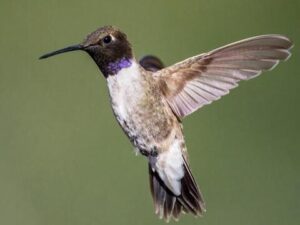
For many Wyoming birders, Broad‑tailed Hummingbirds are the “default” hummingbird, especially in mountain and foothill areas. Males have a
Broad-tailed-Hummingbird
rosy‑red throat and produce a distinctive, metallic wing trill as they fly, making them easy to recognize around mountain cabins and trail‑side meadows.
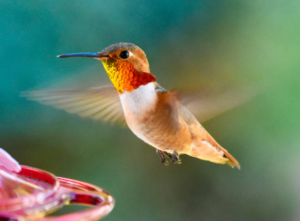
Rufous Hummingbirds are the fiery, highly territorial visitors that often dominate feeders in late summer and early fall as they migrate south. Calliope
Rufous Hummingbird
Hummingbirds, tiny with streaked magenta throats in males, use some higher‑elevation and interior routes, while lack‑chinned Hummingbirds—with their black throats and purple chin bands in males—are more often found in southern and eastern riparian corridors and lower‑elevation habitats.
Summary for Wyoming:
Common, regular species: Broad‑tailed Hummingbird (widespread mountain/foothill breeder), Rufous Hummingbird (especially abundant as
late‑summer migrant), Calliope Hummingbird, Black‑chinned Hummingbird.
Rare visitors: A few additional western species may appear as vagrants, but these four are the ones to plan for.
When do hummingbirds arrive and leave Wyoming?
Wyoming’s hummingbird calendar reflects its high elevation and interior position. Broad‑tailed Hummingbirds typically arrive in Wyoming at the end of April and leave by the end of September. Black‑chinned Hummingbirds usually arrive around the first week of May and also depart by about the third week of September.
Calliope Hummingbirds also arrive around the first week of May and depart around the third week of September, while Rufous Hummingbirds are
Calliope Hummingbird
primarily fall migrants from late June to mid‑September. That means many birders first notice Rufous activity in midsummer, especially at feeders where they may briefly outnumber resident Broad‑taileds.
In general, hummingbird season in Wyoming runs from late April or early May through September, with peak activity in June, July, and August. Most birds are gone by early October, though a few late migrants can still pass through where flowers and feeders remain available.
Typical timing for Wyoming:
First arrivals (Broad‑tailed): late April.
Black‑chinned and Calliope arrivals: around first week of May.
Rufous: primarily late‑June to mid‑September migrants.
Most birds leave: late September, with stragglers into early October.
When to put up and take down feeders in Wyoming
When to put feeders out
Black-chinned hummingbird
Based on typical arrival dates, a good rule of thumb is to have feeders in place by the end of April in most of Wyoming. In lower‑elevation or southern areas, you can put them up a bit earlier, especially if you’re watching regional migration reports and see early birds nearby.
At higher elevations, snow may linger into May, but it still helps to have at least one feeder out by early May so migrating Broad‑tailed, Black‑chinned, and Calliope Hummingbirds can refuel as the landscape thaws. Once feeders are up, keep them clean and filled throughout the season so birds can rely on them in between natural blooms.
When to take feeders down
You can safely keep feeders up through the end of September, since Wyoming’s regular hummingbird species generally depart around then, with Rufous present into mid‑September and others into late September. A simple rule is to take feeders down at the end of October if you haven’t seen hummingbirds for about two weeks—this ensures you’re not cutting off late migrants.
As in other states, leaving feeders up does not stop hummingbirds from migrating. They depart based on day length and internal cues, not because feeders disappear. In Wyoming’s high‑elevation climate, keeping feeders available through September mainly helps late Broad‑taileds, Rufous, Calliopes, and Black‑chinneds refuel on their way south.
Best hummingbird nectar recipe
The best nectar recipe for Wyoming hummingbirds is the standard 4‑to‑1 sugar‑water mix: 1 part plain white sugar to 4 parts water. Bring the water to a brief boil, remove from heat, stir in the sugar until it dissolves completely, and let the mixture cool before filling your feeders.
Avoid red dyes, honey, brown sugar, or artificial sweeteners. The red parts of the feeder are enough to attract hummingbirds, and additives can promote fermentation or other problems. This simple 4‑to‑1 mixture closely matches natural flower nectar concentrations and is safe for Broad‑tailed, Rufous, Calliope, and Black‑chinned Hummingbirds when changed regularly.
All about nectar: how to use it effectively
Wyoming’s climate can swing from cool, frosty nights to hot, sunny days, especially at higher elevations. Using modest‑sized feeders (around 8–12 ounces) helps you offer fresh nectar without leaving large volumes out long enough to spoil. In warm weather, particularly in June through August, plan to change nectar frequently—often every day or two.
During peak activity in summer, you can add extra feeders or fill them a bit more if you’re seeing lots of hummingbirds. As activity tapers off in late September, reduce how much you fill feeders so nectar stays fresh while still offering enough for the last migrants. My main nectar article, How to Make Hummingbird Feeder Nectar, gives Wyoming readers step‑by‑step instructions, batch sizes, and troubleshooting tips.
A clean hummingbird feeder is a must
Even in Wyoming’s relatively dry air, nectar can ferment and feeders can develop mold if not cleaned regularly. Each time you change nectar, rinse the feeder with hot water and scrub any surfaces that can trap residue—the reservoir, ports, seams, and perches. Small brushes made for hummingbird feeders make this easy.
If you notice cloudiness, black spots, or a sour smell, give the feeder a thorough cleaning. A soak in a mild vinegar solution or a diluted bleach solution, followed by very thorough rinsing and complete drying, keeps mold under control. My feeder‑cleaning guide walks readers through this process and suggests how cleaning frequency should change from cool spring days to hot summer afternoons.
Where to hang feeders in Wyoming yards
Wyoming yards range from high‑country cabins and mountain towns to prairie homesteads and city lots, but the basics of feeder placement are similar. Hang feeders near flowers, shrubs, or small trees so hummingbirds have cover and perches, and place them about 4–5 feet above the ground for easy viewing and maintenance.
Keep feeders a safe distance from large, clear windows, or use decals and screens to reduce collision risk. In open, sun‑baked sites, strong afternoon sun can heat nectar quickly, so many people prefer spots with morning sun and afternoon shade or dappled light. In windy locations, hang feeders near walls, fences, or sheltered corners so they don’t swing excessively and spill.
To reduce fighting among hummingbirds:
Use two or more small feeders rather than one big one.
Place feeders 10–15 feet apart or around corners so a territorial male can’t guard them all at once.
Learn how hummingbird aggression impacts your backyard. This video explores territorial behavior and offers practical solutions for attracting more hummingbirds to your feeders. Discover several helpful strategies to encourage a more harmonious environment.
Native plants that attract hummingbirds in Wyoming
Native and region‑appropriate plants are crucial in Wyoming’s often dry, high‑elevation conditions. Hummingbirds favor tubular, nectar‑rich flowers in red, orange, and pink, but will also use purple and blue blooms with good nectar. A regional guide for Colorado, Utah, and Wyoming highlights several drought‑tolerant perennials that do well across the high plains and Rockies.
Good native or region‑appropriate plants for Wyoming include:
Penstemons (Penstemon spp.) – Classic western beardtongues with tubular flowers in red, pink, purple, and blue, thriving in sunny, well‑drained, and rocky soils.
Columbines (Aquilegia spp.) – Western and high‑elevation columbines providing early‑season nectar as hummingbirds arrive in late spring.
Wild bergamot / bee balm (Monarda fistulosa) – Tall, summer‑blooming perennials with pom‑pom flowers that attract hummingbirds and pollinators, doing well in moist but well‑drained, sunny sites.
Hyssop / hummingbird mint (Agastache spp.) – Western hyssops with tubular orange, pink, or purple flowers that offer late‑season nectar for migrating birds.
Western salvias (where hardy) – Heat‑loving, long‑blooming salvias that provide nectar well into late summer in lower, warmer gardens.
You can supplement these with hardy ornamental fuchsias and container plantings where climate allows, especially on protected patios and decks.
Creating a hummingbird‑friendly yard in Wyoming
To build a hummingbird‑friendly yard in Wyoming, combine layers of vegetation, clean feeders, water features, and safe perches. Use small trees and shrubs for structure, native perennials and vines for nectar, and feeders as a reliable supplement—especially important in dry years or at higher elevations.
Avoid or greatly reduce pesticides, especially systemic insecticides, so hummingbirds still have access to small insects and spiders for protein. A yard filled with native plants and minimal chemical use will support more insects, healthier plants, and more hummingbirds.
Layered planting example for a Wyoming yard
In a sunny Wyoming yard, you might plant a small native tree or large shrub—such as serviceberry or chokecherry—toward the back of a bed for structure and early blossoms. In front of that, plant drifts of penstemons and columbines to provide nectar from late spring into early summer.
Along the front edges and in hot, well‑drained spots, add hyssop and wild bergamot for mid‑ to late‑summer color and nectar. On berms or rocky slopes, use drought‑tolerant salvias and additional penstemon species to extend the bloom season and give hummingbirds nectar even in dry conditions.
For the best results do this:
Combine trees, shrubs, vines, and perennials to create a tiered garden with flowers and cover at multiple heights.
Match plants to your local conditions (high plains vs. mountain vs. canyon), emphasizing drought‑tolerant natives.
Place feeders as part of this network, where hummingbirds naturally move between flowers and shelter.
Plan for blooms from spring through fall
In much of Wyoming, the frost‑free season is short, so planning bloom sequences is important. Use early bloomers like columbines and some penstemons, mid‑season staples such as wild bergamot and additional penstemons, and late bloomers like hyssop and hardy salvias. That way hummingbirds find nectar from the time Broad‑taileds arrive in late April or May through the last Rufous and Calliope migrants in September.
My guide The Art of Attracting Hummingbirds to Your Yard helps readers choose plants by season and light conditions and shows how to design beds that keep hummingbirds coming in every part of the state.
Use feeders to supplement, not replace, flowers
Feeders provide a reliable nectar source alongside your plants, especially in early spring and late summer when wild blooms may be sparse because of drought or temperature swings. Hang them where they’re visible from your best flower beds so hummingbirds can move naturally between blossoms and sugar water.
If you’re tired of leaky bottle feeders and constant insect problems, this video explains why a simple saucer‑style Aspects feeder is my go‑to choice. You’ll see how the low, shallow 12‑ounce bowl helps you mix only what your hummingbirds can use before it spoils, while the built‑in ant moat, raised ports, and included Nectar‑Guard tips work together to keep ants, bees, and wasps out of the nectar. The drip‑proof design and twist‑off cover make cleaning and refilling quick and easy, so it’s realistic to keep nectar fresh even in warm weather. Made from tough, UV‑stabilized polycarbonate in the USA and backed by a true lifetime guarantee, this is a “buy it once” feeder you can count on year after year
Provide safe perches and nesting cover
Hummingbirds need secure perches to rest, preen, and watch over their feeding territories. Keep some shrubs, small trees, and a few thin or dead branches in your yard instead of pruning everything into tight, formal shapes. This more natural structure gives birds plenty of lookout posts and nesting options.
A hummingbird swing or decorative perch placed near a feeder gives birds a favorite “guard post,” bringing them into perfect view. Once hummingbirds adopt a perch, you’ll often see them return to it repeatedly between feeding bouts.
Offer water in a way hummingbirds like
Hummingbirds prefer shallow, moving water such as misters, drippers, and fine sprays over deep, still birdbaths. A mister or fine sprayer set near shrubs or perennials lets them bathe in droplets and sip from wet foliage—a valuable resource during hot, dry periods.
You can also install a shallow birdbath. A shallow birdbath with gently sloping edges can also work if kept clean and not too deep. Place water features near nectar plants and feeders so birds can move easily between feeding and bathing without crossing large open areas. Your article How to Use Water Features to Attract Hummingbirds explains depths, flow strength, and placement in more detail.
Skip pesticides and let insects thrive
All hummingbirds, including those in Wyoming, rely heavily on insects and spiders for protein, especially during nesting season. Avoid or sharply limit pesticide use, particularly systemic insecticides that can contaminate nectar and insects alike. A yard rich in native plants, some leaf litter, and natural micro‑habitats will support more insects and healthier hummingbirds.
My article Natural Pest Control Methods for Your Hummingbird Garden helps Wyoming readers manage pests with safer methods—companion planting, beneficial insects, physical barriers, and targeted organic treatments—without harming hummingbirds or their prey.
Keep insects away from your feeder
Bees, wasps, and ants can be serious feeder pests in Wyoming, especially in warm, dry periods. My guide How to Keep Bees and Ants Away From Your Hummingbird Feeder explains how to use ant moats, bee‑resistant feeder designs, better placement, and decoy feeders to keep nectar for hummingbirds only.
What hummingbirds live in Wyoming?
Four hummingbird species occur regularly in Wyoming: Broad‑tailed, Rufous, Calliope, and Black‑chinned. Broad‑taileds are the main mountain and foothill breeders, while Rufous, Calliope, and Black‑chinned appear in different regions and seasons.
When do hummingbirds arrive in Wyoming?
Broad‑tailed Hummingbirds typically arrive in Wyoming by late April. Black‑chinned and Calliope Hummingbirds usually arrive around the first week of May, and Rufous Hummingbirds are most noticeable as migrants from late June into early fall.
When do hummingbirds leave Wyoming?
Most Broad‑tailed, Black‑chinned, Calliope, and Rufous Hummingbirds leave Wyoming by late September, with a few stragglers into early October.
When should I put out hummingbird feeders in Wyoming?
Have feeders up by the end of April in most areas. At lower elevations or in southern Wyoming, you can put them out slightly earlier to be sure you don’t miss early Broad‑taileds.
When should I take down hummingbird feeders in Wyoming?
Many people keep feeders up through September and then take them down after going about one to two weeks without seeing hummingbirds. You can leave one feeder up into October if you want to watch for late migrants.
What is the best hummingbird nectar recipe for Wyoming?
Use 1 part plain white sugar to 4 parts water, boiled and cooled, with no red dye or other additives.
How often should I change hummingbird nectar in Wyoming?
In hot weather, change nectar every 1–2 days; in cooler spring and fall weather, change it every 3–5 days, and always replace it immediately if it looks cloudy, smells fermented, or shows any mold.
Which hummingbird feeder styles work best in Wyoming?
Small 8‑ to 12‑ounce saucer‑style feeders work well because they are easy to clean, resist leaks and wind, and let you offer modest amounts of nectar you can change frequently.
What plants attract hummingbirds in Wyoming?
Natives and region‑adapted plants such as penstemons, columbines, wild bergamot, hyssop, and hardy salvias are excellent choices to attract hummingbirds in Wyoming gardens.
Where can I learn more about hummingbirds in Wyoming?
Regional resources include Rocky Mountain and Wyoming bird‑conservation groups, local Audubon chapters, native‑plant societies, and western hummingbird‑gardening guides.
Further resources for Wyoming hummingbird watchers
– Timing guide that includes Wyoming, listing arrival and departure dates for Broad-tailed, Black-chinned, Calliope, and Rufous Hummingbirds and when to hang feeders.
Hummingbirds in Wisconsin: Ruby‑throated, Feeders, and Native Plants
Wisconsin’s hummingbird story centers on the Ruby‑throated Hummingbird, the only species known to nest in the state and the one almost every backyard watcher will see. Western species like Rufous or Calliope very rarely appear in the Upper Midwest as vagrants, but Ruby‑throateds are the birds to plan for when you design gardens and hang feeders. These tiny migrants arrive in Wisconsin each spring to breed during the short northern summer, then depart again in early fall on a remarkable journey to Mexico and Central America.
Key takeaways for Wisconsin hummingbirds
Ruby‑throated Hummingbirds are the only hummingbirds that regularly breed in Wisconsin, and they are common summer visitors wherever suitable habitat and food are available. They typically start showing up in Wisconsin in late April and early May, with most areas seeing regular activity by early to mid‑May, and they depart from August through October, with most gone by early October. Homeowners can put feeders out by mid‑ to late April so they’re ready for the earliest arrivals, and keep them up through at least the end of September, or about two weeks after they last see a hummingbird. A simple 4‑to‑1 sugar‑water mix with no red dye, changed every 1–2 days in hot spells or every 3–5 days in cooler weather, plus native or region‑friendly plants like wild columbine, bee balm, cardinal flower, and blazing star, will reliably attract Ruby‑throateds to Wisconsin yards.
Wisconsin hummingbird basics
Wisconsin lies within the broad breeding range of the Ruby‑throated Hummingbird, which nests across eastern North America. In the state, Ruby‑throateds use open woodlands, savannas, forest edges, orchards, wetlands, farmsteads, and suburban yards, placing their tiny nests on branches, fence posts, and other horizontal surfaces. They feed on nectar from wildflowers and garden plants, as well as sugar‑water from feeders, and catch small insects and spiders to supply protein for themselves and their chicks.
Each fall, Ruby‑throateds leave Wisconsin and make an extraordinary journey to southern Mexico and Central America, with many adults crossing the Gulf of Mexico in a single, nonstop flight of up to 1,400 miles. In spring, they reverse that trip and arrive as leaves emerge and early flowers open in the Midwest. Wisconsin’s relatively short warm season means Ruby‑throateds must pack courting, nesting, and migration fueling into just a few months, so yards that provide reliable food and safe cover can make a real difference.
Because Wisconsin spans from the Illinois border to Lake Superior and includes cooler northern forests, arrival and departure timing can vary slightly. Southern counties and lake‑moderated areas may see birds a bit earlier in spring and later into fall, while northern and higher‑elevation areas have a somewhat shorter hummingbird season.
What hummingbirds do you get in Wisconsin?
In practice, Wisconsin is a one‑hummingbird state. Ruby‑throated Hummingbirds are the only species known to nest in Wisconsin or neighboring
Ruby-throated Hummingbird
Minnesota, and they are the hummingbirds you should expect at your feeders and flowers. Adult males show a bright ruby‑red throat that can appear black in some light, while females and juveniles are green above and whitish below, lacking the red throat patch.
Very occasionally, other hummingbirds have been reported in the Upper Midwest, but these are exceptional and usually verified by photographs or banders. For day‑to‑day garden planning, Wisconsin homeowners can safely assume that every hummingbird they see from late April through early October is a Ruby‑throated.
Summary for Wisconsin:
Common, regular species: Ruby‑throated Hummingbird (statewide breeder and summer visitor).
Rare visitors: Other hummingbirds as extremely uncommon vagrants, mostly in late fall.
When do hummingbirds arrive and leave Wisconsin?
Wisconsin is far enough north that Ruby‑throateds arrive later than they do in the southern and central U.S. and leave a bit earlier in fall. News and migration maps indicate that Ruby‑throated Hummingbirds typically begin reaching Wisconsin in late April, with most areas seeing hummingbirds by the beginning of May. As with many migrants, adult males usually arrive first, followed by females and then juvenile birds.
By late May and June, Ruby‑throateds are widespread across Wisconsin, nesting and feeding in gardens, natural wetlands, forest edges, and along rivers. July and August are high‑activity months, with adults feeding young and juveniles learning to use feeders and flowers. During this period, birds from farther north may also pass through Wisconsin on their way south, increasing traffic at feeders.
Southbound migration from Wisconsin usually runs from August through October, with many birds leaving the state in September. Adult males often depart first, followed by females and hatch‑year birds. In most years, Ruby‑throateds are largely gone from Wisconsin by early October, especially in the north, though a late individual may linger if weather and food supplies allow.
Typical timing for Wisconsin:
First arrivals: late April into early May.
Peak season: June through August, often strong into early September.
Most birds leave: August through September; most gone by early October.
When to put up and take down feeders in Wisconsin
When to put feeders out
Because Ruby‑throateds typically reach Wisconsin by late April or early May, it is a good idea to have feeders up by mid‑ to late April. In southern Wisconsin or in years with early springs, some birders hang at least one feeder by mid‑April to be sure they don’t miss the first scouts.
Once your feeders are up, keep them clean and filled; even if you don’t see hummingbirds right away, migrants and returning breeders will quickly incorporate your feeders into their daily routes once they arrive.
When to take feeders down
You can safely keep feeders up through September, since Ruby‑throateds commonly pass through Wisconsin well into that month. A simple rule is to leave at least one feeder up until about two weeks after your last hummingbird sighting; for many people, that will mean early October in the south and slightly earlier in the north.
Leaving feeders up does not cause hummingbirds to “forget” to migrate. They depart based on day length and internal cues, not the presence of sugar water. Keeping feeders available into early October mainly helps late migrants refuel before they cross the Midwest, Gulf Coast, and Gulf of Mexico on their way south.
Best hummingbird nectar recipe
The best nectar recipe for Wisconsin hummingbirds is the same standard mix used across North America: 1 part plain white sugar to 4 parts water. Bring the water just to a boil, remove it from the heat, stir in the sugar until it completely dissolves, and let the mixture cool before filling your feeders.
Skip red dyes, honey, brown sugar, or artificial sweeteners. The red parts of the feeder are plenty to attract Ruby‑throateds, and additives can encourage spoilage or health problems. This basic 4‑to‑1 sugar‑water mixture closely matches natural nectar concentrations and is safe for hummingbirds when changed regularly.
Native plants that attract hummingbirds in Wisconsin
Native and region‑appropriate plants are one of the best ways to attract Ruby‑throated Hummingbirds in Wisconsin. They favor tubular, nectar‑rich flowers in red and orange, but will also use purple, pink, and blue blooms with good nectar.
Good native or region‑appropriate plants for Wisconsin include:
Wild columbine (Aquilegia canadensis) – Red and yellow nodding flowers in spring, perfect for woodland edges, rocky outcrops, and part‑shade borders.
Bee balm / Monarda (Monarda fistulosa, M. didyma) – Lavender, pink, or red summer blooms that provide excellent nectar and attract both hummingbirds and pollinators.
Cardinal flower (Lobelia cardinalis) – Brilliant red flower spikes that love moist soils, rain gardens, and stream edges, blooming later in summer.
Foxglove beardtongue (Penstemon digitalis) – Upright spikes of white tubular flowers that thrive in a variety of soils and draw hummingbirds and other pollinators.
Savanna blazing star (Liatris scariosa) and other liatris species – Tall spikes of purple flowers irresistible to hummingbirds and butterflies, great in sunny beds and prairie plantings.
Native honeysuckles and other tubular vines (non‑invasive) – Where appropriate, native or non‑invasive tubular honeysuckle vines provide vertical nectar sources along fences and trellises.
These plants give a sequence of blooms from spring (columbine) through summer (bee balm, penstemon, liatris) into late summer and early fall (cardinal flower, blazing star), fitting nicely within Wisconsin’s hummingbird season.
All about nectar: how to use it effectively
Safe, homemade nectar is one of the simplest and most effective ways to support Ruby‑throateds during Wisconsin’s short summer. Using modest‑sized feeders (around 8–12 ounces) helps you offer fresh nectar without leaving large amounts out long enough to spoil, especially during hot, humid stretches in July and August.
During peak activity in June through August, you can add an extra feeder or fill them a bit more if you’re seeing lots of hummingbirds. As activity drops in late September and early October, reduce how many feeders you have out or how much you fill them so you’re still changing nectar frequently while serving the last migrants.
My main nectar article, How to Make Hummingbird Feeder Nectar, gives Wisconsin readers step‑by‑step instructions, batch sizes for different feeders, how often to change nectar at different temperatures, and what ingredients to avoid.
A clean hummingbird feeder is a must
Even in a northern state like Wisconsin, summer heat and sun can make nectar spoil more quickly than you’d expect. Each time you change nectar, rinse the feeder with hot water and scrub any surfaces that can trap residue—the reservoir, feeding ports, seams, and perches. Small brushes designed for hummingbird feeders make this job faster and more thorough.
If you notice cloudy nectar, black spots, or a sour smell, give the feeder a deep clean. A soak in a mild vinegar solution or a diluted bleach solution, followed by very thorough rinsing and complete drying, keeps mold and yeast under control. My feeder‑cleaning guide walks readers through the whole process and suggests how cleaning frequency should change from cool spring days to hot summer afternoons.
Where to hang feeders in Wisconsin yards
Wisconsin yards range from lakeside lots and city backyards to farmsteads and forest edges, but good feeder placement is similar everywhere. Hang feeders near flowers, shrubs, or small trees so hummingbirds have cover and perches, and place them about 4–5 feet above the ground so they’re easy to watch and maintain.
Keep feeders a safe distance from large, clear windows, or use decals and screens to reduce the risk of collisions. In full‑sun or south‑facing locations, strong midday sun can overheat nectar, so many people prefer spots with morning sun and afternoon shade or dappled light. In windy or exposed areas, hang feeders where they won’t swing excessively—near posts, fences, or protected corners.
To reduce fighting among hummingbirds:
Use two or more small feeders rather than one big one.
Place feeders 10–15 feet apart or around corners so a territorial male can’t guard them all at once.
Learn how hummingbird aggression impacts your backyard. This video explores territorial behavior and offers practical solutions for attracting more hummingbirds to your feeders. Discover several helpful strategies to encourage a more harmonious environment.
Creating a hummingbird‑friendly yard in Wisconsin
To build a hummingbird‑friendly yard in Wisconsin, combine layers of vegetation, clean feeders, water, and safe perches. Use small trees and shrubs for structure and potential nest sites, flowering perennials and annuals for nectar, and feeders as a reliable supplement when blooms are scarce.
Avoid or greatly limit pesticides, especially systemic insecticides, because hummingbirds and their chicks depend heavily on small insects and spiders for protein. A yard full of native plants, some leaf litter, and natural structure will support more insects, which in turn support healthier hummingbirds.
Layered planting example for a Wisconsin yard
In a sunny or part‑sun Wisconsin yard, you might plant a small native tree or large shrub—such as serviceberry or flowering crabapple—toward the back of a bed for structure and early blossoms. In front of that, plant drifts of wild columbine, bee balm, and foxglove beardtongue to provide nectar from late spring through mid‑summer.
Along the front edges and in the sunniest spots, add savanna blazing star and other liatris species for tall, purple spikes that bloom in mid‑ to late summer. In low or wetter areas, plant cardinal flower so that late‑season hummingbirds have bright red nectar sources as they prepare to migrate south.
For the best results do this:
Combine small trees, shrubs, vines, and perennials to create a tiered garden with flowers and cover at different heights.
Emphasize native and region‑adapted plants that handle Wisconsin’s winters and support insects as well as hummingbirds.
Place feeders where hummingbirds naturally move between flower beds and cover, rather than isolated in the middle of a lawn.
Plan for blooms from spring through fall
Because Wisconsin’s warm season is short, it’s important to plan for continuous bloom from May through September. Use early‑bloomers like wild columbine, mid‑season standouts such as bee balm, foxglove beardtongue, and blazing star, and late‑season stars like cardinal flower so hummingbirds always have something to feed on while they’re in the state.
My guide The Art of Attracting Hummingbirds to Your Yard gives readers plant lists organized by season and light conditions, plus layout ideas that are easy to adapt to Wisconsin yards and climates.
Use feeders to supplement, not replace, flowers
Feeders provide a reliable nectar source alongside your plants, especially in early spring and late summer when wild blooms may be sparse because of drought or temperature swings. Hang them where they’re visible from your best flower beds so hummingbirds can move naturally between blossoms and sugar water.
If you’re tired of leaky bottle feeders and constant insect problems, this video explains why a simple saucer‑style Aspects feeder is my go‑to choice. You’ll see how the low, shallow 12‑ounce bowl helps you mix only what your hummingbirds can use before it spoils, while the built‑in ant moat, raised ports, and included Nectar‑Guard tips work together to keep ants, bees, and wasps out of the nectar. The drip‑proof design and twist‑off cover make cleaning and refilling quick and easy, so it’s realistic to keep nectar fresh even in warm weather. Made from tough, UV‑stabilized polycarbonate in the USA and backed by a true lifetime guarantee, this is a “buy it once” feeder you can count on year after year
Provide safe perches and nesting cover
Hummingbirds need safe perches to rest, preen, and watch over their feeding territories. Keep some shrubs, small trees, and even a few thin or dead branches in your yard instead of pruning everything into tight, formal shapes. This slightly “wilder” structure gives birds more perches and better cover.
A hummingbird swing or decorative perch placed a few feet from your feeder brings birds into perfect view and gives them a favorite lookout. Once a Ruby‑throated adopts a perch, you’ll often see it return to that same spot repeatedly between feeding sessions.
Offer water in a way hummingbirds like
Hummingbirds prefer shallow, moving water—misters, drippers, and fine sprays—over deep, still birdbaths. A mister or fine sprayer set near shrubs or perennials lets them bathe in droplets and sip from wet leaves, which can be especially appealing during warm, dry spells or after long flights.
You can also install a shallow birdbath with gently sloping edges, keeping the water no more than about an inch deep so hummingbirds can safely sip and splash at the edge. Place water features near, but not directly over, your best flower beds so birds can move easily between feeding and bathing.
Your article How to Use Water Features to Attract Hummingbirds explains how deep the water should be, what kind of motion works best, and where to place features so birds feel safe and are still easy to watch.
Skip pesticides and let insects thrive
Avoid or greatly limit pesticides, especially systemic insecticides, because hummingbirds and their chicks rely on small insects and spiders for protein. A yard full of native plants, some unmowed or less‑tidy areas, and fewer chemicals will naturally support more insects and, in turn, healthier Ruby‑throateds.
My article Natural Pest Control Methods for Your Hummingbird Garden shows Wisconsin readers how to prevent and manage pests using safer methods—companion planting, beneficial insects, organic sprays, and physical barriers—so they can protect their plants without harming hummingbirds or their food sources.
Keep insects away from your feeder
Bees, wasps, and ants can take over a feeder anywhere, including Wisconsin, but you don’t have to give up and bring the feeder in. My guide How to Keep Bees and Ants Away From Your Hummingbird Feeder explains how to use ant moats, bee‑resistant feeders, smarter placement, and decoy feeders so sugar water stays available for hummingbirds instead of insects.
What hummingbirds live in Wisconsin?
Ruby‑throated Hummingbirds are the only hummingbirds that regularly breed in Wisconsin, and they are the species you should expect at your feeders and flowers. Other hummingbirds appear only as rare visitors.
When do hummingbirds arrive in Wisconsin?
Ruby‑throated Hummingbirds typically start arriving in Wisconsin in late April and early May, with most areas seeing regular activity by the beginning of May.
When do hummingbirds leave Wisconsin?
Most Ruby‑throated Hummingbirds leave Wisconsin between August and September, with many gone by early October, especially in the northern part of the state.
When should I put out hummingbird feeders in Wisconsin?
Put feeders out by mid‑ to late April so they are ready for the earliest arrivals; in southern Wisconsin you can hang one feeder a bit earlier if you want an extra margin.
When should I take down hummingbird feeders in Wisconsin?
A common approach is to keep feeders up through September, then take them down after you have gone about one to two weeks without seeing hummingbirds.
What is the best hummingbird nectar recipe for Wisconsin?
Use 1 part plain white sugar to 4 parts water, boiled and cooled, with no red dye or other additives.
How often should I change hummingbird nectar in Wisconsin?
In warm weather, change nectar every 1–2 days; in cooler spring and fall weather, change it every 3–5 days, and always replace it immediately if it looks cloudy, smells fermented, or shows any mold.
Which hummingbird feeder styles work best in Wisconsin?
Small 8‑ to 12‑ounce saucer‑style feeders work well because they are easy to clean, resist leaks, and let you offer modest amounts of nectar you can change frequently.
What plants attract hummingbirds in Wisconsin?
Natives and region‑adapted plants such as wild columbine, bee balm, cardinal flower, foxglove beardtongue, blazing star, and native honeysuckles are excellent choices to attract Ruby‑throateds to Wisconsin gardens.
Where can I learn more about hummingbirds in Wisconsin?
Regional resources include Wisconsin conservation groups, extension services, local Audubon chapters, native‑plant organizations, and national guides to Ruby‑throated Hummingbirds and Midwest pollinator gardening.
Further resources for Wisconsin hummingbird watchers
Hummingbirds in West Virginia: Ruby‑throated, Feeders, and Native Plants
West Virginia’s hummingbird story centers on the Ruby‑throated Hummingbird, the only species that commonly breeds in the state and the one almost every backyard birder will see. Western species like Rufous may occasionally wander in as rare visitors, usually in fall or winter, but Ruby‑throateds are the birds to plan for when you design gardens and place feeders. These tiny migrants arrive each spring to nest in West Virginia’s forests and hollows, fill the summer with color and activity, and then head south again in early fall.
Key takeaways for West Virginia hummingbirds
Ruby‑throated Hummingbirds are the only hummingbirds you can reliably expect in West Virginia; other species should be treated as rare and unusual visitors. They typically arrive in West Virginia from late March into April, with males often appearing first and females following a bit later, and they depart from late September into early October. Homeowners can put feeders out by late March or the first week of April so they’re ready for the earliest arrivals, and keep them up through at least the end of September, or about two weeks after they last see a hummingbird. A simple 4‑to‑1 sugar‑water mix with no red dye, changed every 1–2 days in hot spells or every 3–5 days in cooler weather, plus native or region‑friendly plants like bee balm, cardinal flower, trumpet creeper, and jewelweed, will reliably attract Ruby‑throateds to West Virginia yards.
West Virginia hummingbird basics
West Virginia lies in the heart of the Ruby‑throated Hummingbird’s breeding range in eastern North America. In the state, Ruby‑throateds nest anywhere there is a mix of trees, shrubs, and openings, including forest edges, hollows, farmsteads, yards, and stream corridors. They build tiny, camouflaged nests on horizontal branches, often over streams or shaded clearings, and depend on nectar from flowers and feeders plus small insects and spiders for protein.
Each year, Ruby‑throateds winter in Mexico and Central America, then move north in waves as spring advances. West Virginia birds typically arrive after the Gulf Coast and Deep South have filled in, timing their return with leaf‑out and early blooms in the Appalachians. Their short breeding season in West Virginia means they must quickly establish territories, nest, and fuel up for migration before cool weather returns.
Because the state includes a range of elevations and microclimates, hummingbird timing can vary slightly by location. Lower valleys and the Ohio River region may see birds a bit earlier in spring and later into fall, while higher ridges and northern counties may have a somewhat shorter season.
What hummingbirds do you get in West Virginia?
Practically speaking, West Virginia is a one‑hummingbird state. Ruby‑throated Hummingbirds are the only species that regularly breed here and the
Ruby-throated Hummingbird
only hummingbirds most residents are likely to see at their feeders and flowers. Males have a bright ruby throat that can look black in some light, while females and juveniles are green above and whitish below with no red on the throat.
Occasionally, western hummingbirds such as Rufous or Broad‑tailed may wander east and be reported in the eastern U.S., often in late fall or early
Rufous Hummingbird
winter at feeders that stay up. These records are rare and usually confirmed by photographs or hummingbird banders, so most hummingbirds seen in West Virginia from spring through early fall will be Ruby‑throateds.
Summary for West Virginia:
Common, regular species: Ruby‑throated Hummingbird (statewide breeder during the warm months).
Broad-tailed-Hummingbird
Rare visitors: Western hummingbirds like Rufous or Broad‑tailed as very occasional vagrants, mostly in late fall.
When do hummingbirds arrive and leave West Virginia?
West Virginia sits mid‑way along the Ruby‑throated’s northward route, so birds arrive after the Gulf Coast and southern states but before the far Northeast. Reports and migration maps suggest that Ruby‑throated Hummingbirds typically reach West Virginia in late March and early April, with males appearing first and females following by mid‑April.
By May and June, Ruby‑throateds are widespread across the state, pairing up, nesting, and visiting both wildflowers and feeders. July and August bring high activity as adults feed their young and juveniles learn to use feeders and flowers, with many birds moving through as they migrate from more northerly breeding areas.
Southbound migration usually runs from late August through September in West Virginia. Males tend to leave first, followed by females and hatch‑year birds, and most Ruby‑throateds are gone by early October, especially in higher, cooler locations. Occasionally, an individual may linger a bit longer if weather and food sources hold, but regular hummingbird season is essentially over by mid‑October.
Typical timing for West Virginia:
First arrivals: late March into early–mid April.
Peak season: May through August, often strong into early September.
Most birds leave: late September into early October.
When to put up and take down feeders in West Virginia
When to put feeders out
Because Ruby‑throateds usually reach West Virginia in late March and early April, it’s wise to have feeders up by around late March or the first week of April. In milder river valleys or southern parts of the state, you may want to hang at least one feeder in late March, especially if migration reports show birds moving into neighboring states.
Once your feeders are up, keep them clean and filled through the season. Early in April you might see only a few birds, but numbers will grow through April and May as more migrants and returning breeders arrive.
When to take feeders down
You can safely keep feeders up through the end of September, since Ruby‑throateds commonly pass through West Virginia into late September. A good rule is to leave at least one feeder up until about two weeks after your last hummingbird sighting, which for most people will be sometime in late September or early October.
Leaving feeders up does not stop hummingbirds from migrating; they leave based on day length and internal cues, not because feeders vanish. Keeping nectar available into early October mainly helps late migrants refuel before they cross long stretches of the Southeast and Gulf region on their way south.
Best hummingbird nectar recipe
The best nectar recipe for West Virginia hummingbirds is the standard mix used across North America: 1 part plain white sugar to 4 parts water. Bring the water just to a boil, remove from heat, stir in the sugar until it completely dissolves, then let the mixture cool before filling your feeders.
Do not add red dye, honey, brown sugar, or artificial sweeteners. The red parts of the feeder are enough to attract Ruby‑throateds, and additives can cause health and spoilage issues. This 4‑to‑1 sugar‑water recipe closely matches natural flower nectar and is safe for hummingbirds when you keep it fresh.
Native plants that attract hummingbirds in West Virginia
Native and region‑appropriate plants are one of the best ways to attract Ruby‑throateds in West Virginia. Hummingbirds favor tubular, nectar‑rich flowers in red and orange, but will also use purple and pink blooms with good nectar.
Good native or region‑appropriate plants for West Virginia include:
Bee balm / Monarda (Monarda fistulosa, M. didyma) – Showy summer flowers in red, pink, or purple, excellent in sunny or lightly shaded borders and a magnet for hummingbirds.
Cardinal flower (Lobelia cardinalis) – Brilliant red spikes that thrive in moist soils, rain gardens, and along streams, blooming from mid‑summer into fall.
Trumpet creeper (Campsis radicans) – A vigorous native vine with large orange‑red trumpets; best planted where its spread can be managed.
Coral honeysuckle (Lonicera sempervirens) – A non‑invasive native vine with red‑orange tubular flowers, great for fences, trellises, and arbors.
Jewelweed / spotted touch‑me‑not (Impatiens capensis) – A self‑seeding annual with orange spotted tubular flowers, blooming in late summer in damp, partly shaded spots.
Blazing star / liatris (Liatris sp.) – Spikes of purple flowers that attract hummingbirds and other pollinators in sunny beds and meadows.
These plants give a long nectar season in West Virginia’s climate and pair well with the feeder advice, especially along woodland edges and near streams where many readers live.
All about nectar: how to use it effectively
Safe, homemade nectar is one of the simplest and most effective ways to support Ruby‑throat Hummingbirds in West Virginia. Using modest‑sized feeders (for example, 8–12 ounces) helps you offer fresh nectar without letting sugar water sit too long, especially during hot, humid stretches in July and August.
In peak season, you can add an extra feeder or two or fill them a bit more if you have a lot of hummingbirds. As activity drops in late September and early October, reduce the number of feeders or how much you fill them so you’re still changing nectar frequently while serving the last migrants.
My main nectar article, How to Make Hummingbird Feeder Nectar, gives West Virginia readers the full recipe, batch sizes for different feeders, how often to change nectar at different temperatures, ingredients to avoid, and troubleshooting tips if nectar spoils quickly.
A clean hummingbird feeder is a must
West Virginia summers can be warm and muggy, which means sugar water can ferment and mold faster than many people expect. Each time you change nectar, rinse the feeder with hot water and scrub any surfaces that can trap residue—the reservoir, ports, seams, and perches. Small brushes made for hummingbird feeders make this job much easier.
If you see black spots, cloudy nectar, or slime inside the feeder, give it a deep clean. A soak in a mild vinegar solution or a diluted bleach solution (followed by very thorough rinsing and complete drying) will help keep mold at bay. My detailed feeder‑cleaning guide walks readers step‑by‑step through the process and suggests how often to clean during different weather patterns.
Where to hang feeders in West Virginia yards
West Virginia yards run from hollows and hillside clearings to river‑bottom farms and town lots, but the basics of feeder placement are the same. Hang feeders near flowers, shrubs, or small trees so hummingbirds have cover and perches, and place them about 4–5 feet above the ground so they’re easy to see and maintain.
Keep feeders a few feet away from large picture windows, or use decals and screens to cut glare and reduce collision risk. In open, sunny yards, strong afternoon sun can heat nectar quickly, so many people prefer spots with morning sun and afternoon shade, or dappled light under a small tree. In windy ridge‑top or exposed sites, hang feeders where they won’t swing wildly—near a porch, fence, or protected corner.
Hang it in the right spot and they will come!
For a deep dive into perfectly placing your feeder for maximum results, check out my in‑depth guide on how to choose the best place to hang your hummingbird feeder. Discover exactly where to hang your hummingbird feeder for the best results. This complete guide walks you through sunlight and shade, height, distance from windows, wind and predator protection, and how close to place feeders to flowers so hummingbirds feel safe and visit often. You’ll also get practical tips on window feeders, hanging hardware, cleaning schedules by temperature, and simple tricks to stop ants and other pests. Check out the article for everything you need to turn one well‑placed feeder into a busy hummingbird hot spot.
To reduce fighting among hummingbirds:
Use two or more small feeders rather than one big one.
Place feeders 10–15 feet apart or around corners so a territorial male can’t guard them all at once.
Learn how hummingbird aggression impacts your backyard. This video explores territorial behavior and offers practical solutions for attracting more hummingbirds to your feeders. Discover several helpful strategies to encourage a more harmonious environment.
Creating a hummingbird‑friendly yard in West Virginia
To turn a West Virginia yard into hummingbird habitat, combine layers of vegetation, clean feeders, water, and safe perches. Use trees and shrubs for structure and nesting sites, flowering perennials and annuals for nectar, and feeders as a dependable backup food source.
Avoid or greatly limit pesticides, especially systemic insecticides, because hummingbirds and their chicks depend heavily on small insects and spiders for protein. A yard with plenty of native plants, some leaf litter, and natural structure will support more insects, healthier plants, and more hummingbirds.
Layered planting example for a West Virginia yard
In a sunny or part‑sun yard, you might plant a small native tree—such as serviceberry, red buckeye, or dogwood—at the back of a bed to provide perches, shade, and early blossoms. In front of that, use drifts of bee balm and blazing star for mid‑summer color and nectar.
Along the front edges and in moist or low spots, add cardinal flower and patches of jewelweed so there are blooms from mid‑summer into early fall. Train trumpet creeper or coral honeysuckle along a fence or arbor nearby to add vertical nectar sources and create hummingbird “flyways” across the yard.
For the best results do this:
Combine small trees, shrubs, vines, and perennials to create a tiered garden with flowers and cover at different heights.
Emphasize native and region‑adapted plants that thrive in West Virginia’s climate and support insects as well as hummingbirds.
Place feeders where hummingbirds naturally move between flower beds and cover, rather than isolated in the middle of a lawn.
Plan for blooms from spring through fall
West Virginia’s season is long enough to plan for nectar from spring through early fall. Use early‑bloomers such as red columbine and flowering shrubs, mid‑season standouts like bee balm, blazing star, and salvias, and late‑season stars like cardinal flower and jewelweed.
My guide The Art of Attracting Hummingbirds to Your Yard gives readers plant lists for spring, summer, and fall bloomers and ideas for layering plants so something is always flowering while Ruby‑throateds are in the state.
Use feeders to supplement, not replace, flowers
Feeders provide a reliable nectar source alongside your plants, especially in early spring and late summer when wild blooms may be sparse because of drought or temperature swings. Hang them where they’re visible from your best flower beds so hummingbirds can move naturally between blossoms and sugar water.
If you’re tired of leaky bottle feeders and constant insect problems, this video explains why a simple saucer‑style Aspects feeder is my go‑to choice. You’ll see how the low, shallow 12‑ounce bowl helps you mix only what your hummingbirds can use before it spoils, while the built‑in ant moat, raised ports, and included Nectar‑Guard tips work together to keep ants, bees, and wasps out of the nectar. The drip‑proof design and twist‑off cover make cleaning and refilling quick and easy, so it’s realistic to keep nectar fresh even in warm weather. Made from tough, UV‑stabilized polycarbonate in the USA and backed by a true lifetime guarantee, this is a “buy it once” feeder you can count on year after year
Provide safe perches and nesting cover
Hummingbirds need secure perches to rest, preen, and watch over their feeding territories. Keep some shrubs, small deciduous trees, and even a few dead or thin branches in your yard instead of pruning everything into perfect shapes. This slightly “looser” look gives hummingbirds more places to perch and more options for nest sites.
A simple hummingbird swing or decorative perch placed a few feet from your feeder brings birds into perfect view and gives them a favorite lookout. Once a Ruby‑throated adopts a perch, you’ll often see it return to that same spot over and over between feeding bouts.
Offer water in a way hummingbirds like
Hummingbirds prefer moving, shallow water to deep, still birdbaths. A mister or fine sprayer set near shrubs or perennials lets them bathe in dropletsand sip from wet leaves—a welcome resource on hot Appalachian afternoons.
You can also install a shallow birdbath with gently sloping edges—no more than about an inch of water—so hummingbirds can sip and splash at the edge. Place water features near, but not directly over, your main hummingbird plantings so birds can move easily between feeding and bathing.
My article How to Use Water Features to Attract Hummingbirds explains exactly how deep the water should be, how strong the flow ought to be, and where to place features for both safety and good viewing.
Skip pesticides and let insects thrive
Avoid or greatly limit pesticides, especially systemic insecticides, because hummingbirds and their chicks rely on small insects and spiders for protein. A yard full of native plants, leaf litter, and natural structure will support more insects, which in turn support stronger hummingbird populations.
My article Natural Pest Control Methods for Your Hummingbird Garden shows West Virginia readers how to prevent and manage pests using safer methods—companion planting, beneficial insects, organic sprays, and physical barriers—so they can protect their plants without harming hummingbirds or their food sources.
Keep insects away from your feeder
Bees, wasps, and ants can be a problem at feeders anywhere, including West Virginia. My guide How to Keep Bees and Ants Away From Your Hummingbird Feeder explains how to use ant moats, bee‑resistant feeders, better placement, and decoy feeders so sugar water stays available for hummingbirds instead of insects.
What hummingbirds live in West Virginia?
Ruby‑throated Hummingbirds are the only hummingbirds that regularly breed in West Virginia, and they are the species you should expect at your feeders and flowers. Other hummingbirds appear only as rare visitors.
When do hummingbirds arrive in West Virginia?
Ruby‑throated Hummingbirds typically arrive in West Virginia in late March and early April, with males often arriving a bit earlier and females following soon after.
When do hummingbirds leave West Virginia?
Most Ruby‑throated Hummingbirds leave West Virginia between late September and early October, with activity dropping sharply by mid‑October.
When should I put out hummingbird feeders in West Virginia?
Put feeders out by late March or the first week of April so they are ready for the earliest arrivals. In mild areas you can hang one feeder a little earlier if you want an extra margin.
When should I take down hummingbird feeders in West Virginia?
A common approach is to keep feeders up through the end of September, then take them down after you have gone about one to two weeks without seeing hummingbirds.
What is the best hummingbird nectar recipe for West Virginia?
Use 1 part plain white sugar to 4 parts water, boiled and cooled, with no red dye or other additives.
How often should I change hummingbird nectar in West Virginia?
In warm weather, change nectar every 1–2 days; in cooler spring and fall weather, change it every 3–5 days, and always replace it immediately if it looks cloudy, smells fermented, or shows any mold.
Which hummingbird feeder styles work best in West Virginia?
Small 8‑ to 12‑ounce saucer‑style feeders work well because they are easy to clean, resist leaks, and let you offer modest amounts of nectar you can change frequently.
What plants attract hummingbirds in West Virginia?
Natives and region‑adapted plants such as bee balm, cardinal flower, trumpet creeper, coral honeysuckle, jewelweed, and blazing star are excellent choices to attract Ruby‑throateds to West Virginia gardens.
Where can I learn more about hummingbirds in West Virginia?
Regional resources include the West Virginia Division of Natural Resources hummingbird pages, local Audubon chapters, native‑plant and wildflower groups, and national guides to Ruby‑throated Hummingbirds and pollinator‑friendly gardening.
Further resources for West Virginia hummingbird watchers
Washington’s hummingbird story centers on four regular species—Anna’s, Rufous, Calliope, and Black‑chinned—spread across different regions and seasons of the state. Here’s a Washington article in your template style, with bolded plant names and bold FAQ questions, clean for pasting.
Hummingbirds in Washington: Anna’s, Rufous, Feeders, and Native Plants
Washington is a true hummingbird state, with several species occurring regularly rather than just one. Anna’s Hummingbirds now live year‑round in many lowland areas, while Rufous Hummingbirds are widespread migrants and breeders, and Calliope and Black‑chinned Hummingbirds occur mainly in eastern and interior parts of the state. Together, they use Washington’s coasts, forests, mountains, and shrub‑steppe landscapes from early spring through fall, with Anna’s remaining even in winter where conditions allow.
Key takeaways for Washington hummingbirds
Anna’s Hummingbirds have become the “backyard hummingbird” of much of western Washington and can be found year‑round in many coastal and lowland communities. Rufous Hummingbirds are the most widespread migratory species, breeding in forests and mountain habitats across much of the state and especially common west of the Cascades in spring and summer. Calliope and Black‑chinned Hummingbirds are mainly birds of eastern and southeastern Washington, more often found in open, shrubby, or riparian habitats east of the mountains.
Rufous, Calliope, and Black‑chinned Hummingbirds typically arrive in Washington from March through May and depart by late August or September, while Anna’s may be present throughout the year. Homeowners can put spring feeders out by early March in western Washington and by late March or early April in interior and northern areas, then keep them up through September or longer if they’re supporting Anna’s Hummingbirds in winter. A simple 4‑to‑1 sugar‑water mix with no red dye, changed every 1–2 days in warm weather or every 3–5 days in cooler spells, plus native plants like orange honeysuckle, red columbine, penstemons, and California fuchsia, will reliably attract hummingbirds to Washington yards.
Washington hummingbird basics
Four hummingbird species are regular in Washington: Anna’s, Rufous, Calliope, and Black‑chinned. Anna’s are now common backyard birds along the west coast and into the Puget Sound region, where they’ve expanded northward on the strength of mild winters, ornamental plantings, and feeders. Rufous Hummingbirds remain the classic migratory species, moving north along the Pacific coast and Cascades in spring and south through interior routes in late summer.
Calliope Hummingbirds, the smallest breeding birds in North America, occur mostly in eastern Washington and mountain regions, especially where forest edges, meadows, and shrubby slopes provide flowers and small insects. Black‑chinned Hummingbirds are also more frequent in eastern Washington, particularly in river corridors, wetlands, and towns within steppe and Ponderosa pine zones. Altogether, these species give Washington diverse hummingbird activity from sea level to high mountains.
Season length and species mix vary by region: coastal and lowland areas may see hummingbirds nearly year‑round (thanks to Anna’s), while higher elevations and interior areas have shorter but intense hummingbird seasons focused on late spring and summer. In every region, a mix of flowers and clean feeders will draw hummingbirds in when they’re present.
What hummingbirds do you get in Washington?
For many Washington birders, the “everyday” hummingbird is now the Anna’s Hummingbird, especially in western Washington. These birds can be
Anna’s Hummingbird
seen year‑round in many yards, visiting feeders and winter‑blooming ornamentals during cool months and sharing gardens with migratory species in spring and summer.
Rufous Hummingbirds are widespread migrants and breeders, particularly common west of the Cascades and in forested and mountain habitats.
Rufous Hummingbird
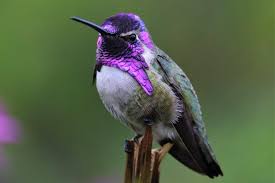
Calliope Hummingbirds occur mostly in eastern and higher‑elevation habitats, while Black‑chinned Hummingbirds are found mainly in eastern
Calliope Hummingbird
Washington’s steppe and Ponderosa pine regions, often near rivers or wetlands. A few other species occasionally appear as rarities, but these four are the regular hummingbirds to plan for.
Summary for Washington:
Common, regular species: Anna’s Hummingbird (year‑round in many western lowlands), Rufous Hummingbird (widespread migrant/breeder), Calliope Hummingbird (mainly eastern and mountain areas), Black‑chinned Hummingbird (primarily eastern rivers and steppe).
Rare visitors: A few additional western species as vagrants, mostly detected by experienced birders at well‑watched feeders.
When do hummingbirds arrive and leave Washington?
Timing in Washington varies by species and region. Anna’s Hummingbirds are present year‑round in many coastal and lowland areas, including much of western Washington, where they may nest as early as late winter and early spring. Rufous Hummingbirds typically arrive in the state in March and April, often first along the coast and in the southwest, then along the Cascades and into the interior.
Calliope and Black‑chinned Hummingbirds reach Washington a bit later in spring, generally by April or May, as snow recedes in mountain regions and spring advances in eastern valleys. Through late spring and summer, these species occupy suitable breeding habitats ranging from coastal gardens and forests to mountain meadows and riparian corridors in the east.
Southbound migration in Washington usually peaks from July through September. Rufous Hummingbirds are especially noticeable moving south in late summer, with many leaving by late August or September. Calliope and Black‑chinned Hummingbirds also migrate out by early fall, while Anna’s may remain in lowland areas through the winter. In most of the state, hummingbird activity around migratory species declines sharply by late September.
Typical timing for Washington:
Anna’s: Year‑round in many western lowlands, with nesting often beginning very early in the year.
Rufous: Arrive March–April; most leave by late August or September.
Calliope and Black‑chinned: Arrive April–May; depart by late August or September.
When to put up and take down feeders in Washington
When to put feeders out
In western Washington, where Anna’s Hummingbirds are present all year, you can keep at least one feeder up year‑round if you can maintain fresh, unfrozen nectar. If you prefer to feed only during the main season, have feeders out by early March to be ready for incoming Rufous and other migratory hummingbirds.
In eastern and central Washington, aim to have feeders up by late March or early April, ahead of peak spring arrivals. Higher‑elevation and more northerly areas may see hummingbirds slightly later, but putting feeders out early ensures that any passing birds have a reliable source of fuel.
When to take feeders down
If you are not feeding Anna’s year‑round, you can remove most feeders after the main migration. Many Washington birders west and east of the Cascades keep feeders up through September, then take them down once they’ve gone about one to two weeks without seeing any hummingbirds.
If you choose to support Anna’s Hummingbirds through the winter in western Washington, keep at least one feeder up year‑round. In freezing weather, you’ll need to prevent nectar from freezing by using heat sources, moving feeders near sheltered house walls, rotating feeders, or using specialized heated bases.
Best hummingbird nectar recipe
The best nectar recipe for Washington hummingbirds is the same standard mix used elsewhere: 1 part plain white sugar to 4 parts water. Heat the water to a brief boil, remove from heat, stir in the sugar until it dissolves completely, and let the solution cool before filling feeders.
Avoid red dye, honey, brown sugar, or artificial sweeteners. The colored parts of the feeder are enough to attract hummingbirds, and additives are not necessary and can be harmful. This 4‑to‑1 sugar‑water recipe closely matches natural nectar concentrations and is safe for Anna’s, Rufous, Calliope, and Black‑chinned Hummingbirds when you keep it fresh.
All about nectar: how to use it effectively
Washington’s climate is milder than many interior states but can still produce hot spells in summer and freezing temperatures in winter. In warm weather, use smaller feeders or only partially fill them so nectar is used up before it spoils. In cooler shoulder seasons, you can get away with slightly longer intervals between changes—but still check often for cloudiness or mold.
During peak activity in late spring and summer, you can add extra feeders or increase fill levels to accommodate more birds, especially where Rufous and other migrants pass through. As fall migration winds down, reduce nectar volume so you can keep it fresh while still offering enough for any lingering birds. In winter, if you are feeding Anna’s, nectar care becomes a balance between preventing freezing and preventing spoilage.
My main nectar guide, How to Make Hummingbird Feeder Nectar, gives detailed instructions on the recipe, storage, change frequency at different temperatures, and common problems like cloudy nectar or black mold.
A clean hummingbird feeder is a must
Even in Washington’s relatively moderate climate, nectar can ferment and feeders can develop mold if not cleaned regularly. Each time you change nectar, rinse the feeder with hot water and scrub surfaces where residue can build up, especially the ports, seams, and inside corners. Small brushes designed for hummingbird feeders are very helpful.
If you notice black spots, cloudiness, or a sour smell, give the feeder a deeper cleaning. Soak in a mild vinegar solution or a diluted bleach solution, rinse thoroughly until no odor remains, and let the feeder dry completely before refilling. My feeder‑cleaning guide shows Washington readers exactly how to do this and how cleaning frequency should change from cool spring days to warm summer afternoons.
Where to hang feeders in Washington yards
Washington yards range from coastal gardens and urban patios to forested lots, farms, and shrub‑steppe properties, but good feeder placement follows the same basics. Hang feeders near flowers, shrubs, or small trees so hummingbirds have cover and perches, and place them about 4–5 feet above the ground for both safety and easy access.
Keep feeders away from large, clear windows or use decals/screens to reduce collision risk. In sunny, exposed spots—especially east of the Cascades—afternoon sun can heat nectar quickly, so many birders prefer locations with morning sun and afternoon shade or dappled light. In windy coastal or ridge‑top locations, choose sheltered spots near walls, fences, or vegetation so feeders don’t swing excessively.
To reduce fighting among hummingbirds:
Use two or more small feeders rather than one big one.
Place feeders 10–15 feet apart or around corners so a territorial male can’t guard them all at once.
Learn how hummingbird aggression impacts your backyard. This video explores territorial behavior and offers practical solutions for attracting more hummingbirds to your feeders. Discover several helpful strategies to encourage a more harmonious environment.
Native plants that attract hummingbirds in Washington
Native and region‑appropriate plants are one of the best ways to attract hummingbirds across Washington’s diverse landscapes. Hummingbirds favor tubular, nectar‑rich flowers in red, orange, and bright pink, but will also visit purple and blue blooms with good nectar.
Good Pacific Northwest natives and region‑appropriate plants for Washington include:
Orange honeysuckle (Lonicera ciliosa or other native honeysuckles) – West‑coast vines with clusters of orange or red tubular flowers, excellent for fences, trellises, and woodland edges.
Sitka columbine / red columbine (Aquilegia formosa) – A red and yellow native columbine that blooms from late spring into summer in part‑shade and open woodland conditions.
Penstemons (Penstemon spp.) – Western beardtongues with tubular flowers in red, pink, purple, or blue, thriving in sunny, well‑drained or rocky soils.
California fuchsia / hummingbird trumpet (Epilobium canum and related cultivars, where hardy) – A low, spreading plant with bright red‑orange tubular flowers, blooming late in the season and highly favored by hummingbirds.
Red‑flowered salvias (where hardy) – Heat‑tolerant salvias that provide long seasons of tubular blooms, especially in milder and drier Washington microclimates.
Native fuchsias or hardy ornamental fuchsias – Tubular flowers that hang below the plant, often blooming over a long season and particularly attractive in coastal, mild climates.
You can expand this list with regionally recommended natives from Pacific Northwest plant lists, local nurseries, and extension resources focused on hummingbird gardens in western and eastern Washington.
Creating a hummingbird‑friendly yard in Washington
To build a hummingbird‑friendly yard in Washington, integrate layers of vegetation, clean feeders, water features, and safe perches. Use trees and shrubs for structure, native perennials and vines for nectar, and feeders as a reliable supplement. Tailor plant choices to your region’s conditions—cool, wet coastal zones versus hotter, drier east‑side climates.
Avoid or greatly reduce pesticides, especially systemics, so hummingbirds still have access to small insects and spiders for protein. A yard filled with native plants and minimal chemical use will support more insects, healthier plants, and more hummingbirds.
Layered planting example for a Washington yard
In a western Washington yard with part sun, you might plant small native trees or large shrubs—like vine maple or red‑flowering currant—for structure and early‑spring blossoms. In front of them, plant drifts of penstemons, red columbine, and hardy salvias for extended blooms from late spring through summer.
Along fences or pergolas, train orange honeysuckle or other tubular‑flowered native vines. In sunny, well‑drained spaces or berms, add California fuchsia (where hardy) for late‑season nectar that keeps hummingbirds visiting into early fall. This layered approach gives hummingbirds food and cover at different heights and seasons.
For the best results do this:
Combine trees, shrubs, vines, and perennials to create a tiered garden with flowers and cover at multiple levels.
Match plants to your local conditions (coastal, Puget Sound, mountain, or east‑side), emphasizing drought‑tolerant natives where needed.
Place feeders as part of this network, where hummingbirds naturally move between flowers and shelter.
Plan for blooms from spring through fall
In much of Washington, you can plan for hummingbird blooms from early spring to fall. Use early bloomers like currants and columbines, mid‑season staples such as penstemons and salvias, and late bloomers like California fuchsia and some ornamental shrubs. This ensures hummingbirds find nectar whenever they’re present, from early Anna’s courtship in winter/spring to late Rufous and Calliope migrants in early fall.
My guide The Art of Attracting Hummingbirds to Your Yard helps readers choose plants by season and light conditions and shows how to design beds that keep hummingbirds coming in every part of the state.
Use feeders to supplement, not replace, flowers
Feeders provide a reliable nectar source alongside your plants, especially in early spring and late summer when wild blooms may be sparse because of drought or temperature swings. Hang them where they’re visible from your best flower beds so hummingbirds can move naturally between blossoms and sugar water.
If you’re tired of leaky bottle feeders and constant insect problems, this video explains why a simple saucer‑style Aspects feeder is my go‑to choice. You’ll see how the low, shallow 12‑ounce bowl helps you mix only what your hummingbirds can use before it spoils, while the built‑in ant moat, raised ports, and included Nectar‑Guard tips work together to keep ants, bees, and wasps out of the nectar. The drip‑proof design and twist‑off cover make cleaning and refilling quick and easy, so it’s realistic to keep nectar fresh even in warm weather. Made from tough, UV‑stabilized polycarbonate in the USA and backed by a true lifetime guarantee, this is a “buy it once” feeder you can count on year after year
Provide safe perches and nesting cover
Hummingbirds need secure perches to rest, preen, and watch over their feeding territories. Keep some shrubs, small trees, and even a few dead or thin branches in your yard instead of pruning everything into tight shapes. This more natural structure gives birds plenty of lookout posts and nesting options.
A hummingbird swing or decorative perch placed near a feeder gives birds a favorite “guard post,” bringing them into perfect view for you. Once hummingbirds adopt a perch, you’ll see them return to it repeatedly between feeding bouts.
Offer water in a way hummingbirds like
Consider adding a mister. Hummingbirds prefer shallow, moving water such as misters, drippers, and fine sprays over deep, still birdbaths. A mister set near shrubs or perennials lets them bathe in droplets and sip from wet foliage—a valuable resource during warm, dry periods or smoky days.
You can alsoinstall a shallow birdbath. A shallow birdbath with gently sloping edges can also work if kept clean and not too deep. Place water features near nectar plants and feeders so birds can move easily between feeding and bathing without crossing wide open spaces.
Skip pesticides and let insects thrive
All hummingbirds, including those in Washington, rely on insects and spiders for protein, especially during nesting season. Avoid or sharply limit pesticide use, particularly systemic insecticides that can contaminate nectar and insects alike. A yard rich in native plants, leaf litter, and natural micro‑habitats will support more insects and healthier hummingbirds.
My article Natural Pest Control Methods for Your Hummingbird Garden helps Washington readers manage pests with safer methods—companion planting, beneficial insects, physical barriers, and targeted organic treatments—without harming hummingbirds or their prey.
Keep Insects Away From Your Feeder
Bees, wasps, and ants can be serious feeder pests in Washington, especially in warm, dry periods. My guide How to Keep Bees and Ants Away From Your Hummingbird Feeder explains how to use ant moats, bee‑resistant feeder designs, better placement, and decoy feeders to keep nectar for hummingbirds only.
What hummingbirds live in Washington?
Four hummingbird species occur regularly in Washington: Anna’s, Rufous, Calliope, and Black‑chinned. Anna’s are year‑round residents in many western lowland areas, Rufous are widespread migrants and breeders, and Calliope and Black‑chinned occur mainly in eastern and interior parts of the state.
When do hummingbirds arrive in Washington?
Rufous Hummingbirds typically arrive between March and April, while Calliope and Black‑chinned Hummingbirds generally appear by April or May. Anna’s Hummingbirds may be present year‑round in many western areas.
When do hummingbirds leave Washington?
Most Rufous, Calliope, and Black‑chinned Hummingbirds leave Washington between late August and September. Anna’s Hummingbirds may remain all winter in coastal and lowland regions where food is available.
When should I put out hummingbird feeders in Washington?
In western Washington, you can keep at least one feeder up year‑round if you’re feeding Anna’s. If you prefer to feed only during the main season, put feeders out by early March. In eastern and interior Washington, aim for late March or early April.
When should I take down hummingbird feeders in Washington?
If you’re not feeding Anna’s over winter, you can remove most feeders after migration ends—typically in late September—once you’ve gone about one to two weeks without seeing hummingbirds. If you want to support wintering Anna’s in western Washington, keep one feeder up year‑round and protect it from freezing.
What is the best hummingbird nectar recipe for Washington?
Use 1 part plain white sugar to 4 parts water, boiled and cooled, with no red dye or other additives.
How often should I change hummingbird nectar in Washington?
In warm weather, change nectar every 1–2 days; in cooler spring and fall weather, change it every 3–5 days. Always replace nectar immediately if it looks cloudy, smells fermented, or shows any mold.
Which hummingbird feeder styles work best in Washington?
Small 8‑ to 12‑ounce saucer‑style feeders are ideal. They are easy to clean, resist leaks in wet and windy conditions, and let you offer manageable amounts of nectar that you can change frequently.
What plants attract hummingbirds in Washington?
Native and region‑appropriate plants such as orange honeysuckle, Sitka / red columbine, penstemons, California fuchsia (where hardy), red‑flowered salvias, and hardy fuchsias are all excellent for attracting hummingbirds in Washington gardens.
Where can I learn more about hummingbirds in Washington?
Regional resources include Birds Connect Seattle, local Audubon chapters, Washington bird‑atlas and bird‑guide sites, native‑plant organizations, and Pacific Northwest hummingbird‑gardening guides.
Further resources for Washington hummingbird watchers
– Overview of the four hummingbird species found in Washington (Anna’s, Rufous, Calliope, Black-chinned), including which are common and which are more rare.
Hummingbirds in Virginia: Ruby‑throated, Feeders, and Native Plants
Virginia’s hummingbird story revolves around the Ruby‑throated Hummingbird, the only species that breeds regularly in the state and a familiar summer visitor to gardens, porches, and forest edges. Other hummingbirds—especially Rufous—appear as uncommon fall and winter visitors, but Ruby‑throateds are the species most Virginians should plan for when creating hummingbird habitat. These birds arrive in spring, nest through the warm months, and migrate south again in early fall.
Key takeaways for Virginia hummingbirds
Ruby‑throated Hummingbirds are the only hummingbirds that regularly breed in Virginia and are common across all regions of the state where habitat and flowers are available. Rufous Hummingbirds and a handful of other western species show up as uncommon migrants or winter visitors, particularly at feeders that stay up and are watched closely.
Ruby‑throateds typically return to Virginia from mid‑April through early May and depart from late August through September, with most gone by early October. Homeowners can put feeders out by early April to be ready for the first arrivals, and keep them up through at least the end of September, or about two weeks after they last see a hummingbird. A simple 4‑to‑1 sugar‑water mix with no red dye, changed every 1–2 days in hot weather or every 3–5 days in cooler spells, plus native plants like cardinal flower, bee balm, coral honeysuckle, and trumpet vine, will reliably attract Ruby‑throateds to Virginia yards.
Virginia hummingbird basics
Virginia lies well within the core breeding range of Ruby‑throated Hummingbirds, which nest throughout the eastern United States. In Virginia, they occur in every region of the state, from the mountains to the coastal plain, using forest edges, woodlots, riparian corridors, farms, and suburban and urban yards that offer trees, shrubs, and nectar sources.
These birds winter mainly in Mexico and Central America and return north each spring, crossing the Gulf or moving along the Atlantic and inland flyways before arriving in the mid‑Atlantic. Their presence in Virginia is tied to flowering plants and insect availability; they feed on nectar for energy and small insects and spiders for protein, especially when raising chicks. Feeders, when maintained properly, supplement natural food sources and bring these birds into easy viewing range.
Although Ruby‑throateds are the focus, Virginia also hosts other hummingbirds during migration and winter. Rufous Hummingbirds, in particular, are being reported more often in fall and winter, and a few other western species are recorded as rarities. Feeders left up into late fall and early winter can sometimes attract these special visitors.
What hummingbirds do you get in Virginia?
For backyard birders across Virginia, the “everyday” hummingbird is the Ruby‑throated Hummingbird. Males show a bright ruby‑red throat, while
Ruby-throated Hummingbird
females and juveniles are green above and whitish below. They are widespread breeders across the state wherever there is a mix of trees, shrubs, and flowering plants.
Rufous Hummingbirds are the next most likely species in Virginia, usually as late fall or winter visitors at feeders that remain up after Ruby‑throateds
Rufous Hummingbird
depart. A few other western species—such as Black‑chinned, Calliope, Allen’s, Anna’s, and Rivoli’s—have been recorded as rare vagrants, usually in cooler months and often at well‑monitored feeders. These are exciting finds, but not birds you should expect every year.
Summary for Virginia:
Common, regular species: Ruby‑throated Hummingbird (statewide breeder and migrant).
Uncommon migrants / winter visitors: Rufous Hummingbird, with a handful of other western species as rare vagrants.
When do hummingbirds arrive and leave Virginia?
Virginia sits along a major migration route, so Ruby‑throated Hummingbirds pass through and breed across the state. Mature males are usually the first to arrive, often reaching Virginia around mid‑April, with females and younger birds following in late April and early May. By early to mid‑May, most areas of Virginia can expect hummingbirds at feeders and flowers.
Ruby‑throateds remain through the summer, nesting and feeding in gardens, woodland edges, and along waterways. Activity is often highest in June, July, and August, when adults are raising young and juveniles are learning to use feeders and flowers. In late summer, more birds may move through as northern breeders pass southward through Virginia on their way to wintering grounds.
Southbound migration begins as early as late August, with males generally departing first. Females and juveniles follow through September, and most Ruby‑throateds have left Virginia by late September or early October. Rufous and other western hummingbirds may remain later into fall, and a few overwinter in parts of the state where feeders and flowers remain available.
Typical timing for Virginia:
First arrivals: mid‑April through early May.
Peak season: roughly May through August, often strong into September.
Most birds leave: late September into early October, with some variation by region and weather.
When to put up and take down feeders in Virginia
When to put feeders out
Because Ruby‑throateds begin reaching Virginia in mid‑April, it’s wise to have feeders up by around April 1–15. In coastal and southern Virginia or in years with mild springs, you may want to hang at least one feeder in late March, especially if early arrivals have been reported nearby.
Once your feeders are up, keep them clean and filled so birds can depend on them. Early in the season you may see only a few visitors, but more hummingbirds will arrive through April and May as migration progresses and local birds settle in to nest.
When to take feeders down
You can safely keep feeders up through September and into early October, since Ruby‑throateds and occasional Rufous Hummingbirds can use Virginia yards into that period. A common approach is to leave feeders up until about two weeks after your last hummingbird sighting.
Leaving feeders up does not prevent hummingbirds from migrating; they leave based on day length and internal cues, not because feeders disappear. In Virginia, where winter hummingbirds are increasingly documented, keeping at least one feeder up into late fall or even winter can support these birds and provide unique viewing opportunities—as long as you can keep nectar thawed and fresh.
Best hummingbird nectar recipe
The best nectar recipe for Virginia hummingbirds is the standard 4‑to‑1 sugar‑water mix: 1 part plain white sugar to 4 parts water. Bring the water just to a boil, remove from heat, stir in the sugar until it dissolves completely, then let the mixture cool before filling your feeders.
Avoid red dyes, honey, brown sugar, or artificial sweeteners. The red parts of the feeder are enough to attract hummingbirds, and additives can be harmful or promote spoilage. This simple mix closely matches natural flower nectar and is safe for Ruby‑throateds and any visiting western hummingbirds when you keep it fresh.
All about nectar: how to use it effectively
In Virginia’s warm, often humid summers, nectar management is especially important. Use modest‑sized feeders so you’re not leaving large volumes of nectar out for too long. During hot spells, plan to change nectar frequently—often daily or every other day—to stay ahead of fermentation and mold.
In peak season (May through September), you can add extra feeders or fill them a bit more to handle busy periods, especially in August when southbound migrants pass through. As activity drops in late September and October, reduce the number of feeders or the amount of nectar so you can still change it often while serving the remaining birds.
My detailed nectar guide, How to Make Hummingbird Feeder Nectar, gives Virginia readers step‑by‑step instructions, batch size suggestions, and troubleshooting tips if nectar spoils quickly.
A clean hummingbird feeder is a must
Virginia’s summers can be hot and humid, which means sugar water can spoil fast. Each time you change nectar, rinse the feeder with hot water and scrub any surfaces that can trap residue—the reservoir, feeding ports, and seams. Small brushes designed for hummingbird feeders make it easier to get into tight spots.
If you see cloudiness, black spots, or slime, give the feeder a thorough cleaning. A soak in a mild vinegar solution or a diluted bleach solution (followed by very thorough rinsing and complete drying) will help keep mold under control. My feeder‑cleaning guide shows exactly how to do this and how often to clean in different temperature conditions.
Where to hang feeders in Virginia yards
Virginia yards range from city lots and suburban neighborhoods to forested hillside homes and rural properties, but the basics of feeder placement are the same. Hang feeders near flowers, shrubs, or small trees so hummingbirds have cover and perches, and place them about 4–5 feet above the ground for easy viewing and maintenance.
Keep feeders a safe distance from large windows or use decals and screens to reduce collision risk. In full‑sun locations and on hot afternoons, nectar can overheat quickly, so many people prefer spots with morning sun and afternoon shade or dappled light. In breezy areas, hang feeders where they won’t swing excessively—near posts, fences, or sheltered corners.
To reduce fighting among hummingbirds:
Use two or more small feeders rather than one big one.
Place feeders 10–15 feet apart or around corners so a territorial male can’t guard them all at once.
Learn how hummingbird aggression impacts your backyard. This video explores territorial behavior and offers practical solutions for attracting more hummingbirds to your feeders. Discover several helpful strategies to encourage a more harmonious environment.
Native plants that attract hummingbirds in Virginia
Native and region‑appropriate plants are one of the best ways to bring Ruby‑throateds (and any winter visitors) into your Virginia yard. Hummingbirds gravitate to tubular, nectar‑rich flowers in red and orange and will also use pink, purple, and blue blooms with good nectar.
Good native or region‑appropriate plants for Virginia include:
Cardinal flower (Lobelia cardinalis) – Brilliant red spikes that love moist soils and partial shade, perfect for rain gardens, stream edges, and low spots.
Bee balm / wild bergamot (Monarda didyma and relatives) – Showy summer flowers in red, pink, or purple that attract hummingbirds and many other pollinators.
Coral honeysuckle (Lonicera sempervirens) – A non‑invasive native vine with clusters of red‑orange tubular flowers; great on fences, arbors, and trellises.
Trumpet vine (Campsis radicans) – A vigorous native vine with large orange‑red trumpets; best planted where its spread can be managed.
Red buckeye (Aesculus pavia) – A small native tree with spring red flower spikes that hummingbirds favor, especially in woodland or edge plantings.
Jewelweed (Impatiens capensis) – An annual with orange spotted tubular flowers, thriving in damp, partly shaded spots and blooming in late summer.
You can expand this list with local recommendations from Virginia extension, native‑plant societies, and Chesapeake Bay gardening resources that focus on pollinator‑friendly plants and waterwise landscaping.
Creating a hummingbird‑friendly yard in Virginia
To create a hummingbird‑friendly yard in Virginia, combine layers of vegetation, clean feeders, water features, and perches. Use trees and shrubs for structure and nesting sites, flowering perennials and annuals for nectar, and feeders as a reliable supplement.
Avoid or greatly reduce pesticide use, especially systemic insecticides, because hummingbirds and their chicks depend heavily on small insects and spiders for protein. A yard rich in native plants, leaf litter, and natural structure will support more insects and, in turn, healthier hummingbirds.
Layered planting example for a Virginia yard
In a sunny or part‑sun Virginia yard, you might plant a small native tree—such as red buckeye or serviceberry—toward the back of a bed for structure and perches. In front of that, plant drifts of bee balm for mid‑summer nectar and color.
Along the front edges and in moist spots, add cardinal flower and patches of jewelweed so something is blooming from mid‑summer into fall. Train coral honeysuckle or trumpet vine along a fence or arbor nearby to create vertical nectar sources and give hummingbirds a natural flight path across the yard.
For the best results do this:
Combine trees, shrubs, vines, and perennials to create a layered garden with flowers and cover at several heights.
Emphasize native and region‑adapted plants that thrive in Virginia’s climate and support insects as well as hummingbirds.
Place feeders where hummingbirds naturally move between flower beds and cover, rather than on their own in open areas.
Plan for blooms from spring through fall
Virginia’s season is longer than in northern New England, so you can plan for nectar from early spring into fall. Use early‑bloomers such as red buckeye and early perennials, mid‑season workhorses like bee balm and other salvias, and late‑season flowers such as cardinal flower and jewelweed.
My guide The Art of Attracting Hummingbirds to Your Yard gives readers plant lists and layout ideas organized by season and light conditions, helping Virginians build beds that carry hummingbirds from April arrivals through fall migration.
Use feeders to supplement, not replace, flowers
Feeders provide a reliable nectar source alongside your plants, especially in early spring and late summer when wild blooms may be sparse because of drought or temperature swings. Hang them where they’re visible from your best flower beds so hummingbirds can move naturally between blossoms and sugar water.
If you’re tired of leaky bottle feeders and constant insect problems, this video explains why a simple saucer‑style Aspects feeder is my go‑to choice. You’ll see how the low, shallow 12‑ounce bowl helps you mix only what your hummingbirds can use before it spoils, while the built‑in ant moat, raised ports, and included Nectar‑Guard tips work together to keep ants, bees, and wasps out of the nectar. The drip‑proof design and twist‑off cover make cleaning and refilling quick and easy, so it’s realistic to keep nectar fresh even in warm weather. Made from tough, UV‑stabilized polycarbonate in the USA and backed by a true lifetime guarantee, this is a “buy it once” feeder you can count on year after year
Provide safe perches and nesting cover
Keep some shrubs, small trees, and a few dead or thin branches where hummingbirds can rest, display, and watch over feeders and flowers. Avoid pruning everything into hard, formal shapes; a softer outline with twiggy growth gives birds more perches and hiding spots.
A simple hummingbird swing or decorative perch placed a few feet from your feeder brings birds into perfect view and gives them a favorite lookout. Once hummingbirds adopt a perch, they often use it repeatedly to rest, preen, and defend feeding areas.
Offer water in a way hummingbirds like
Hummingbirds prefer shallow, moving water over deep, still birdbaths. A mister or fine sprayer set near shrubs or perennials lets them bathe in droplets and sip from wet leaves. This is especially appealing on hot, humid Virginia days.
You can also install a shallow birdbath with gently sloping edges—no more than about an inch deep—so hummingbirds can sip and splash safely. Place water features near your main hummingbird beds so birds can move easily between feeding and bathing.
My article How to Use Water Features to Attract Hummingbirds walks readers through the best kinds of misters, drippers, and shallow baths, how deep and how strong the water flow should be, and where to place them in the yard.
Skip pesticides and let insects thrive
Avoid or greatly limit pesticides, especially systemic insecticides, because hummingbirds and their chicks depend heavily on small insects and spiders for protein. A yard rich in native plants and free of heavy chemical use will support more insects, which means more natural food for hummingbirds.
My article Natural Pest Control Methods for Your Hummingbird Garden shows Virginia readers how to manage pests with safer methods like companion planting, beneficial insects, physical barriers, and targeted organic sprays, so they can protect plants without harming hummingbirds or their prey.
Keep Insects Away From Your Feeder
Bees, wasps, and ants can turn a hummingbird feeder into an insect magnet, especially in warm, humid weather. My guide How to Keep Bees and Ants Away From Your Hummingbird Feeder explains how to use ant moats, bee‑resistant feeders, smarter placement, and decoy feeders so nectar stays available for hummingbirds.
What hummingbirds live in Virginia?
Ruby‑throated Hummingbirds are the only hummingbirds that regularly breed in Virginia. Rufous Hummingbirds and a few other western species may appear as uncommon fall and winter visitors at feeders.
When do hummingbirds arrive in Virginia?
Ruby‑throated Hummingbirds usually arrive in Virginia from mid‑April through early May, with males typically arriving a bit earlier than females.
When do hummingbirds leave Virginia?
Most Ruby‑throated Hummingbirds leave Virginia between late September and early October, with males tending to depart first and females and young following later.
When should I put out hummingbird feeders in Virginia?
Put feeders out by early to mid‑April so they’re ready for the earliest arrivals; in southern or coastal Virginia, you may want to hang at least one feeder in late March.
When should I take down hummingbird feeders in Virginia?
Many people keep feeders up through September and early October, then take them down after going about one to two weeks without seeing hummingbirds. You can keep one feeder up longer if you want to watch for winter visitors.
What is the best hummingbird nectar recipe for Virginia?
Use 1 part plain white sugar to 4 parts water, boiled and cooled, with no red dye or other additives.
How often should I change hummingbird nectar in Virginia?
In hot weather, change nectar every 1–2 days; in milder spring and fall weather, change it every 3–5 days, and always replace it immediately if it looks cloudy or shows any mold.
Which hummingbird feeder styles work best in Virginia?
Small 8‑ to 12‑ounce saucer‑style feeders work well because they are easy to clean, resist leaks, and let you offer modest amounts of nectar that you can change frequently in warm, humid conditions.
What plants attract hummingbirds in Virginia?
Native plants such as cardinal flower, bee balm, coral honeysuckle, trumpet vine, red buckeye, and jewelweed are excellent for attracting Ruby‑throated Hummingbirds in Virginia gardens.
Where can I learn more about hummingbirds in Virginia?
Regional resources include the Virginia Bird Atlas, Virginia Department of Wildlife Resources, Virginia Department of Forestry’s native plant lists, local Audubon chapters, and national guides on Ruby‑throated Hummingbirds and pollinator‑friendly gardening.
Further resources for Virginia hummingbird watchers
Hummingbirds in Vermont: Ruby‑throated, Feeders, and Native Plants
Vermont’s hummingbird story centers on the Ruby‑throated Hummingbird, the only species that breeds regularly in the state and the one almost every backyard watcher will see. A few western hummingbirds may wander in very rarely, but Ruby‑throateds are the species to plan for when you design gardens and place feeders. These tiny birds return to Vermont each spring, nest through the short northern summer, and head south again in early fall.
Key takeaways for Vermont hummingbirds
Ruby‑throated Hummingbirds are the only hummingbirds you can reliably expect in Vermont; any other species should be treated as a rare visitor. Ruby‑throateds typically arrive in Vermont in early May, with most feeders seeing activity by mid‑May, and they depart from late September into early October.
Homeowners can put feeders out by the first week of May so they’re ready for the earliest arrivals, and keep them up through at least the end of September, or about two weeks after they last see a hummingbird. A simple 4‑to‑1 sugar‑water mix with no red dye, changed every 1–2 days in hot spells or every 3–5 days in cooler weather, plus native or region‑friendly plants like bee balm, cardinal flower, jewelweed, and trumpet honeysuckle, will reliably attract Ruby‑throateds to Vermont yards.
Vermont hummingbird basics
Vermont sits well within the core breeding range of the Ruby‑throated Hummingbird, which nests throughout the eastern United States and southern Canada. In the state, Ruby‑throateds use mixed woodlands, forest edges, hedgerows, riparian corridors, and human landscapes like yards, orchards, and village gardens that offer a mix of trees for nesting and flowers for nectar.
These hummingbirds winter in Mexico and Central America, then migrate north each spring, crossing the Gulf of Mexico or following the coast and interior before reaching New England. Their presence in Vermont is closely tied to the short growing season: they arrive as trees leaf out and early flowers open, feed heavily through the summer, and depart once days shorten and food sources decline. A well‑placed feeder can provide vital fuel on both the northbound and southbound legs of this journey.
Because Vermont’s climate is cool and the season is short, Ruby‑throateds must pack breeding, feeding, and feather molt into just a few months. Yards that combine flowering plants, clean feeders, and safe cover for perching and nesting can make a significant difference for these birds during that compressed timeframe.
What hummingbirds do you get in Vermont?
For practical purposes, Vermont is a one‑hummingbird state. The Ruby‑throated Hummingbird is the only species that breeds here and the only one
Ruby-throated Hummingbird
you should expect to see in your yard in a typical year. Males show the glittering red throat patch, while females and juveniles are green above and whitish below, with no red on the throat.
Occasionally, western hummingbirds such as Rufous or Allen’s may appear in the Northeast as rare vagrants, often in late fall or early winter at
Rufous Hummingbird
feeders that remain up. These records are exceptional and usually confirmed by photographs or by hummingbird banders. For most Vermont birders, every hummingbird at the feeder from May through September will be a Ruby‑throated.
Summary for Vermont:
Common, regular species: Ruby‑throated Hummingbird (statewide breeder during the warm months).
Rare visitors: Western hummingbirds like Rufous as very occasional vagrants, mostly in late fall.
When do hummingbirds arrive and leave Vermont?
Vermont lies toward the northern edge of the Ruby‑throated’s breeding range, so birds arrive later and leave earlier than they do farther south. Most years, the first Ruby‑throateds appear in southern and low‑lying parts of the state in the first half of May, with numbers building steadily through mid‑ to late May.
By June, Ruby‑throateds are widely distributed across Vermont, pairing up, nesting, and visiting both wildflowers and feeders. July and August are high‑activity months, with adults feeding young and juveniles learning to use feeders and flowers. In late summer and early fall, family groups and passing migrants all move through at once, so activity around feeders often peaks in August and early September.
Southbound migration through Vermont usually runs from late August into early October. Males tend to leave first, with females and juveniles following somewhat later. In most years, Ruby‑throateds are largely gone from Vermont by early October, though a very late individual may occasionally linger if warm weather and food sources hold on.
Typical timing for Vermont:
First arrivals: roughly early to mid‑May.
Peak season: June through August, often strong into early September.
Most birds leave: late September into early October.
When to put up and take down feeders in Vermont
When to put feeders out
Because Ruby‑throateds usually reach Vermont in early May, it’s wise to have feeders up by the first week of May. If you live in a slightly milder, low‑lying area or simply want to be extra ready, you can hang one feeder in late April as a “scout” feeder.
Once your feeders are up, keep them clean and filled through the season. Early in May, you might not see much activity at first, but migrants and returning local birds will quickly add your feeders to their regular routes as soon as they find them.
When to take feeders down
You can safely keep feeders up through the end of September, since Ruby‑throateds commonly pass through Vermont into late September. A simple rule is to leave at least one feeder up until about two weeks after your last hummingbird sighting.
Leaving feeders up does not stop hummingbirds from migrating. They leave based on day length and internal changes, not because feeders run out. Keeping nectar available into early October mainly helps late migrants refuel.
Best hummingbird nectar recipe
The best nectar recipe for Vermont hummingbirds is the standard mix used across the continent: 1 part plain white sugar to 4 parts water. Bring the water just to a boil, remove from heat, stir in the sugar until it completely dissolves, then let the mixture cool before filling your feeders.
Skip red dyes, honey, brown sugar, or artificial sweeteners. The red parts of the feeder are enough to attract Ruby‑throateds, and additives can cause problems. This simple 4‑to‑1 sugar‑water recipe closely matches natural flower nectar and is safe for hummingbirds when you keep it fresh.
All about nectar: how to use it effectively
Safe, homemade nectar is one of the easiest and most effective ways to support Ruby‑throateds in Vermont’s short season. Use modest‑sized feeders (8–12 ounces) so you’re not leaving large quantities of nectar out longer than necessary, especially during warm spells.
In June through August, you can add an extra feeder or fill them a bit more if you’re seeing a lot of activity. As migration tapers off in late September, let nectar levels drop so you can keep changing it frequently while still offering enough for the last migrants.
My main nectar article, How to Make Hummingbird Feeder Nectar, walks Vermont readers through the recipe, batch sizes for different feeder volumes, how often to change nectar at different temperatures, and common mistakes to avoid.
A clean hummingbird feeder is a must
Even in a cooler state like Vermont, summer heat and sun can make nectar spoil faster than you’d expect. Each time you change nectar, rinse the feeder with hot water and scrub any surfaces that can trap residue, especially the feeding ports and seams. Small brushes designed for hummingbird feeders make this easy.
If you see black spots, cloudiness, or slime, give the feeder a more thorough cleaning. A soak in a mild vinegar solution or a diluted bleach solution (followed by very thorough rinsing and complete drying) keeps mold under control. My feeder‑cleaning guide gives step‑by‑step instructions and shows which tools and routines work best.
Where to hang feeders in Vermont yards
Vermont yards range from village lots and farmsteads to wooded hillside properties, but good feeder placement is similar everywhere. Hang feeders near flowers, shrubs, or small trees so hummingbirds have perches and quick cover, and place them about 4–5 feet above the ground so they’re easy to watch and maintain.
Keep feeders a few feet from large windows, or use decals or screens to reduce collision risk. In open, sunny yards, strong midday sun can heat nectar quickly, so many people prefer spots with morning sun and afternoon shade or dappled light under a small tree. In exposed, breezy sites, hang feeders where they won’t swing wildly—near a post, fence, or sheltered corner.
To reduce fighting among hummingbirds:
Use two or more small feeders rather than one big one.
Place feeders 10–15 feet apart or around corners so a territorial male can’t guard them all at once.
Learn how hummingbird aggression impacts your backyard. This video explores territorial behavior and offers practical solutions for attracting more hummingbirds to your feeders. Discover several helpful strategies to encourage a more harmonious environment.
Native plants that attract hummingbirds in Vermont
Native and region‑adapted plants are one of the best ways to attract Ruby‑throated Hummingbirds in Vermont. They favor tubular, nectar‑rich flowers in red and orange, but will also use purple, pink, and white blooms with good nectar.
Good native or region‑appropriate plants for Vermont include:
Bee balm / Monarda (Monarda didyma and relatives) – A classic hummingbird plant with shaggy red or pink blooms in mid‑ to late summer, excellent in sunny or lightly shaded borders.
Cardinal flower (Lobelia cardinalis) – Brilliant red flower spikes that thrive in moist soils, rain gardens, and stream edges, often drawing hummingbirds in close.
Trumpet honeysuckle (Lonicera sempervirens) – A non‑invasive vine with clusters of red‑orange tubular flowers, great on fences, arbors, or trellises.
Jewelweed / spotted touch‑me‑not (Impatiens capensis) – A self‑seeding annual with orange spotted tubular flowers that blooms in late summer in damp, partly shaded spots.
Red columbine (Aquilegia canadensis) – Nodding red‑and‑yellow spring flowers that provide early‑season nectar under trees or along woodland edges.
Foxglove beardtongue (Penstemon digitalis) – White to pink tubular flowers on upright spikes, tolerant of a range of soils and attractive to hummingbirds and other pollinators.
You can supplement these with hardy salvias, phlox, and other nectar‑rich perennials suited to Vermont’s climate, plus well‑chosen annuals in containers near seating areas for close views.
Creating a hummingbird‑friendly yard in Vermont
To make a Vermont yard truly hummingbird‑friendly, combine layers of vegetation, clean feeders, water, and safe perches. Use trees and shrubs for structure, flowering perennials and annuals for nectar, and a couple of feeders as reliable “backup” food.
Avoid or greatly limit pesticides, especially systemic insecticides, because hummingbirds and their chicks rely heavily on tiny insects and spiders for protein. A yard full of native plants and minimal chemicals will naturally support more insects and stronger plants.
Layered planting example for a Vermont yard
In a sunny or part‑sun Vermont yard, you might plant a small ornamental or native tree—such as serviceberry or crabapple—at the back of a bed to provide perches and early blossoms. In front of that, plant drifts of bee balm, foxglove beardtongue, and other perennials that bloom from early to late summer.
Along the front edges and in moist or shaded corners, add red columbine, cardinal flower, and patches of jewelweed so something is blooming from late spring into early fall. Train trumpet honeysuckle along a fence or trellis nearby to add vertical nectar sources and create a hummingbird “flyway” across the yard.
For the best results do this:
Combine small trees, shrubs, vines, and perennials to create a tiered garden with flowers and cover at different heights.
Emphasize native and region‑adapted plants that thrive in Vermont’s climate and support insects as well as hummingbirds.
Place feeders where hummingbirds naturally move between flower beds and shelter, rather than in isolation.
Plan for blooms from spring through fall
Because Vermont’s season is short, it helps to plan for continuous bloom from May through September. Use early‑bloomers like red columbine, mid‑season flowers such as bee balm and foxglove beardtongue, and late‑season stars like jewelweed and cardinal flower.
My guide The Art of Attracting Hummingbirds to Your Yard gives readers simple plant lists organized by season and light conditions, plus layout ideas that are easy to adapt to Vermont yards.
Use feeders to supplement, not replace, flowers
Feeders provide a reliable nectar source alongside your plants, especially in early spring and late summer when wild blooms may be sparse because of drought or temperature swings. Hang them where they’re visible from your best flower beds so hummingbirds can move naturally between blossoms and sugar water.
If you’re tired of leaky bottle feeders and constant insect problems, this video explains why a simple saucer‑style Aspects feeder is my go‑to choice. You’ll see how the low, shallow 12‑ounce bowl helps you mix only what your hummingbirds can use before it spoils, while the built‑in ant moat, raised ports, and included Nectar‑Guard tips work together to keep ants, bees, and wasps out of the nectar. The drip‑proof design and twist‑off cover make cleaning and refilling quick and easy, so it’s realistic to keep nectar fresh even in warm weather. Made from tough, UV‑stabilized polycarbonate in the USA and backed by a true lifetime guarantee, this is a “buy it once” feeder you can count on year after year
Provide safe perches and nesting cover
Keep some shrubs, small deciduous trees, and a few dead or thin branches where hummingbirds can rest and watch over feeders and flowers. Avoid pruning everything into tight, formal shapes; a softer outline with twiggy tips gives birds more places to perch and display.
A simple hummingbird swing or decorative perch placed a few feet from your feeder brings birds into perfect view and gives them a favorite lookout. Hummingbirds spend more time perched than many people realize, so providing good perches increases the time they spend in your yard.
Offer water in a way hummingbirds like
Hummingbirds prefer moving, shallow water to deep birdbaths. A mister or fine sprayer set near shrubs or perennials lets birds bathe in droplets and sip from wet leaves.
You can also install a shallow birdbath with gently sloping edges—no more than about an inch of water—so hummingbirds can sip and splash at the edge. Place water features near, but not directly over, your best flower beds so birds can shuttle easily between feeding and bathing.
Skip pesticides and let insects thrive
Avoid or greatly limit pesticides, especially systemic insecticides, because hummingbirds and their chicks depend on small insects and spiders for protein. A yard rich in native plants naturally supports more insects, which in turn support healthier, more successful hummingbirds.
My article Natural Pest Control Methods for Your Hummingbird Garden shows Vermont readers how to manage pests with safer methods—companion planting, beneficial insects, physical barriers, and targeted organic sprays—so they protect their plants without harming hummingbirds or their food sources.
Keep Insects Away From Your Feeder
Insect problems at feeders are common everywhere. My guide How to Keep Bees and Ants Away From Your Hummingbird Feeder shows how to use ant moats, bee‑resistant feeders, smart placement, and even decoy feeders so sugar water stays available for hummingbirds instead of bees and ants.
What hummingbirds live in Vermont?
Ruby‑throated Hummingbirds are the only hummingbirds that regularly breed in Vermont, and they are the species you should expect at your feeders and flowers.
When do hummingbirds arrive in Vermont?
Ruby‑throated Hummingbirds typically arrive in Vermont in early to mid‑May, with most areas seeing regular activity by the middle of the month.
When do hummingbirds leave Vermont?
Most Ruby‑throated Hummingbirds leave Vermont from late September into early October, with activity dropping sharply by mid‑October.
When should I put out hummingbird feeders in Vermont?
Put feeders out by about the first week of May so they’re ready for the earliest arrivals; in mild areas you can hang one feeder in late April if you want an extra margin.
When should I take down hummingbird feeders in Vermont?
A common approach is to keep feeders up through the end of September, then take them down after you have gone about one to two weeks without seeing hummingbirds.
What is the best hummingbird nectar recipe for Vermont?
Use 1 part plain white sugar to 4 parts water, boiled and cooled, with no red dye or other additives.
How often should I change hummingbird nectar in Vermont?
In warm weather, change nectar every 1–2 days; in cooler spring and fall weather, change it every 3–5 days, and always replace it immediately if it looks cloudy or shows any mold.
Which hummingbird feeder styles work best in Vermont?
Small 8‑ to 12‑ounce saucer‑style feeders work well because they are easy to clean, resist leaks, and let you offer modest amounts of nectar you can change frequently.
What plants attract hummingbirds in Vermont?
Natives and region‑adapted plants such as bee balm, cardinal flower, trumpet honeysuckle, jewelweed, red columbine, and foxglove beardtongue are excellent choices to attract Ruby‑throateds to Vermont gardens.
Where can I learn more about hummingbirds in Vermont?
Regional resources include the Vermont Atlas of Life, local Audubon chapters, native‑plant and wildflower groups, and national guides to Ruby‑throated Hummingbirds and pollinator‑friendly gardening.
Further resources for Vermont hummingbird watchers
Hummingbirds in Utah: Broad‑tailed, Black‑chinned, Feeders, and Native Plants
Utah’s hummingbird story focuses on a mix of western species rather than a single “default” bird. Broad‑tailed and Black‑chinned Hummingbirds are the most widespread breeders, with Rufous and Calliope Hummingbirds passing through as migrants and Costa’s, Anna’s, and Ruby‑throated appearing only rarely. These tiny birds use Utah’s mountains, canyons, foothills, deserts, and irrigated valleys from spring through early fall, and respond quickly to well‑placed feeders and native plants in yards across the state.
Key takeaways for Utah hummingbirds
Broad‑tailed and Black‑chinned Hummingbirds are the species most backyard birders see regularly in Utah, with Broad‑taileds especially common in higher‑elevation mountains and foothills and Black‑chinneds more frequent in lowland deserts, river corridors, and urban areas. Rufous and Calliope Hummingbirds are regular migrants that pass through in smaller numbers, particularly in late summer and early fall, and a few other species (like Costa’s and Anna’s) are rare visitors.
Hummingbirds typically reach Utah in April and May, with arrivals moving north and upslope as snow melts and flowers bloom, and they remain through late summer before most birds depart in September. Homeowners can put feeders out by early to mid‑April so they are ready for the first arrivals, and keep them up through September, or at least two weeks after they stop seeing hummingbirds. A simple 4‑to‑1 sugar‑water mix with no red dye, changed every 1–2 days in hot weather or every 3–5 days in cooler mountain conditions, plus native and region‑friendly plants like penstemons, red columbine, beardtongues, and salvias, will reliably attract hummingbirds to Utah yards.
Utah hummingbird basics
Utah lies in the core breeding range of several western hummingbirds. Broad‑tailed Hummingbirds breed widely in the central and southern Rockies and use Utah’s mountains, foothills, and high plateaus, while Black‑chinneds favor lower‑elevation canyons, desert scrub, and river corridors across much of the state. Rufous and Calliope Hummingbirds migrate through Utah, especially in late summer and fall, and a handful of other species appear rarely as vagrants.
These hummingbirds winter mainly in Mexico and Central America (and, for Rufous and Calliope, also along the Pacific Coast and in the mountains of western Mexico), then move north each spring through the interior West. Their presence in Utah is closely tied to flowering shrubs, wildflowers, and insect availability, but they readily supplement those resources with sugar‑water feeders in towns, farmsteads, and mountain communities.
Because Utah spans hot low deserts and cool alpine habitats, hummingbird timing and species mix can change with elevation. Low valleys and southern deserts may see hummingbirds earlier in spring and later into fall, while higher elevations concentrate birds into the short snow‑free season when wildflowers and feeders are both abundant.
What hummingbirds do you get in Utah?
For most Utah backyard birders, the “everyday” hummingbirds are Broad‑tailed and Black‑chinned. Broad‑tailed Hummingbirds are especially common
Broad-tailed-Hummingbird
in mountains and foothills, where males’ loud wing trills are a familiar sound in summer meadows and aspen groves. Black‑chinneds are more typical along rivers, canyons, desert scrub, and in urban and suburban yards at lower elevations, particularly along the Wasatch Front and in southern Utah towns.
Rufous Hummingbirds pass through Utah in both spring and fall, but are most noticeable in late summer and early fall as they move south through
Black-chinned Hummingbird
gardens, high mountain meadows, and feeder setups. Calliope Hummingbirds—the smallest birds in the U.S.—also migrate through in smaller numbers, often at higher elevations and in mountain corridors. Costa’s, Anna’s, and even Ruby‑throated have been recorded as rarities, but these should be considered special finds rather than expected yard birds.
Summary for Utah:
Common, regular species: Broad‑tailed Hummingbird (higher elevations), Black‑chinned Hummingbird (lower elevations, canyons, cities).
Regular migrants: Rufous and Calliope Hummingbirds, mainly in late summer and early fall.
Rare visitors: Costa’s, Anna’s, and Ruby‑throated Hummingbirds and a few other western species as vagrants.
When do hummingbirds arrive and leave Utah?
Utah is north and upslope of many hummingbird wintering grounds, so birds arrive later than in the Southwest deserts and Gulf states and leave
Calliope Hummingbird
earlier than in the deep South. Broad‑tailed and Black‑chinned Hummingbirds typically reach Utah in April and May, with low‑elevation sites seeing them first and high‑elevation mountain meadows filling in later as snow recedes.
By May and June, hummingbirds are widespread across Utah, with males displaying, females building nests, and birds feeding at both wildflowers and feeders. Summer remains the main hummingbird season in much of the state, though some desert and canyon areas may see strong numbers earlier in spring.
Fall migration typically kicks in by late July, with Rufous and some Broad‑taileds moving south through August and September, and Calliopes passing through mountain and foothill habitats around the same time. Most hummingbirds are gone from Utah by early to mid‑October, especially at higher elevations, though a few individuals may linger longer in mild lowland spots.
Typical timing for Utah:
First arrivals: April into early May, earlier at low elevation, later in mountains.
Costa’s hummingbird
Peak season: roughly May through August, with strong numbers in June–August.
Most birds leave: late August through September, with many gone by early to mid‑October.
Rufous and Calliope: mainly late summer and early fall migrants, especially in August and September.
When to put up and take down feeders in Utah
When to put feeders out
Because hummingbirds usually arrive in Utah by mid‑April to early May, it is a good idea to have feeders outside by early to mid‑April in most
Anna’s hummingbird
areas. In warmer valleys and southern Utah, you can put feeders up in early April to catch the first Black‑chinneds and Broad‑taileds as they move north.
If you live at higher elevation, consider putting at least one feeder up shortly before wildflowers begin blooming—often late April into May—so that migrating and returning birds have a reliable food source as they arrive in still‑thawing landscapes. Once your feeders are up, keep them clean and filled through the summer so hummingbirds can depend on them throughout their short mountain season.
When to take feeders down
You can safely keep feeders up through September, since Broad‑taileds, Black‑chinneds, Rufous, and Calliopes commonly use Utah yards into that
Ruby-throated Hummingbird
month. A simple rule is to leave at least one feeder up into late September or early October and then take it down after you have gone about one to two weeks without seeing any hummingbirds.
Leaving feeders up does not delay migration; hummingbirds depart based on day length and internal cues, not the presence of sugar water. In Utah’s colder climate, most birds leave on their own schedule, and keeping feeders out mainly helps late migrants refuel, especially at higher elevations where frost can arrive early.
Best hummingbird nectar recipe
The best nectar recipe for Utah hummingbirds is the same standard mix used throughout North America: 1 part plain white sugar to 4 parts water. Bring the water to a brief boil, remove from heat, stir in the sugar until it completely dissolves, and then let the mixture cool before filling clean feeders.
Do not add red dye, honey, brown sugar, or artificial sweeteners. The red parts of the feeder are enough to attract hummingbirds, and dyes or alternative sugars are not recommended. The 4‑to‑1 mixture closely matches natural flower nectar concentrations and provides a safe, familiar food source for Broad‑taileds, Black‑chinneds, Rufous, Calliopes, and any rarer visitors.
All about nectar: how to use it effectively
Safe, homemade nectar is one of the simplest and most effective ways to support hummingbirds in Utah, where seasons are short and weather swings can be dramatic. Using modest‑sized feeders (for example, 8–12 ounces) helps you offer fresh nectar without letting sugar water sit too long, especially when daytime temperatures spike in summer.
During peak activity in May through August, you can add an extra feeder or two or fill them a bit more to handle higher traffic. As activity drops in September and early October, reduce the number of feeders or how much you fill them so you’re still changing nectar frequently while serving late migrants.
My main nectar article, How to Make Hummingbird Feeder Nectar, will give Utah readers the details on the 4‑to‑1 recipe, batch sizes, how often to change nectar at different temperatures, ingredients to avoid, and how to keep insects from taking over.
A clean hummingbird feeder is a must
Even in Utah’s relatively dry climate, warm summer days can spoil nectar quickly and allow mold and bacteria to build up in feeders if they’re not cleaned regularly. Each time you change nectar, rinse the feeder with hot water and scrub ports, seams, and any surfaces where residue can build up, using small brushes designed for hummingbird feeders.
For stubborn residue or mold, a soak in a mild vinegar solution or a diluted bleach solution (about 1 part household bleach to 10 parts water), followed by a very thorough rinse and complete air‑drying, keeps feeders safe. Your detailed feeder‑cleaning guide shows step‑by‑step how to remove mold, adjust cleaning frequency when temperatures swing from cold to hot, and choose brushes and ant moats that work in both lowland and mountain setups.
Where to hang feeders in Utah yards
Utah yards range from small urban lots along the Wasatch Front to high‑elevation cabins and desert homesteads, but good feeder placement follows the same basic rules. Hang feeders near flowers, shrubs, or small trees so hummingbirds have perches and quick cover, and place them about 4–5 feet above the ground to balance safety and easy access.
Keep feeders a few feet away from large windows or use decals or screens to reduce collision risk. In hot, exposed locations—like south‑facing desert patios—strong sun can overheat nectar, so many Utah birders prefer sites with morning sun and afternoon shade or dappled light, especially in July and August. In windy canyon mouths and ridge tops, choose spots sheltered by buildings, fences, or vegetation so feeders don’t swing excessively and birds can feed comfortably.
To reduce fighting among hummingbirds:
Use two or more small feeders rather than one big one.
Place feeders 10–15 feet apart or around corners so a territorial male can’t guard them all at once.
Learn how hummingbird aggression impacts your backyard. This video explores territorial behavior and offers practical solutions for attracting more hummingbirds to your feeders. Discover several helpful strategies to encourage a more harmonious environment.
Native plants that attract hummingbirds in Utah
Native and region‑adapted plants are one of the best ways to attract hummingbirds in Utah. Hummingbirds favor tubular, nectar‑rich flowers in red, orange, and bright pink, but they will also use purple, blue, and white flowers with good nectar.
Good native or region‑appropriate plants for Utah include:
Penstemons (Penstemon spp.) – Classic western perennials with tubular flowers in red, pink, purple, and blue that thrive in sunny, well‑drained beds and rocky slopes.
Red columbine (Aquilegia formosa and related species) – Nodding red and yellow spring flowers that provide early nectar along streams and in shaded mountain gardens.
Scarlet gilia / skyrocket (Ipomopsis aggregata) – A showy red wildflower of open slopes and meadows that hummingbirds heavily use in summer.
Beardtongues (many Penstemon species) – Additional penstemons and related beardtongue species that bloom in succession, extending the nectar season in xeric gardens.
Salvias (where hardy, such as Salvia greggii in warmer areas) – Long‑blooming shrubs and perennials with tubular flowers; in milder parts of Utah, hardy salvias can provide nectar from late spring into fall.
Trumpet honeysuckle or other non‑invasive tubular vines – Where climate allows, tubular‑flowered vines add vertical nectar sources along fences and pergolas.
Bee balm / Monarda (in cooler, moist gardens) – In higher, moister areas, bee balm can provide colorful mid‑summer blooms that attract hummingbirds and other pollinators.
You can expand this list with regionally recommended natives from Utah extension, local native‑plant societies, and Rocky Mountain hummingbird habitat guides, focusing on drought‑tolerant species suited to your readers’ elevation and precipitation.
Creating a hummingbird‑friendly yard in Utah
To turn a Utah yard into quality hummingbird habitat, combine layers of vegetation, clean feeders, water, and safe perches. Focus on small trees and shrubs for structure, flowering perennials and vines for nectar, and a few well‑placed feeders to supplement natural sources.
Limit pesticides, especially systemic insecticides, because hummingbirds and their chicks rely heavily on tiny insects and spiders for protein. Even a small city yard, mountain cabin clearing, or desert courtyard can become hummingbird‑friendly with a few carefully chosen plants and one or two properly maintained feeders.
Layered planting example for a Utah yard
In a sunny or part‑sun Utah yard, you might plant a small ornamental or native tree—such as Gambel oak or serviceberry—at the back of a bed for structure and perches. In front of that, use drifts of penstemons and beardtongues for mid‑season nectar and color.
Along the front and in rockier spots, add scarlet gilia and other drought‑tolerant wildflowers, while in cooler, moister corners you can incorporate red columbine and bee balm for extended blooming. In warmer microclimates, hardy salvias or tubular vines can add long‑season nectar. This layered combination provides cover, perches, and nectar across much of the hummingbird season, even in Utah’s challenging climate.
For the best results do this:
Combine small trees, shrubs, vines, and perennials to create a tiered garden with flowers and cover at different heights.
Emphasize native and region‑adapted plants that thrive in Utah’s elevation, sun, and moisture conditions and support insects as well as hummingbirds.
Place feeders where hummingbirds naturally move between flower beds and shelter, rather than in isolation.
Plan for blooms from spring through fall
Include early, mid‑season, and late‑blooming plants so something is always flowering while hummingbirds are present. At higher elevations, focus on plants that bloom steadily during the shorter summer, while in low valleys you can use a longer sequence of spring‑through‑fall bloomers.
My guide The Art of Attracting Hummingbirds to Your Yard gives readers plant lists for spring, summer, and fall bloomers and advice on layering plants, choosing options for sun and shade, and adapting designs to different climates—perfect for someone gardening in Utah’s varied elevations.
Use feeders to supplement, not replace, flowers
Feeders provide a reliable nectar source alongside your plants, especially in early spring and late summer when wild blooms may be sparse because of drought or temperature swings. Hang them where they’re visible from your best flower beds so hummingbirds can move naturally between blossoms and sugar water.
If you’re tired of leaky bottle feeders and constant insect problems, this video explains why a simple saucer‑style Aspects feeder is my go‑to choice. You’ll see how the low, shallow 12‑ounce bowl helps you mix only what your hummingbirds can use before it spoils, while the built‑in ant moat, raised ports, and included Nectar‑Guard tips work together to keep ants, bees, and wasps out of the nectar. The drip‑proof design and twist‑off cover make cleaning and refilling quick and easy, so it’s realistic to keep nectar fresh even in warm weather. Made from tough, UV‑stabilized polycarbonate in the USA and backed by a true lifetime guarantee, this is a “buy it once” feeder you can count on year after year
Provide safe perches and nesting cover
Keep some shrubs, small deciduous trees, and a few dead or thin branches where hummingbirds can rest, display, and look out over feeders and flower beds. Avoid pruning everything into tight, bare shapes; a slightly softer outline with twiggy tips gives birds more places to sit and watch over feeders and flowers.
A simple hummingbird swing or decorative perch placed a few feet from your feeder brings birds into perfect view and gives them a “guard post.” Hummingbirds may spend more time perched than many people realize, using these spots to rest, preen, digest nectar, and defend their favorite feeding areas.
Offer water in a way hummingbirds like
In Utah, water can be as attractive as nectar. Hummingbirds prefer shallow, moving water—fine sprays, mists, and droplets on leaves—rather than deep, still birdbaths. A mister or fine sprayer set near shrubs or perennials lets birds bathe in droplets and sip from wet foliage.
You can also install a shallow birdbath with gently sloping edges—no more than about an inch of water—so hummingbirds can sip and splash at the edge. Position water features near, but not directly over, key flower beds so birds can move easily between bathing and feeding.
My article How to Use Water Features to Attract Hummingbirds shows readers exactly how deep water should be, what kind of motion works best, and where to place features so birds feel safe but are still easy to watch.
Skip pesticides and let insects thrive
Avoid or greatly limit pesticides, especially systemic insecticides, because hummingbirds and their chicks rely heavily on tiny insects and spiders for protein. A healthy, chemical‑reduced yard with native plants will naturally support more insects, which means more high‑quality food for hummingbirds.
Your article Natural Pest Control Methods for Your Hummingbird Garden shows Utah readers how to prevent and manage pests using natural methods—companion planting, encouraging beneficial insects, organic sprays, and physical barriers—so they protect their plants without harming hummingbirds or their insect prey.
Keep Insects Away From Your Feeder
Bees, wasps, and ants can take over a hummingbird feeder anywhere, including Utah, but you don’t have to give up and bring the feeder in. Your guide How to Keep Bees and Ants Away From Your Hummingbird Feeder explains how to use ant moats, bee‑resistant feeders, smarter placement, and decoy feeders that draw insects away so the sugar water stays clean and available for hummingbirds only.
If readers are curious how Utah compares to other parts of the country, they can see arrival and departure times for every state in “When to Feed Hummingbirds: A State‑by‑State Feeder Guide.” It’s handy if they travel, have family in other regions, or just want the big migration picture.
FAQ for Utah hummingbirds
What hummingbirds live in Utah?
Broad‑tailed and Black‑chinned Hummingbirds are the most common hummingbirds in Utah, with Broad‑taileds more common in mountains and foothills and Black‑chinneds in lower‑elevation canyons, deserts, and urban areas. Rufous and Calliope are regular migrants, and a few other species appear rarely as vagrants.
When do hummingbirds arrive in Utah?
Most hummingbirds arrive in Utah between April and May, earlier at low elevations and in southern parts of the state and later in high mountain areas as snow melts.
When do hummingbirds leave Utah?
Most hummingbirds leave Utah between late August and September, with many gone by early to mid‑October, especially at higher elevations.
When should I put out hummingbird feeders in Utah?
Put feeders out by early to mid‑April so they are ready for the earliest arrivals, and earlier in warm lowland areas or southern Utah if you want an extra margin.
When should I take down hummingbird feeders in Utah?
A common approach is to keep feeders up through September and then take them down after you have gone about one to two weeks without seeing hummingbirds, unless you want to watch for very late migrants into early October.
What is the best hummingbird nectar recipe for Utah?
Use 1 part plain white sugar to 4 parts water, boiled and cooled, with no red dye or other additives.
How often should I change hummingbird nectar in Utah?
In warm weather, change nectar every 1–2 days; in cooler spring and fall weather, change it every 3–5 days, and always replace it immediately if it looks cloudy, smells fermented, or shows any mold.
Which hummingbird feeder styles work best in Utah?
Small 8‑ to 12‑ounce saucer‑style feeders are ideal because they are easy to clean, resist leaks, and let you offer fresh nectar in modest amounts that will not spoil quickly in summer heat.
What plants attract hummingbirds in Utah?
Western natives such as penstemons, red columbine, scarlet gilia, beardtongues, hardy salvias, and bee balm in suitable sites are excellent choices to attract hummingbirds in Utah gardens.
Where can I learn more about hummingbirds in Utah?
Regional resources include Wild About Utah, the Jordan River Commission, Utah Native Plant Society guides, local Audubon chapters, and national references on western hummingbirds and Rocky Mountain pollinator gardens.
– Short overview of Utah’s main hummingbird species (Broad-tailed, Black-chinned, Rufous, Calliope), their migration, and why feeders should stay up for two weeks after your last bird.
Hummingbirds in Texas: Ruby‑throated, Black‑chinned, Feeders, and Native Plants
Texas’s hummingbird story is richer than most states, with several regular species instead of just one. Ruby‑throated and Black‑chinned Hummingbirds are the most widespread breeders, joined by many migrant and wintering western species, especially along the Gulf Coast, in Central Texas, and the Trans‑Pecos. Hummingbirds pass through Texas twice each year, arriving as early as late February and staying into October, with some individuals and species present somewhere in the state year‑round.
Key takeaways for Texas hummingbirds
Ruby‑throated and Black‑chinned Hummingbirds are the species most backyard birders see regularly in Texas, with Ruby‑throateds dominating in the east and Black‑chinneds in much of central and western Texas. Rufous, Allen’s, Calliope, Anna’s, Broad‑tailed, and other western hummingbirds also migrate through or winter in parts of Texas, particularly near the Gulf Coast, the Hill Country, and the far west.
Hummingbirds typically reach Texas in late February to March, with arrivals moving north and west across the state through April and May. Many species remain through summer in areas where they breed or linger, then head south from August through October, with Ruby‑throateds gathering in large numbers along the Gulf Coast in late summer and early fall.
Homeowners can put feeders out by early March (around March 15 at the latest) so they are ready for the first birds, and keep them up through October, or at least two weeks after they stop seeing hummingbirds. A simple 4‑to‑1 sugar‑water mix with no red dye, changed every 1–2 days in hot weather or every 3–5 days in cooler spells, plus native Texas plants like Turk’s cap, scarlet sage, salvias, trumpet vine, and Mexican oregano, will reliably attract hummingbirds to Texas yards.
Texas hummingbird basics
Texas lies along critical migration routes and includes breeding ranges for both eastern and western hummingbirds, so its species list is longer than in many states. Ruby‑throated Hummingbirds breed in eastern Texas, while Black‑chinned Hummingbirds breed widely in central, western, and some southern parts of the state. In addition, multiple western species pass through or winter, making Texas a hummingbird hotspot.
These tiny birds winter mainly in Mexico and Central America (and in some cases along the Gulf Coast) and move north each spring through Texas before spreading across the central and western United States. Their presence in Texas is strongly tied to the availability of flowering plants, insect prey, and backyard feeders, which provide vital fuel during both spring and fall migration.
Because Texas stretches from the Gulf Coast to the High Plains and Trans‑Pecos, timing and species composition vary by region, but in most areas, a combination of native flowers and clean feeders will attract hummingbirds somewhere between early spring and late fall every year.
What hummingbirds do you get in Texas?
For many Texas backyard birders, the “everyday” hummingbirds are Ruby‑throated and Black‑chinned. Ruby‑throated Hummingbirds are common
migrants and breeders in eastern Texas, especially east of roughly the 96th–98th meridians, while Black‑chinneds dominate much of central and western Texas.
Rufous and Allen’s Hummingbirds, along with species like Calliope, Anna’s, and Broad‑tailed, show up in Texas during migration and winter, particularly along the Gulf Coast, in the Hill Country, and in far‑west sites like Big Bend and El Paso. Some individuals spend the entire winter where feeders and flowers are available. For most backyards, however, Ruby‑throateds and Black‑chinneds will still be the primary species seen.
Ruby‑throated Hummingbirds are the primary eastern hummingbird species in Texas, breeding mostly in the eastern third of the state where forests,
Ruby-throated Hummingbird
woodlots, and flower‑rich neighborhoods provide suitable habitat. Most Ruby‑throateds reach Texas between mid‑March and mid‑May, then nest from early April into summer before departing from late July through mid‑November, with abundance decreasing as you move westward toward drier regions.
In migration, Texas plays a critical refueling role for Ruby‑throateds heading to and from their wintering grounds in Mexico and Central America. In fall, huge numbers gather along the central and southern Texas coast, where they gain crucial body weight on flowers and feeders before making nonstop flights across the Gulf of Mexico or following an overland route through Mexico.
Black‑chinned Hummingbirds are the most abundant hummingbirds across central and western Texas, where they breed from roughly the Rolling
Black-chinned Hummingbird
Plains and Edwards Plateau westward into the Trans‑Pecos. They arrive between mid‑March and early May, nest from late March into August, and are considered common to locally abundant summer residents in semi‑open habitats ranging from agave–cactus desert and brushy canyons to juniper–live oak woodlands, stream edges, and even towns and suburbs.txtbba.tamu+3
Texas Parks and Wildlife notes that Black‑chinneds are strictly migratory in the state, with most birds wintering in Mexico and only rare individuals lingering along the coast in winter. In migration and late summer, they may move upslope to higher elevations or concentrate where flowering plants and feeders are plentiful, often dominating backyard feeders in central and western Texas while Ruby‑throateds are more common east of about the 96th–98th meridians.
Rufous Hummingbirds are not regular breeders in Texas, but they are important migrants and winter visitors, especially in the western half of the state
Rufous Hummingbird
and along the Gulf Coast. The Texas Breeding Bird Atlas notes that Rufous is a common southbound migrant from mid‑July to early October in the Trans‑Pecos, becoming less common eastward, with some birds wintering—rare to locally uncommon—on the coast, in the lower Rio Grande Valley, and inland in the southern half of the state.txtbba.tamu+1
Because most Rufous Hummingbirds migrate north along the Pacific Coast in spring, individuals detected in Texas in late winter and early spring are usually birds that have spent the winter here rather than true spring migrants passing through. Winter surveys show that a significant share of Rufous reports come from coastal Texas, where mild temperatures and reliable feeders allow some birds to stay from roughly November through February before heading back toward their northwestern breeding grounds.digitalcommons.usf+3
Allen’s Hummingbirds are considered very rare in Texas, but careful banding work and photo‑documented records show that they do occur as fall
Allen’s Hummingbird
migrants and winter visitors, primarily along the Gulf Coast and in the southern part of the state. The Texas Bird Records Committee notes that at least 22 Allen’s Hummingbirds were documented in Texas between 2002 and the time of their report, with occurrence dates ranging from mid‑August through late February, and most birds being identified in hand by tail measurements.
In practice, many Allen’s in Texas are likely overlooked or recorded as Rufous, because females and immature males of both species look extremely similar and can only be separated reliably by detailed tail measurements. Reports from banders and winter hummingbird observers along the Texas coast suggest that female and immature Allen’s may winter more often than adult males, but because they’re so hard to identify in the field, most casual sightings of green‑backed Selasphorus hummingbirds are left as “Rufous/Allen’s” unless a bander has examined them.
Calliope Hummingbirds are tiny western hummingbirds that occur in Texas mainly as rare migrants and winter visitors, especially in the western part of
Calliope Hummingbird
the state. Texas Parks and Wildlife notes that Calliope is most often detected in far‑west Texas during fall migration, but banding and observation records show that it has been seen across the state again in fall and winter months, including occasional wintering birds at feeders.
Because Calliopes breed in high mountain meadows of the northern Rockies and Pacific Northwest and winter in pine–oak forests of Mexico, Texas lies along the outer fringe of their long migration route. Reports from Big Bend, El Paso, and other western and central Texas locations suggest that a few Calliopes pass through from late summer into early winter, sometimes visiting backyard feeders alongside Rufous, Broad‑tailed, and other western species during the state’s “winter hummingbird” season.
Anna’s Hummingbirds are primarily a West Coast species, but they now appear in Texas as rare winter visitors, especially along the upper Gulf Coast
Anna’s Hummingbird
and in parts of west and north Texas. Houston Audubon describes Anna’s as a “rare in winter” hummingbird on the Upper Texas Coast, where vocal and aggressive males sometimes take over feeders for days or weeks when they show up. Texas Parks and Wildlife hummingbird‑roundup reports have even documented a handful of nesting attempts and successful fledging events, indicating that Anna’s has occasionally bred in the state, though these records remain exceptional.houstonaudubon+4
Like Rufous and other winter hummingbirds, Anna’s Hummingbirds in Texas are most often reported from August through early spring, with peaks in late fall and winter at yards that keep feeders up and closely monitored. Range‑expansion studies show that Anna’s has been steadily pushing its breeding and wintering range north and east from California, aided by mild winters, ornamental plantings, and backyard feeders, and Texas now sits at the far eastern edge of that expanded range, making each Anna’s sighting a notable event for state birders.
Broad‑tailed Hummingbirds are primarily birds of the western mountains, and in Texas they breed locally in high‑elevation habitats of the Trans‑Pecos,
Broad-tailed-Hummingbird
especially in the Guadalupe, Davis, and Chisos Mountains. The Texas Breeding Bird Atlas found confirmed and probable breeding records mainly in the Guadalupe and Davis ranges, where Broad‑taileds nest in pine–oak woodlands and juniper scrub, often placing their tiny, insulated nests on conifer or deciduous branches just a few feet above the ground.
In Texas, northbound Broad‑tailed migrants have been recorded from late March through May, with peak spring movement in late March to late April, while southbound migration runs from late July into November, with most birds passing through in August and October. Although their core breeding range lies in the Trans‑Pecos highlands, Broad‑taileds also appear more widely in migration and have even wintered at feeders in various parts of the state, making them an uncommon but regularly detected member of Texas’s diverse hummingbird community.
Summary for Texas:
Common, regular species: Ruby‑throated Hummingbird (eastern Texas), Black‑chinned Hummingbird (central and western Texas).
Regular migrants / winter visitors: Rufous, Allen’s, Calliope, Anna’s, Broad‑tailed, and others, especially along the Gulf Coast and in western Texas.
When do hummingbirds arrive and leave Texas?
Texas sits at the front line of both spring and fall hummingbird migration. Early Ruby‑throateds, Black‑chinneds, and other species begin reaching Texas as early as late February, with arrivals continuing through March and into April depending on latitude and elevation.
By April and May, hummingbirds are widespread across Texas, with Ruby‑throateds settling into breeding territories in the east and Black‑chinneds in central and western regions. In summer, resident birds continue to use both wildflowers and feeders as they feed and raise young.
Fall migration begins as early as July for some western species and ramps up in August and September, when Ruby‑throateds concentrate along the Texas Gulf Coast before crossing the Gulf or moving along the coast toward Mexico and Central America. Many hummingbirds leave by October, but in milder areas and along the coast, some individuals and species may stay into winter, especially where feeders remain available.
Typical timing for Texas:
First arrivals: late February to early March, with widespread presence by April.
Peak season: roughly March through September (longer along the coast and in some central/western areas).
Most birds leave: August through October, with many migrants gone by late October, though some winter in Texas.
When to put up and take down feeders in Texas
When to put feeders out
Because hummingbirds often reach Texas in early March (and sometimes late February), it is a good idea to have feeders outside by around March 1–15. Texas Parks and Wildlife suggests putting up feeders by mid‑March at the latest so you are ready for early migrants.
If you enjoy watching for the very first arrivals, especially in South or Central Texas, you can put at least one feeder up as early as late February or Valentine’s Day. Once your feeders are up in spring, keep them clean and filled through the rest of the season so migrating and nesting hummingbirds can depend on them.
When to take feeders down
You can safely keep feeders up through October, and in much of Texas it is fine to leave them up year‑round if you are willing to maintain them in winter. A common rule of thumb is to leave feeders up until about two weeks after you see your last hummingbird.
Leaving feeders up does not prevent hummingbirds from migrating; they depart based on day length, hormones, and weather patterns, not the presence of sugar water. In Texas, where some hummingbirds overwinter, keeping at least one feeder going into winter can support these birds and provide exciting viewing opportunities in mild spells.
Best hummingbird nectar recipe
The best nectar recipe for Texas hummingbirds is the same standard mix used across North America: 1 part plain white sugar to 4 parts water. Bring the water to a brief boil, remove from heat, stir in the sugar until it completely dissolves, and then let the mixture cool before filling clean feeders.
Do not add red dye, honey, brown sugar, or artificial sweeteners. The red parts of the feeder are enough to attract hummingbirds, and dyes or alternative sugars are not recommended. The 4‑to‑1 mixture closely matches natural flower nectar concentrations and provides a safe, familiar food source for Ruby‑throateds, Black‑chinneds, and all the western hummingbirds passing through Texas.
All about nectar: how to use it effectively
Safe, homemade nectar is one of the simplest and most effective ways to support hummingbirds in Tennessee, especially during peak migration in spring and fall. Using modest‑sized feeders (for example, 8–12 ounces) helps you offer fresh nectar without letting sugar water sit too long, particularly in the hot, humid summers common across the state.
During peak activity in late April through May and again in August and September, you can add an extra feeder or two or fill them a bit more to handle higher traffic. As activity drops in late October and early November, reduce the number of feeders or how much you fill them so you are still changing nectar frequently while serving late migrants and any winter visitors.
Safe, homemade nectar is the single most important thing you can offer hummingbirds—and it’s much simpler than many guides make it sound. My comprehensive main nectar article, How to Make Hummingbird Feeder Nectar, can walk Tennessee readers through the same 4‑to‑1 sugar‑water recipe, how much to mix for different feeder sizes, and how often to change it at different temperatures so it never ferments or molds, plus ingredients to avoid and ways to keep insects from taking over.
A clean hummingbird feeder is a must
Texas summers are hot, and in many regions humid as well, so nectar can spoil quickly and feeders can develop mold if not cleaned regularly. Each time you change nectar, rinse the feeder with hot water and scrub ports, seams, and any surfaces where residue can build up, using small brushes designed for hummingbird feeders.
For stubborn residue or mold, soak parts in a mild vinegar solution or a diluted bleach solution (about 1 part household bleach to 10 parts water), then rinse thoroughly and let everything air‑dry completely before refilling. My detailed feeder‑cleaning guide shows step‑by‑step how to remove mold, how often to clean in Texas‑level heat, which brushes and ant moats make the job easier, and how to keep bees and ants under control so feeders stay safe and attractive.
Where to hang feeders in Texas yards
Texas yards run the gamut from small city lots and suburban gardens to Hill Country ranches and coastal properties, but good feeder placement follows the same basic rules. Hang feeders near flowers, shrubs, or small trees so hummingbirds have perches and quick cover, and place them about 4–5 feet above the ground to balance safety and easy access.
Keep feeders a few feet away from large windows or use decals or screens to reduce collision risk. In much of Texas, intense afternoon sun can overheat nectar, so many birders choose locations with morning sun and afternoon shade or dappled light, especially in summer. In windy or exposed prairie and coastal sites, pick spots sheltered by buildings, fences, or vegetation so feeders do not swing excessively and birds can feed comfortably.
I also wrote a more in‑depth guide on how to choose the best place to hang your hummingbird feeder.Discover exactly where to hang your hummingbird feeder for the best results. This complete guide walks you through sunlight and shade, height, distance from windows, wind and predator protection, and how close to place feeders to flowers so hummingbirds feel safe and visit often. You’ll also get practical tips on window feeders, hanging hardware, cleaning schedules by temperature, and simple tricks to stop ants and other pests.Check out the article for everything you need to turn one well‑placed feeder into a busy hummingbird hot spot.
To reduce fighting among hummingbirds:
Use two or more small feeders rather than one big one.
Place feeders 10–15 feet apart or around corners so a territorial male can’t guard them all at once.
Learn how hummingbird aggression impacts your backyard. This video explores territorial behavior and offers practical solutions for attracting more hummingbirds to your feeders. Discover several helpful strategies to encourage a more harmonious environment.
Native plants that attract hummingbirds in Texas
Native and region‑adapted plants are one of the best ways to attract hummingbirds in Texas. Hummingbirds favor tubular, nectar‑rich flowers in red, orange, and bright pink, but they will also use purple, blue, and white flowers with good nectar.
Good native or region‑appropriate plants for Texas include:
Turk’s cap (Malvaviscus arboreus var. drummondii) – A shade‑tolerant Texas native with red “turban” flowers that never fully open, providing protected nectar that hummingbirds can reach but many insects can’t; blooms from early summer to frost.
Scarlet sage / scarlet salvia (Salvia coccinea) – A native salvia with bright red flower spikes, ideal for pairing with Turk’s cap; prefers moist soils and blooms over a long season.
Other salvias (such as Salvia greggii and Salvia microphylla) – Heat‑tolerant shrubs and perennials with abundant tubular flowers that are hummingbird favorites across much of Texas.
Trumpet vine / trumpet creeper (Campsis radicans) – A vigorous vine with large orange‑red trumpet flowers; best sited where its spread can be controlled, but superb for attracting hummingbirds.
Mexican oregano (Poliomintha longiflora and related species) – A shrubby herb with tubular lavender‑pink flowers that draw in hummingbirds, especially in hotter, drier regions.
Red yucca (Hesperaloe parviflora) – An architectural plant with tall spikes of coral‑red tubular flowers; drought‑tolerant and ideal for sunny, dry sites.
Coral honeysuckle (Lonicera sempervirens) – A non‑invasive honeysuckle vine with clusters of red‑orange tubes that hummingbirds readily use, suitable for fences and arbors.
You can expand this list with regionally recommended natives from local resources like the Houston Parks Board’s hummingbird‑plant guides and Texas extension/native‑plant organizations, focusing on red and orange tubular flowers that bloom from early spring into fall.
Creating a hummingbird‑friendly yard in Texas
To turn a Texas yard into quality hummingbird habitat, combine layers of vegetation, clean feeders, water, and safe perches. Focus on small trees and shrubs for structure, flowering perennials and vines for nectar, and a few well‑placed feeders to supplement natural sources.
Avoid or greatly limit pesticides, especially systemic insecticides, because hummingbirds and their chicks rely heavily on tiny insects and spiders for protein. Even a small patio, courtyard, or front yard can become hummingbird‑friendly with a few strategic plantings and one or two properly maintained feeders.
Layered planting example for a Texas yard
In a sunny or part‑sun Texas yard, you might plant a small ornamental or native tree—such as a desert willow or small oak—at the back of a bed for structure and perches. In front of that, use drifts or clumps of Turk’s cap and scarlet sage for mid‑ to late‑season nectar and color.
Along the front edges and in drier spots, add red yucca and other salvias for long‑blooming, drought‑tolerant nectar sources. Train trumpet vine or coral honeysuckle along a fence or arbor nearby to add vertical interest and more tubular flowers. This layered combination provides cover, perches, and nectar from spring through fall.
For the best results do this:
Combine small trees, shrubs, vines, and perennials to create a tiered garden with flowers and cover at different heights.
Emphasize native and region‑adapted plants that thrive in Texas heat and soils and support insects as well as hummingbirds.
Place feeders where hummingbirds naturally move between flower beds and shelter, rather than in isolation.
Plan for blooms from spring through fall
Include early, mid‑season, and late‑blooming plants so something is always flowering when hummingbirds are present in your area. Plant in groups or drifts rather than isolated single plants so hummingbirds can feed efficiently and find blossoms more easily.
My special guide The Art of Attracting Hummingbirds to Your Yard can provide Tennessee readers with lists of hummingbird‑attracting plants that bloom during each season—spring, summer, and fall—making it easy to select plants that will provide continuous blooms from the first arrivals in March and April until birds depart in fall. It also gives advice on layering plants, choosing options for sun and shade, and building a garden that works in their specific growing conditions.
Use feeders to supplement, not replace, flowers
Feeders provide a reliable nectar source alongside your plants, especially in early spring and late summer when wild blooms may be sparse because of drought or temperature swings. Hang them where they’re visible from your best flower beds so hummingbirds can move naturally between blossoms and sugar water.
If you’re tired of leaky bottle feeders and constant insect problems, this video explains why a simple saucer‑style Aspects feeder is my go‑to choice. You’ll see how the low, shallow 12‑ounce bowl helps you mix only what your hummingbirds can use before it spoils, while the built‑in ant moat, raised ports, and included Nectar‑Guard tips work together to keep ants, bees, and wasps out of the nectar. The drip‑proof design and twist‑off cover make cleaning and refilling quick and easy, so it’s realistic to keep nectar fresh even in warm weather. Made from tough, UV‑stabilized polycarbonate in the USA and backed by a true lifetime guarantee, this is a “buy it once” feeder you can count on year after year
Provide safe perches and nesting cover
Keep some shrubs, small deciduous trees, and a few dead or thin branches where hummingbirds can rest, display, and build nests. Avoid pruning everything into bare, tight shapes; a slightly softer outline with twiggy tips gives birds more places to sit and watch over feeders and flowers.
Hummingbirds may spend more time perched than many people realize, using these spots to rest, preen, digest nectar, and defend their favorite feeding areas. Once birds adopt a swing or perch, they often stay in the yard longer and make more frequent, relaxed visits.
Offer water in a way hummingbirds like
Consider adding a mister. Most people focus on feeders and flowers, but the right water feature can turn your Nebraska yard into a true hummingbird hangout. Hummingbirds prefer shallow, moving water—fine sprays, mists, and droplets on leaves—rather than deep, still birdbaths. Add a mister, dripper, or fine spray so hummingbirds can bathe in moving droplets on leaves or in a shallow basin.
You can alsoinstall a shallow birdbathwith gently sloping edges with gently sloping edges—no more than about an inch of water—gives hummingbirds a place to sip and splash at the edge.Position water features near, but not directly over, key flower beds so birds can move easily between bathing and feeding.
Placing Water Features for Maximum Hummingbird Activity
Where you place your water features matters as much as what you choose.
Near cover, not in the open: Position water within a few feet of shrubs, small trees, or tall perennials so hummingbirds can retreat quickly if they feel threatened.
Partial shade: Light shade keeps water cooler and reduces evaporation while still allowing enough sun for droplets to sparkle.
Close to nectar plants and feeders: Place water features near your hummingbird‑friendly flowers and feeders so birds can easily move between feeding and bathing.
Safe viewing distance: Set features where you can see them from a window, patio, or garden bench, but not so close that frequent traffic scares birds away.
If you have multiple water features, spread them around to reduce territorial conflicts and give more birds access.
For a comprehensive guide on using water features, check out my article: How to Use Water Features to Attract Hummingbirds. This guide will walk you through the exact kinds of misters, drippers, and shallow baths hummingbirds prefer, how deep and how strong the water flow should be, where to place everything so birds feel safe, and how to keep it all clean without spending a lot of money.
Skip pesticides and let insects thrive
Avoid or greatly limit pesticides, especially systemic insecticides, because hummingbirds and their chicks rely heavily on tiny insects and spiders for protein.
A healthy, chemical‑free yard with native plants will naturally support more insects, which means more high‑quality food for hummingbirds.
My article Natural Pest Control Methods for Your Hummingbird Garden shows readers they don’t have to choose between a healthy hummingbird garden and effective pest control. It explains exactly how to prevent and manage pests using natural methods—companion planting, encouraging “good bugs,” organic sprays like garlic, pepper, and neem, physical barriers, and smart traps—so they protect their plants without poisoning hummingbirds or the insects they eat. It also gives clear, season‑by‑season checklists and safety tips (like where not to spray, how to avoid harming pollinators, and how to keep pest control away from nests and feeders), making it easy to follow even if you’re new to organic gardening. If you want fewer pests, stronger plants, and a garden that’s truly safe for hummingbirds from spring through fall, this is the article for you!
Keep Insects Away From Your Feeder
Bees, wasps, and ant trails can quickly take over a hummingbird feeder, but you don’t have to give up and bring the feeder in. My detailed guide: How to Keep Bees and Ants Away From Your Hummingbird Feeder walks you through the safest, most effective ways to keep pests out of your nectar—using ant moats, bee‑resistant feeders, smarter placement, and even “decoy” feeders that draw insects away—so the sugar water stays clean and available for hummingbirds only. If you’re tired of fighting swarms on your feeders and want a simple plan that actually works, This guide is your proven answer!
Sometimes, small insects like ants, bees and wasps won’t be the only pests raiding your hummingbird feeder. For those times when larger critters become a problem, check out my guide: Effective Tips For Pest Control At The Hummingbird Feeder.
If you’re curious how your state compares to other parts of the country, you can see arrival and departure times for every state in my main guide, “When to Feed Hummingbirds: A State‑by‑State Guide.” It’s a handy overview if you travel, have relatives in other states, or just want to understand the bigger migration picture.
FAQ for Texas hummingbirds
What hummingbirds live in Texas?
Ruby‑throated and Black‑chinned Hummingbirds are the most common hummingbirds in Texas, with Ruby‑throateds breeding mainly in the east and Black‑chinneds in central and western regions. Several western species, including Rufous, Allen’s, Calliope, Anna’s, and Broad‑tailed, also migrate through or winter in parts of the state.
When do hummingbirds arrive in Texas?
Many hummingbirds arrive in Texas between late February and April, with males often appearing first and numbers building through March and April as birds move north.
When do hummingbirds leave Texas?
Most migrating hummingbirds leave Texas between August and October, with Ruby‑throateds peaking along the Gulf Coast in August–September and many gone by late October, though some individuals and species may stay through winter in mild areas.
When should I put out hummingbird feeders in Texas?
Put feeders out by early March—no later than mid‑March—so they’re ready for the earliest arrivals; in South and Central Texas, many people hang at least one feeder by late February.
When should I take down hummingbird feeders in Texas?
A general rule is to leave feeders up through October and take them down about two weeks after you last see a hummingbird, but in much of Texas it is fine to leave at least one feeder up year‑round if you can keep nectar fresh.
What is the best hummingbird nectar recipe for Texas?
Use 1 part plain white sugar to 4 parts water, boiled and cooled, with no red dye or other additives.
How often should I change hummingbird nectar in Texas?
In hot Texas weather, change nectar every 1–2 days; in milder spring and fall conditions, change it every 3–5 days, and always replace it immediately if it looks cloudy, smells fermented, or shows any mold.
Which hummingbird feeder styles work best in Texas?
Small 8‑ to 12‑ounce saucer‑style feeders are ideal because they are easy to clean, resist leaks, and let you offer fresh nectar in modest amounts that will not spoil quickly in Texas heat.
What plants attract hummingbirds in Texas?
Showy natives such as Turk’s cap, scarlet sage, other salvias, trumpet vine, Mexican oregano, red yucca, and coral honeysuckle are excellent choices to attract hummingbirds in Texas gardens.
Where can I learn more about hummingbirds in Texas?
Regional resources include Texas Parks and Wildlife, local Audubon and nature centers, native‑plant groups, and national guides on Ruby‑throated, Black‑chinned, and western hummingbirds, as well as migration‑map sites that track arrivals and departures across Texas.
Further resources for Texas hummingbird watchers
Texas Parks & Wildlife – Hummingbird FAQs – Official guidance on when to put feeders out in Texas, how long to keep them up, and why feeders do not stop hummingbirds from migrating.
Houston Audubon – Hummingbirds of Houston – Species list and migration timing for the Houston area, useful for Gulf Coast readers tracking peak spring and fall movements.
How to Make Hummingbird Feeder Nectar – My in‑depth guide to the 4:1 nectar recipe, batch sizes, and how often to change nectar in different temperatures.
Cleaning a Hummingbird Feeder – Step‑by‑step cleaning instructions, including how to remove mold and keep feeders safe in hot Texas weather.
Hummingbirds in Tennessee: Ruby‑throated, Feeders, and Native Plants
Tennessee’s hummingbird story focuses on the Ruby‑throated Hummingbird, the only hummingbird that breeds regularly in the state, with several western hummingbirds showing up as increasingly frequent fall and winter visitors at backyard feeders. Ruby‑throateds pass through twice each year, arriving in spring to nest across Tennessee’s forests and neighborhoods, then migrating south again in late summer and fall to spend the winter in Mexico and Central America.
Key takeaways for Tennessee hummingbirds
Ruby‑throated Hummingbirds are the only hummingbirds you can reliably expect in Tennessee during the breeding season, and they are familiar summer inhabitants of gardens, parks, and woodlands from roughly mid‑April through early October. Western species such as Rufous, Black‑chinned, Allen’s, Anna’s, Calliope, and Broad‑tailed are possible but uncommon visitors, usually noted in fall and winter when birders maintain feeders and monitor unusual hummingbirds; some individuals have even returned to the same Tennessee yard for multiple winters.
Ruby‑throateds typically reach Tennessee from late March through April, with numbers building into May as migration continues north and local birds settle in to nest. Most birds remain through the summer, then depart from late August through October, with peak fall numbers in August and September and a few birds lingering into October.
Homeowners can put feeders out by April 1 so they are ready for the first arrivals, and keep them up through October, or at least a week or two after they stop seeing hummingbirds. A simple 4‑to‑1 sugar‑water mix with no red dye, changed every 1–2 days in hot weather or every 3–5 days in cooler spells, plus native plants like coral honeysuckle, bee balm, red buckeye, and cardinal flower, will reliably attract Ruby‑throateds to Tennessee yards.
Tennessee hummingbird basics
Tennessee lies squarely within the core breeding range of the Ruby‑throated Hummingbird, which nests across most of the eastern United States. In the state, Ruby‑throateds use mixed woodlands, forest edges, riparian corridors, orchards, suburban yards, city gardens, and rural properties that offer a mix of trees, shrubs, flowers, and feeders.
These tiny birds winter mainly in Mexico and northern Central America and move north each spring through the Gulf Coast and lower Mississippi Valley before spreading through the Southeast and Mid‑Atlantic. Their presence in Tennessee is strongly tied to the availability of flowering plants and insect prey, which provide both nectar and protein, and they readily visit backyard feeders when offered safe sugar water.
Several western hummingbirds—including Rufous, Black‑chinned, Allen’s, Anna’s, Calliope, Broad‑tailed, and even Green Violet‑ear—have been documented in Tennessee during the non‑breeding season, particularly at well‑maintained winter feeders. Maintaining at least one feeder into late fall and winter slightly increases the chance of attracting such a rarity, especially if you watch closely and photograph or report unusual birds.
What hummingbirds do you get in Tennessee?
For backyard birders across Tennessee, the everyday hummingbird is the Ruby‑throated Hummingbird. It is the species you will see at feeders and flowers from spring through early fall, and the only hummingbird confirmed to breed in the state.
Rufous Hummingbirds and other western species are possible as fall and winter visitors, especially at feeders that remain up and are monitored
Rufous Hummingbird
carefully after Ruby‑throateds depart. Tennessee wildlife agencies note that several western species have now been recorded, and banding studies show that individual Rufous Hummingbirds sometimes return to the same yard in successive winters. Even so, these are still special occurrences; Ruby‑throateds should be considered the default hummingbird in Tennessee.
Uncommon to rare visitors: Rufous, Black‑chinned, Allen’s, Anna’s, Calliope, Broad‑tailed, and Green Violet‑ear as fall and winter visitors at feeders, particularly where at least one feeder is kept up with fresh nectar.
When do hummingbirds arrive and leave Tennessee?
Tennessee sits along a major Ruby‑throated migration route, so hummingbirds pass through the state twice each year—once heading north in spring and again heading south in late summer and fall. Ruby‑throateds start arriving in Tennessee as early as late March, with many yards seeing their first birds in early April, and migration continues through mid‑May.
By May, Ruby‑throateds are widely distributed across Tennessee, courting, establishing territories, and visiting both wildflowers and feeders while they nest and raise young. Fall migration typically begins in early July, with numbers building through August and September as both adults and juveniles move south. Many Ruby‑throateds are gone by October, although some birds and western vagrants may appear later at feeders that remain up.
Typical timing for Tennessee:
First arrivals (Ruby‑throated): late March through early April, with migration continuing into mid‑May.
Peak season: roughly May through September, with especially high numbers in August and September.
Most birds leave: August through October, with many Ruby‑throateds gone by mid‑ to late October.
Western visitors: mainly fall and winter at feeders that stay up and are watched closely.
When to put up and take down feeders in Tennessee
When to put feeders out
Because Ruby‑throateds usually arrive in Tennessee by late March and early April, it is a good idea to have feeders outside by April 1. This ensures that early migrants can refuel when they reach your yard after crossing the Gulf of Mexico or moving north through the Southeast.
If you enjoy watching for the very first birds, you can put at least one feeder up in late March as an extra margin. Once your feeders are up in spring, keep them clean and filled through the rest of the season so local birds can depend on them, even when wildflowers are blooming.
When to take feeders down
You can safely keep feeders up through October, since Ruby‑throateds commonly use Tennessee yards into that month and western hummingbirds sometimes overwinter. A simple rule is to leave at least one feeder up into late October or early November, and then take it down after you have gone about one to two weeks without seeing any hummingbirds—unless you are intentionally trying to attract winter visitors.
Leaving a feeder up longer does not delay migration; hummingbirds migrate based on day length and internal cues, not the presence or absence of feeders. In Tennessee, where wintering western hummingbirds are being documented more often, keeping at least one feeder going into the cooler months can support these birds and provide opportunities for banders to study them.
Best hummingbird nectar recipe
The best nectar recipe for Tennessee hummingbirds is the standard mix used across the Ruby‑throated’s range: 1 part plain white sugar to 4 parts water. Bring the water to a brief boil, remove from heat, stir in the sugar until it completely dissolves, and then let the mixture cool before filling clean feeders.
Do not add red dye, honey, brown sugar, or artificial sweeteners. The red parts of the feeder are enough to attract hummingbirds, and dyes or alternative sugars are not recommended. The 4‑to‑1 mixture closely matches natural flower nectar concentrations and provides a safe, familiar food source for Ruby‑throateds and any visiting western hummingbirds.
All about nectar: how to use it effectively
Safe, homemade nectar is one of the simplest and most effective ways to support hummingbirds in Tennessee, especially during peak migration in spring and fall. Using modest‑sized feeders (for example, 8–12 ounces) helps you offer fresh nectar without letting sugar water sit too long, particularly in the hot, humid summers common across the state.
During peak activity in late April through May and again in August and September, you can add an extra feeder or two or fill them a bit more to handle higher traffic. As activity drops in late October and early November, reduce the number of feeders or how much you fill them so you are still changing nectar frequently while serving late migrants and any winter visitors.
Safe, homemade nectar is the single most important thing you can offer hummingbirds—and it’s much simpler than many guides make it sound. My comprehensive main nectar article, How to Make Hummingbird Feeder Nectar, can walk Tennessee readers through the same 4‑to‑1 sugar‑water recipe, how much to mix for different feeder sizes, and how often to change it at different temperatures so it never ferments or molds, plus ingredients to avoid and ways to keep insects from taking over.
A clean hummingbird feeder is a must
Tennessee’s warm, humid summers make feeder cleanliness especially important. Each time you change nectar, rinse the feeder with hot water and scrub ports, seams, and any surfaces where residue can build up, using small brushes designed for hummingbird feeders.
For stubborn residue or mold, a soak in a mild vinegar solution or a diluted bleach solution (1 part household bleach to 10 parts water), followed by a very thorough rinse and complete air‑drying, keeps feeders safe. Your main detailed feeder‑cleaning guide can show Tennessee birders exactly how to remove mold, how to adjust cleaning frequency when temperatures swing from mild to hot and humid, which brushes and ant moats make the job easier, and how to keep bees and ants under control so feeders stay safe and attractive.
Where to hang feeders in Tennessee yards
Tennessee yards range from small city lots and suburban neighborhoods to forested hillsides and rural farms, but good feeder placement follows the same basic rules. Hang feeders near flowers, shrubs, or small trees so hummingbirds have perches and quick cover, and place them about 4–5 feet above the ground to balance safety and easy access.
Keep feeders a few feet away from large windows or use decals or screens to reduce collision risk. Because strong sun and humidity can spoil nectar quickly, many Tennessee birders like locations with morning sun and afternoon shade or dappled light, especially in June, July, and August. In windy or exposed ridgetop or open‑field sites, choose spots sheltered by buildings, fences, or vegetation so feeders do not swing excessively and birds can feed comfortably.
To reduce fighting among hummingbirds:
Use two or more small feeders rather than one big one.
Place feeders 10–15 feet apart or around corners so a territorial male can’t guard them all at once.
Learn how hummingbird aggression impacts your backyard. This video explores territorial behavior and offers practical solutions for attracting more hummingbirds to your feeders. Discover several helpful strategies to encourage a more harmonious environment.
Native plants that attract hummingbirds in Tennessee
Native and region‑adapted plants are one of the best ways to attract Ruby‑throated Hummingbirds and winter visitors to Tennessee yards. Hummingbirds favor tubular, nectar‑rich flowers in red, orange, and bright pink, but they will also use purple, blue, and white flowers with good nectar.
Good native or region‑appropriate plants for Tennessee include:
Coral honeysuckle (Lonicera sempervirens) – A native vine with clusters of tubular red‑orange flowers that hummingbirds love, ideal for fences, arbors, and trellises.
Bee balm / scarlet beebalm (Monarda didyma and other Monarda spp.) – Summer‑blooming mints with shaggy flower heads that support hummingbirds and many pollinators.
Red buckeye (Aesculus pavia) – A small understory tree with spring red flower spikes that are classic hummingbird magnets in the Southeast.
Cardinal flower (Lobelia cardinalis) – Brilliant red flower spikes for moist beds and stream edges; hummingbirds will often feed at close range on these plants.
Trumpet creeper (Campsis radicans) – A vigorous native vine with large orange‑red trumpets; best planted where its spread can be managed.
Red columbine (Aquilegia canadensis) – Nodding red‑and‑yellow spring flowers that provide early‑season nectar as hummingbirds arrive.
Spotted jewelweed (Impatiens capensis) – A self‑seeding annual with orange spotted tubular flowers that thrives in damp, partly shaded spots and is heavily used by hummingbirds in late summer.
You can expand this list with regionally recommended natives from the Tennessee “Hummingbird Gardening in Tennessee” Extension publication and the National Wildlife Federation or Audubon native plant finders, focusing on tubular red and orange flowers.
Creating a hummingbird‑friendly yard in Tennessee
To turn a Tennessee yard into quality hummingbird habitat, combine layers of vegetation, clean feeders, water, and safe perches. Focus on small trees and shrubs for structure, flowering perennials and vines for nectar, and a few well‑placed feeders to supplement natural sources.
Keep pesticides to a minimum so hummingbirds still have access to small insects and spiders for protein, especially when feeding nestlings. Even a small yard, balcony garden, or farm edge can become hummingbird‑friendly with a few strategic plantings and one or two properly maintained feeders.
Layered planting example for a Tennessee yard
In a sunny or part‑sun Tennessee yard, you might plant a small ornamental or native tree—such as red buckeye or dogwood—at the back of a bed for structure and perches. In front of that, use drifts of bee balm for mid‑summer nectar and color.
Along the front and in moist or low spots, plant groups of red columbine and cardinal flower so you have blooms from late spring through late summer. Add coral honeysuckle on a fence or trellis nearby for additional tubular flowers that can bloom over a long season in Tennessee’s climate. This layered combination provides cover, perches, and nectar across much of the hummingbird season.
For the best results do this:
Combine small trees, shrubs, vines, and perennials to create a tiered garden with flowers and cover at different heights.
Emphasize native and region‑adapted plants that thrive in Tennessee’s climate and support insects as well as hummingbirds.
Place feeders where hummingbirds naturally move between flower beds and shelter, rather than in isolation.
Plan for blooms from spring through fall
Include early, mid‑season, and late‑blooming plants so something is always flowering when hummingbirds are present in Tennessee. Plant in groups or drifts rather than isolated single plants so hummingbirds can feed efficiently and find blossoms more easily.
My special guide The Art of Attracting Hummingbirds to Your Yard can provide Tennessee readers with lists of hummingbird‑attracting plants that bloom during each season—spring, summer, and fall—making it easy to select plants that will provide continuous blooms from the first arrivals in March and April until birds depart in fall. It also gives advice on layering plants, choosing options for sun and shade, and building a garden that works in their specific growing conditions.
Use feeders to supplement, not replace, flowers
Feeders provide a reliable nectar source alongside your plants, especially in early spring and late summer when wild blooms may be sparse because of drought or temperature swings. Hang them where they’re visible from your best flower beds so hummingbirds can move naturally between blossoms and sugar water.
If you’re tired of leaky bottle feeders and constant insect problems, this video explains why a simple saucer‑style Aspects feeder is my go‑to choice. You’ll see how the low, shallow 12‑ounce bowl helps you mix only what your hummingbirds can use before it spoils, while the built‑in ant moat, raised ports, and included Nectar‑Guard tips work together to keep ants, bees, and wasps out of the nectar. The drip‑proof design and twist‑off cover make cleaning and refilling quick and easy, so it’s realistic to keep nectar fresh even in warm weather. Made from tough, UV‑stabilized polycarbonate in the USA and backed by a true lifetime guarantee, this is a “buy it once” feeder you can count on year after year
Provide safe perches and nesting cover
Keep some shrubs, small deciduous trees, and a few dead or thin branches where hummingbirds can rest, display, and build nests. Avoid pruning everything into bare, tight shapes; a slightly softer outline with twiggy tips gives birds more places to sit and watch over feeders and flowers.
Hummingbirds may spend more time perched than many people realize, using these spots to rest, preen, digest nectar, and defend their favorite feeding areas. Once birds adopt a swing or perch, they often stay in the yard longer and make more frequent, relaxed visits.
Offer water in a way hummingbirds like
Consider adding a mister. Most people focus on feeders and flowers, but the right water feature can turn your Nebraska yard into a true hummingbird hangout. Hummingbirds prefer shallow, moving water—fine sprays, mists, and droplets on leaves—rather than deep, still birdbaths. Add a mister, dripper, or fine spray so hummingbirds can bathe in moving droplets on leaves or in a shallow basin.
You can alsoinstall a shallow birdbathwith gently sloping edges with gently sloping edges—no more than about an inch of water—gives hummingbirds a place to sip and splash at the edge. Position water features near, but not directly over, key flower beds so birds can move easily between bathing and feeding.
Placing Water Features for Maximum Hummingbird Activity
Where you place your water features matters as much as what you choose.
Near cover, not in the open: Position water within a few feet of shrubs, small trees, or tall perennials so hummingbirds can retreat quickly if they feel threatened.
Partial shade: Light shade keeps water cooler and reduces evaporation while still allowing enough sun for droplets to sparkle.
Close to nectar plants and feeders: Place water features near your hummingbird‑friendly flowers and feeders so birds can easily move between feeding and bathing.
Safe viewing distance: Set features where you can see them from a window, patio, or garden bench, but not so close that frequent traffic scares birds away.
If you have multiple water features, spread them around to reduce territorial conflicts and give more birds access.
For a comprehensive guide on using water features, check out my article: How to Use Water Features to Attract Hummingbirds. This guide will walk you through the exact kinds of misters, drippers, and shallow baths hummingbirds prefer, how deep and how strong the water flow should be, where to place everything so birds feel safe, and how to keep it all clean without spending a lot of money.
Skip pesticides and let insects thrive
Avoid or greatly limit pesticides, especially systemic insecticides, because hummingbirds and their chicks rely heavily on tiny insects and spiders for protein.
A healthy, chemical‑free yard with native plants will naturally support more insects, which means more high‑quality food for hummingbirds.
My article Natural Pest Control Methods for Your Hummingbird Garden shows readers they don’t have to choose between a healthy hummingbird garden and effective pest control. It explains exactly how to prevent and manage pests using natural methods—companion planting, encouraging “good bugs,” organic sprays like garlic, pepper, and neem, physical barriers, and smart traps—so they protect their plants without poisoning hummingbirds or the insects they eat. It also gives clear, season‑by‑season checklists and safety tips (like where not to spray, how to avoid harming pollinators, and how to keep pest control away from nests and feeders), making it easy to follow even if you’re new to organic gardening. If you want fewer pests, stronger plants, and a garden that’s truly safe for hummingbirds from spring through fall, this is the article for you!
Keep Insects Away From Your Feeder
Bees, wasps, and ant trails can quickly take over a hummingbird feeder, but you don’t have to give up and bring the feeder in. My detailed guide: How to Keep Bees and Ants Away From Your Hummingbird Feeder walks you through the safest, most effective ways to keep pests out of your nectar—using ant moats, bee‑resistant feeders, smarter placement, and even “decoy” feeders that draw insects away—so the sugar water stays clean and available for hummingbirds only. If you’re tired of fighting swarms on your feeders and want a simple plan that actually works, This guide is your proven answer!
Sometimes, small insects like ants, bees and wasps won’t be the only pests raiding your hummingbird feeder. For those times when larger critters become a problem, check out my guide: Effective Tips For Pest Control At The Hummingbird Feeder.
If you’re curious how your state compares to other parts of the country, you can see arrival and departure times for every state in my main guide, “When to Feed Hummingbirds: A State‑by‑State Guide.” It’s a handy overview if you travel, have relatives in other states, or just want to understand the bigger migration picture.
FAQ for Tennessee hummingbirds
What hummingbirds live in Tennessee?
Ruby‑throated Hummingbirds are the only regular breeding hummingbirds in Tennessee. Western species such as Rufous, Black‑chinned, Allen’s, Anna’s, Calliope, Broad‑tailed, and Green Violet‑ear may appear as uncommon fall and winter visitors at feeders, but these remain special occurrences.
When do hummingbirds arrive in Tennessee?
Ruby‑throated Hummingbirds typically arrive in Tennessee from late March through April, with most areas seeing them regularly by late April and early May.
When do hummingbirds leave Tennessee?
Most Ruby‑throateds leave Tennessee from late August through October, and many are gone by mid‑ to late October, although some western hummingbirds may remain as winter visitors.
When should I put out hummingbird feeders in Tennessee?
Put feeders out by April 1 so they are ready for the earliest Ruby‑throated arrivals; if you enjoy watching for first sightings, you can put at least one feeder up in late March.
When should I take down hummingbird feeders in Tennessee?
A common approach is to keep feeders up through October, then take them down after you have gone about one to two weeks without seeing hummingbirds—unless you want to keep one feeder up into winter to watch for western visitors.
What is the best hummingbird nectar recipe for Tennessee?
Use 1 part plain white sugar to 4 parts water, boiled and cooled, with no red dye or other additives.
How often should I change hummingbird nectar in Tennessee?
In warm weather, change nectar every 1–2 days; in cooler spring and fall weather, change it every 3–5 days, and always replace it immediately if it looks cloudy, smells fermented, or shows any mold.
Which hummingbird feeder styles work best in Tennessee?
Small 8‑ to 12‑ounce saucer‑style feeders are ideal because they are easy to clean, resist leaks, and let you offer fresh nectar in modest amounts that won’t spoil quickly in Tennessee’s heat and humidity.
What plants attract hummingbirds in Tennessee?
Bold, tubular natives such as coral honeysuckle, bee balm, red buckeye, cardinal flower, trumpet creeper, red columbine, and spotted jewelweed are excellent choices to attract hummingbirds in Tennessee gardens.
Where can I learn more about hummingbirds in Tennessee?
Regional resources include the Tennessee Wildlife Resources Agency, Tennessee Watchable Wildlife, University of Tennessee Extension’s “Hummingbird Gardening in Tennessee,” local native‑plant societies, and national guides on Ruby‑throated Hummingbirds and creating hummingbird‑friendly yards.
Further resources for Tennessee hummingbird watchers
How to Make Hummingbird Feeder Nectar – My in‑depth how‑to on the 4:1 sugar‑water recipe, batch sizes, and how often to change nectar in different temperatures.
Cleaning a Hummingbird Feeder – Step‑by‑step cleaning instructions, including how to deal with mold and keep feeders safe during Tennessee’s hot, humid summers.
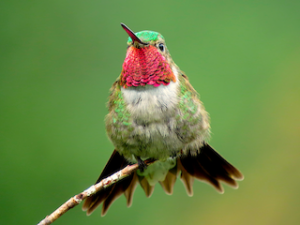
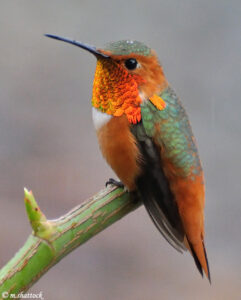
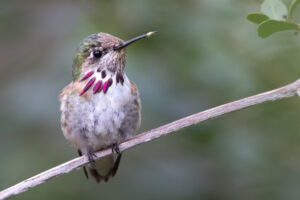
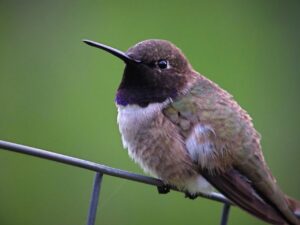
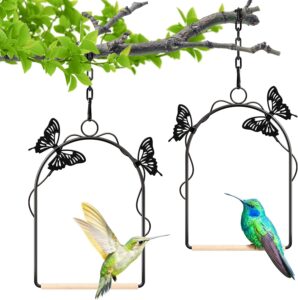 adopt a perch, you’ll often see them return to it repeatedly between feeding bouts.
 shrubs or perennials lets them bathe in droplets and sip from wet foliage—a valuable resource during hot, dry periods.
 birds can move easily between feeding and bathing without crossing large open areas. Your article