Hummingbird Food You Can Make Yourself
In this article on hummingbird food you will learn what hummingbirds actually eat and you will also learn how to make hummingbird food that you can put in your feeder to feed the hummingbirds. And at the end of the article is my special instructional video that will teach you how to hand-feed your hummingbirds.
Making hummingbird food
Making your own hummingbird food is easy, fun and inexpensive. Making homemade hummingbird nectar only requires two ingredients, white table sugar and water. No red food coloring will be added to the nectar. Food coloring might be harmful to hummingbirds and isn’t necessary to attract them to a feeder. If your feeder is red, that’s enough. You can even attach a red ribbon if you want more color to attract hummingbirds. Don’t add any other ingredient. NO brown sugar, honey, corn syrup, molasses or artificial sweeteners. The flower nectar that hummingbirds feed on contains sucrose (ordinary table sugar) and that is all that we will use. Other ingredients can prove to be harmful or even fatal to the hummingbirds, or at the very least will ferment the sugar, so don’t use anything except white granulated table sugar and water.
The recipe for homemade hummingbird nectar is to add 1 part sugar to 4 parts water. This 1 to 4 ratio will produce a homemade nectar that is just like the nectar found in the flower nectar that hummingbirds feed on. For this demonstration we will be using cups, but any 1 to 4 ratio will work. It all depends on how big a batch of nectar you want to end up with.
Place the nectar solution in a pan on the stove and stir the mixture until the sugar is dissolved.
Bring the hummingbird syrup to a boil and let it boil for 2 minutes. The boiling of your hummingbird nectar will release any chlorine that might be in the water and it will also kill any mold spores or bacteria that might be in the sugar. Mold spores or bacteria will cause you nectar to ferment and have to be changed sooner. Once the nectar is done boiling, remove it from the heat and let it cool. Boiling for longer than 2 minutes is unnecessary and will boil away too much water making the nectar sweeter and more attractive to bees and wasps. Boiling the nectar will release any chlorine that might be in the water and boiling will kill any mold spores or bacteria that might be in the sugar. Boiling will help you nectar last longer in your feeder before t needs changed and it will last longer in storage also.
Once cooled the nectar can be added to your feeder. If you have any nectar left over you can store it in the refrigerator for a week or more and use it when necessary.
As I said before, any ratio of 1 part sugar to 1 part water will work. If you want a smaller amount, you can use 1/2 cup sugar to 2 cups water or 1/4 cup sugar to 1 cup water. If you want more nectar for a large amount of feeders use 2 cups sugar to 8 cups water, and so forth. Below is a nice video on homemade hummingbird food
Video: making hummingbird food
Where to hang your hummingbird feeder
Now that you have made some hummingbird nectar and your feeder is full, you will need to choose a spot to hang your feeder. If possible you should look for a cooler spot to hang the feeder so your nectar will last longer. If you can find some shade, that would be better. Heat will cause the sugar to ferment quicker so hanging it in the shade rather than in the sun will keep the nectar fresh longer.
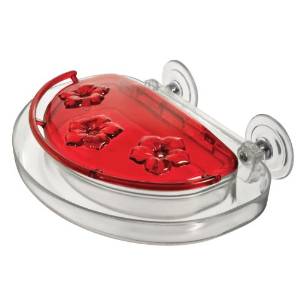
You might also want a spot near a window to hang your feeder. If you can find a shady spot near a window in a room where you spend a lot of time, you will have a very good spot to hang it. The feeder will stay cooler and you will be able to observe your feeder while in the house. You might even want to go with a hummingbird window feeder that attaches right to the window with suction cups. This will give you the best view of your feeder possible.
How to keep your hummingbird nectar fresh
Now that you have your feeder in a good spot and hopefully attracting lots of hummingbirds, you will want to make sure that the nectar is always fresh so that the hummingbirds keep coming back for more. If the nectar goes bad the hummingbirds will quit using your feeder.
Heat from the outside air is what will determine how long the nectar stays fresh before the sugar starts to ferment. The hotter the temperature is the quicker the sugar will ferment and the sooner the nectar will have to be changed. Usually if the outside temperature stays in the 60’s you nectar might last up to a week before needing to be changed. Once the temperature gets hotter, it will need to be changed more frequently. Below is a chart that will give you a general idea about how often the nectar will need changing. Using the chart along with your visual observations will tell you when to change the nectar
High temperatures…………Change after
71-75……………………………6 days
76-80……………………………5 days
81-84……………………………4 days
85-88……………………………3 days
89-92……………………………2 days
93+………………………………change daily
Anytime you notice the nectar becoming cloudy, change it. If you notice it’s cloudy and notice black specks of mold in the nectar or mold on the feeder, you know you have waited too long and need to start changing it sooner. If you wait too long, yeast will ferment the sugar and mold and bacteria, that can be harmful to hummingbirds, will start to grow in the nectar and on your feeder.
How to keep your feeder clean
Every time the nectar is changed, you should rinse out the feeder with hot water, several times. The National Audubon Society suggests to clean your hummingbird feeder once a week by rinsing it out with a solution containing 1 part white vinegar to 4 parts water. After rinsing with the vinegar solution, rinse your feeder out 3 times with running water to remove the vinegar.
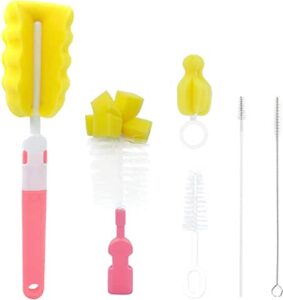
If you don’t change the nectar often enough and you find mold growing in your nectar or on your feeder, you will have to clean the feeder with a mild bleach solution to kill the mold and to sterilize the feeder. You may also have to use hummingbird feeder brushes to get all the mold out of your feeder.
To make the bleach solution to sterilize your feeder, mix 1/4 cup bleach in a gallon of water. Submerge your feeder into the solution and soak it for an hour. After an hour remove the feeder and thoroughly rinse it off under running water to remove all the bleach. The bleach could be harmful to the hummingbirds so it’s very important to make sure you rise it all off.
A good hummingbird feeder that is easy to take apart and easy to clean will make your feeder cleaning a lot easier!
Below is a good video on how to clean a hummingbird feeder . It will show the various feeder brushes that are very helpful in cleaning the feeder.
How to ant proof and how to bee proof your hummingbird feeder
Now you know how to make your own food and how to keep your feeder clean. Next you need to know how to keep insects such as ants, bees and wasps off of your feeder. All these insects will be attracted to the sweet hummingbird nectar just as much as the hummingbirds are. They can become quite a problem at the feeder. Ants will get into the nectar and drown. Then their decomposing bodies will ruin your nectar. Bees and wasp can get so thick at your feeder that the hummingbirds won’t even have a chance to feed.
Controlling pests at the feeder can be fairly simple if you start with a good hummingbird feeder that is designed to keep the insects away. If yours isn’t, there are steps you can take to control the feeder pests.
How to keep ants off a hummingbird feeder
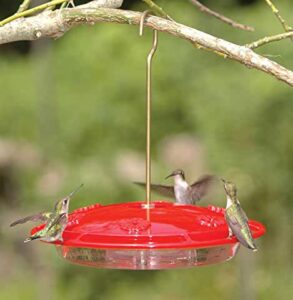
 Some feeders have ant moats built right into the design of the feeder. For other feeders you can always add an ant moat in front of the feeder between the feeder hook and the feeder. The ant moat is a barrier that keeps ants away from your feeder and out of the nectar. An ant moat is a container that holds water. The ants cannot swim, so when they reach the ant moat they cannot go any farther. Add an ant moat in front of your feeder and your ant problem will be solved. Add a red ant moat and it will also help to attract hummingbird to your feeder
Ant moats come in different designs and are made out of more than just plastic. Some are made out of ceramic, copper and brass and will add an attractive appearance to you feeder.
If you would like to try making your own ant moat, here is a video
How to keep bees off a hummingbird feeder
There are several things you can try to keep bees off of your hummingbird feeder, if you have a feeder that isn’t already designed to keep bees away. Of course, the best thing possible is to get a bee proof feeder to begin with. Here’s what you can try with your feeder.
*Try moving the feeder to a different spot.
Sometimes moving it only a short distance will work because the bees aren’t nearly as smart as the hummingbirds and will think it is gone.
*Try taking the feeder down for a few days
Take the hummingbird feeder down until the bees quit looking for it. The hummingbirds won’t give up nearly as easy and will quickly find it again once you put it back up.
*Try giving the bees their own feeder.
Hang up a feeder with a nectar solution with a ratio of 1 part sugar to 3 parts water. Bees are more attracted to sweeter tasting nectar, so they should go after this feeder instead of the hummingbird feeder. Once the bees start using this feeder, give them a few hours and then move it away from the hummingbird feeder and hopefully the bees will follow and leave the hummingbird feeder alone. Good luck!
Here is a video that shows how one man bee proofed his feeder
The best possible way to keep bees, ants and other insects off a hummingbird feeder is to invest in a good feeder that has all the features built into the feeder. There are some feeders out there that are bee and ant proof and a lot more!
What to look for to find the best hummingbird feeder
*get a leak-proof feeder. A leaky feeder will lose nectar onto the outside of the feeder and then drip onto the ground. This is a great way to attract unwanted feeder pasts.
*get a feeder with an ant moat built-in.
*get a feeder that is bee proof.
*get a feeder that has perches so the hummingbirds can rest and conserve energy while they feed. This will also let you get a better view of the hummingbird
*get a feeder that has rain guards to keep rain water from getting into the nectar and diluting it.
*get a feeder that is easy to take apart and easy to clean. If a feeder comes apart easily and all the nooks and crannies are exposed you are much better able to clean it. And more likely to keep it clean.
*get a red feeder to attract hummingbirds.
For the most part, hummingbird feeders are divided into two types, basin (saucer feeders) and inverted bottle feeders.
Saucer feeder
The saucer type feeder is like a little dish with a cover on top. There are feeding ports in the top of the saucer’s lid where the hummingbirds can feed. The nectar is in the bowl below the lid. This type of feeder is leak-proof.
Inverted bottle feeder
The bottle style feeders will have a bottle-like container that will screw into the base of the feeder. The nectar is in a bottle, overhead of the base of the feeder. The problem with the inverted bottle style feeder arises when the nectar level starts to go down and causes an air space at the top of the bottle. Hot weather will then cause the air space to expand and force nectar downward and out of the feeding ports. Once nectar is outside the feeder and on the ground it’s an insect magnet.
The best hummingbird feeder will be a saucer/dish type feeder (non-leaking hummingbird feeder) with all the features listed above. I have found one that has everything you could want in a hummingbird feeder.
Hummzinger Ultra hummingbird feeder with ant moat and bee guard tips.
*This feeder has a built-in ant moat that holds water around the base of the hanger so ant can’t get at the nectar.
*It has patented “Nectar Guard Tips” to keep out bees and wasps. The Nectar Guard Tips are plastic flexible membranes that fit into the feeding ports from the underside of the lid. They allow the hummingbird to stick its beak through the port and when the beak is withdrawn the tips close the hole so bees and wasps can’t get in.
*The Hummzinger Ultra is red.
*It has red, raised rain guards in the shape of flowers around the feeding ports to keep out rain water.
*It’s a basin type feeder that doesn’t leak and it’s easy to take apart and clean.
*Inexpensive too.
Nectar is by far, not the only food hummingbirds eat. They eat nectar to provide the energy they need to sustain their extremely high metabolic rate. The sugar in nectar is a source of quick energy for the hummingbirds.
Hummingbird food that hummingbirds eat besides nectar
Besides nectar, hummingbirds also need sources of essential vitamins, minerals, amino acids, proteins, oils and fats. To get these into their diet, hummingbirds rely on eating insects. They eat small spiders and will eat the insects out of a spider’s web. And some species of hummingbirds feed on tree sap from holes in trees that other birds have made such as yellow bellied sap suckers. Hummingbirds also eat ants and small insects such as mosquitoes, aphids, gnats, midges, caterpillars, flying ants, weevils, small beetles, white flies and insect eggs.
Remember when your filling your feeder with your homemade nectar, that the nectar is not all they’ll be eating. So try to refrain from using insecticides to keep from harming the hummingbirds.
Here is my instructional video on how to hand-feed hummingbirds. It’s some of the most fun I have ever had. And using my techniques, it was so easy to do.
Here is another technique you can use to hand-feed hummingbirds through a window in your home.
If you would like to watch my other videos on hand-feeding different backyard birds and squirrels, click the link Hand-feeding backyard birds and squirrels
So now you know how to make hummingbird food, when to change the nectar, how to clean a hummingbird feeder, how to ant proof and how to bee proof your hummingbird feeder and how to hand-feed your hummingbirds. You should now be able to get the most enjoyment possible, out of feeding your hummingbirds !
If you found this article helpful in feeding hummingbirds and making hummingbird food, please share it using the social bookmarking buttons on the left side of this page. Help everyone to increase their enjoyment of hummingbirds and do it for the hummingbirds!
related article – Cornell university– feeder pest control
<


