Introduction
Hummingbirds are nature’s living jewels, captivating us with their vibrant colors, incredible flying abilities, and charming personalities. Creating the perfect homemade hummingbird food is not only a rewarding experience but also crucial for attracting these delightful creatures to your garden. In this comprehensive guide, we’ll explore everything you need to know about crafting the ideal nectar, from the perfect recipe to essential tips for maintaining your feeders. Whether you’re a seasoned bird enthusiast or a curious beginner, this article will equip you with the knowledge to become a hummingbird’s favorite host.
The Science Behind Hummingbird Nutrition
Understanding Hummingbird Metabolism
Hummingbirds have one of the highest metabolic rates of any animal, with heart rates that can exceed 1,200 beats per minute during flight. This incredible energy expenditure requires a diet that can quickly provide easily accessible calories.
Natural Diet vs. Feeder Nectar
In the wild, hummingbirds derive their energy from flower nectar and small insects. The nectar provides quick energy, while insects supply essential proteins, amino acids, and other nutrients. Homemade nectar aims to replicate the sugar content found in natural flower nectar, serving as a supplementary energy source.
The Perfect Homemade Hummingbird Food Recipe
The Golden Ratio: 4:1
Creating the ideal hummingbird nectar is surprisingly simple. The perfect ratio is:
-
4 parts water
-
1 part white granulated sugar
This mixture closely mimics the natural nectar found in flowers that hummingbirds favor.
Step-by-Step Instructions
-
Boil the water: Start with clean, fresh water and bring it to a boil. This helps purify the water and ensures the sugar dissolves completely.
-
Add sugar: Measure out the sugar and add it to the boiling water. Stir until completely dissolved.
-
Cool the mixture: Allow the sugar solution to cool to room temperature before filling your feeders.
-
Store excess: Any leftover mixture can be stored in the refrigerator for up to a week.
Scaling the Recipe
For convenience, here’s a quick reference guide for different quantities:
-
1 cup water + 1/4 cup sugar
-
2 cups water + 1/2 cup sugar
-
3 cups water + 3/4 cup sugar
-
4 cups water + 1 cup sugar
What to Avoid
-
Never use honey: It can promote dangerous fungal growth.
-
Avoid artificial sweeteners: These provide no nutritional value to hummingbirds.
-
Skip the red dye: It’s unnecessary and potentially harmful.
-
Don’t use brown sugar or molasses: These contain additional minerals that can be harmful to hummingbirds.
Use Songbird Essentials Nectar Aid Self Measuring Pitcher and never measure ingredients again. Make any amount and the ingredients are measured for you.
 |
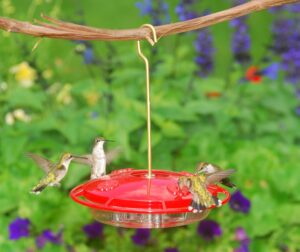
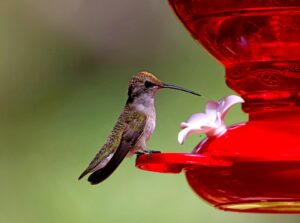
Choosing the Right Feeder
Types of Hummingbird Feeders
-
Bottle Feeders: Traditional and widely available, these hanging feeders come in various sizes.
-
Saucer Feeders: Easy to clean and less likely to leak, these are ideal for areas with high wind.
-
Window Feeders: Perfect for close-up viewing, these attach directly to windows.
-
Decorative Feeders: These combine functionality with aesthetic appeal, often featuring intricate designs.
Key Features to Look For
-
Easy to Clean: Choose feeders that disassemble easily for thorough cleaning.
-
Red Accents: Hummingbirds are attracted to the color red, but avoid feeders with red nectar.
-
Perches: Some feeders include perches, allowing for longer feeding sessions and better observation.
-
Ant Moats: Built-in ant moats prevent insects from reaching the nectar.
-
Bee Guards: These help deter bees and wasps from accessing the nectar ports.
One of the best Hummingbird feeders that’s easy to take apart and clean is the HummZinger Ultra.
Aspects 12oz HummZinger Ultra With Nectar Guard.
The HummZinger Ultra12oz Saucer Feeder is one of the best options for a hummingbird feeder that’s both easy to clean and maintain. This top-tier feeder features patented Nectar Guard tips—flexible membranes on the feeding ports that keep flying insects out while still allowing hummingbirds to feed freely. Plus, it comes with an integrated ant moat to prevent crawling insects from reaching the nectar, and the raised flower ports help divert rain, keeping the nectar fresh.
With a 12 oz capacity, this mid-size feeder offers plenty of space and can be hung or mounted on a post using the included hardware. It has four feeding ports and is made from durable, unbreakable polycarbonate. Whether you’re concerned about bees, wasps, or ants, this feeder is built for easy cleaning and insect protection.
Material Considerations
-
Glass: Durable and easy to clean, but can be heavy.
-
Plastic: Lightweight and shatter-resistant, but may degrade faster in sunlight.
-
Ceramic: Attractive and durable, but can be fragile and expensive.
Proper Feeder Maintenance
Cleaning Schedule
-
Every 2-3 days: In hot weather (above 80°F / 27°C)
-
Every 4-5 days: In cooler weather (below 80°F / 27°C)
Guide for when to change the nectar
Letting the nectar ferment encourages mold growth, which makes the cleaning process more difficult. To avoid this, follow the chart below for recommended nectar changes based on the temperature. The hotter it gets, the more frequently you’ll need to replace the nectar.
High temperatures…………Change after
71-75……………………………6 days
76-80……………………………5 days
81-84……………………………4 days
85-88……………………………3 days
89-92……………………………2 days
93+………………………………change daily
Cleaning Method
-
Empty the feeder completely.
-
Rinse with hot water.
-
Use a mild soap solution if necessary (avoid harsh detergents).
-
For stubborn residue, create a solution of 1 part white vinegar to 4 parts water.
-
Use a bottle brush to scrub all surfaces, especially the feeding ports.
-
Rinse thoroughly to remove all soap or vinegar residue.
-
Allow to air dry completely before refilling.
- Click on the link for a detailed guide to help you clean your hummingbird feeder, especially when mold starts to grow due to nectar not being changed in time.
Signs of Spoilage
-
Cloudy or milky nectar
-
Black or white mold
-
Stringy or thick consistency
-
Foul odor
Seasonal Maintenance Tips
-
Spring: Clean feeders thoroughly before hanging them for the season.
-
Summer: Increase cleaning frequency during hot weather.
-
Fall: Continue feeding to help late migrants prepare for their journey.
-
Winter: In areas with winter hummingbirds, use a heated feeder to prevent freezing.
Attracting Hummingbirds to Your Garden
Create a Hummingbird-Friendly Environment
-
Provide perches near feeders for resting and preening.
-
Offer a water source for bathing, such as a shallow fountain or mister.
-
Avoid using pesticides in your garden to protect hummingbirds and their insect prey.
-
Plant native species that bloom at different times to provide a consistent food source.
Offer Water and Shelter
In addition to nectar, hummingbirds need water and safe spaces to rest. By providing a birdbath or misting system, you can ensure they have everything they need.
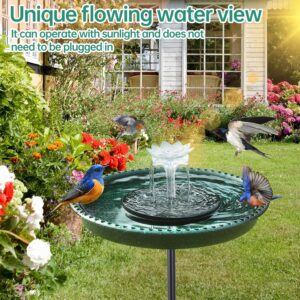
Water Sources
Hummingbirds enjoy fresh water to drink and bathe. A shallow birdbath with a fine spray from a mister is ideal. Just make sure the water is changed regularly to keep it clean.
Here’s a solar powered bird bath.
Hummingbird misters at Amazon.com
Shelter and Safe Spaces
Hummingbirds need safe places to rest between feedings. Planting small trees, shrubs, and vines can provide these resting spots. Avoid predators like cats, which can scare or harm the birds.
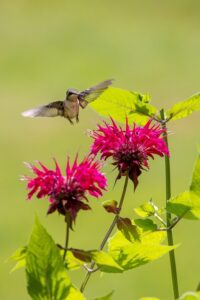
Plant Hummingbird-Friendly Flowers
-
Trumpet Honeysuckle (Lonicera sempervirens)
-
Bee Balm (Monarda didyma)
-
Cardinal Flower (Lobelia cardinalis)
-
Fuchsia (Fuchsia spp.)
-
Columbine (Aquilegia spp.)
-
Salvia (Salvia spp.)
-
Penstemon (Penstemon spp.)
-
Lantana (Lantana camara)
Here’s a complete guide to attracting hummingbirds to your yard. It lists plants, vines and shrubs that are in bloom for spring, summer and fall. Your hummingbirds will always have flowers to feed on.
Feeder Placement Strategies
-
Hang feeders at varying heights to accommodate different species.
-
Place feeders near flowering plants to catch the attention of nectar-seeking hummingbirds.
-
Ensure feeders are visible from multiple angles to increase their attractiveness.
-
Consider hanging multiple feeders to reduce competition among hummingbirds.
- Here’s a great article that tells everything you need to know about how to choose the best place to hang your hummingbird feeder.
Common Myths About Hummingbird Feeding
Myth 1: Feeders Make Hummingbirds Dependent
Reality: Hummingbirds naturally prefer flower nectar and only use feeders as a supplement. They will not become dependent on feeders and will continue to seek out natural food sources.
Myth 2: Feeders Should Be Taken Down in Fall
Reality: Leaving feeders up doesn’t delay migration and can help late migrants. Hummingbirds migrate based on daylight hours, not food availability.
Myth 3: Sugar Water is Bad for Hummingbirds
Reality: A proper sugar-water mixture is safe and beneficial for hummingbirds when prepared and maintained correctly.
Myth 4: Red Dye is Necessary to Attract Hummingbirds
Reality: The red color on the feeder itself is sufficient to attract hummingbirds. Adding red dye to the nectar is unnecessary and potentially harmful.
Frequently Asked Questions
How Often Should I Change the Nectar?
Change the nectar every 2-3 days in hot weather and every 4-5 days in cooler weather to prevent fermentation and mold growth. Always clean the feeder before refilling.
Can I Use Brown Sugar or Honey Instead of White Sugar?
No, stick to white granulated sugar. Brown sugar and honey can be harmful to hummingbirds due to their mineral content and tendency to ferment quickly.
Why Aren’t Hummingbirds Visiting My Feeder?
Ensure your feeder is clean, the nectar is fresh, and it’s placed in a visible, safe location. Be patient, as it may take time for hummingbirds to discover a new feeder. Also, consider the time of year and whether hummingbirds are present in your area.
Is It Safe to Feed Hummingbirds Year-Round?
Yes, it’s safe to feed hummingbirds year-round, especially in areas where they don’t migrate. In colder regions, feeders can help late migrants or winter residents. However, be prepared to maintain feeders more frequently in freezing temperatures.
How Can I Prevent Bees and Wasps from Taking Over My Feeder?
Use feeders with bee guards, avoid yellow feeders (which attract insects), and ensure there are no leaks or drips. You can also try moving the feeder slightly, as hummingbirds will find it more quickly than insects.
If you already have a hummingbird feeder, and you want to protect your hummingbird food from ants and other crawling insects, the ant moat below will do the job.
Trap-It Ant Moat for Hummingbird Feeders
Using an ant moat for your hummingbird feeder is an effective way to keep ants away from the sweet nectar. These tiny creatures are drawn to
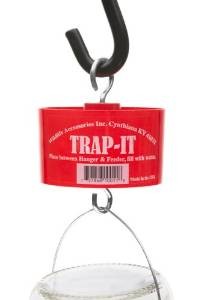
the sugar water, and without a barrier, they will quickly infest your feeder, preventing the birds from enjoying the nectar. An ant moat works by creating a barrier of water that ants can’t cross. Positioned above the feeder, it effectively blocks the ants’ path, keeping them from reaching the nectar.
This simple solution also ensures that your hummingbird feeder remains clean and accessible for the birds, rather than becoming a breeding ground for ants or other pests. It’s a small addition that can make a big difference in maintaining a healthy, inviting space for hummingbirds, while also reducing the need for chemical ant deterrents.
The first and still the best to protect your Hummingbird and Oriole feeder from ants and other crawling insects. Insert between hanger and feeder and fill with water, providing a barrier to crawling pests. Red color to attract hummingbirds.
What Should I Do If I See a Sick or Injured Hummingbird?
Contact a licensed wildlife rehabilitator immediately. Do not attempt to care for the bird yourself, as hummingbirds have specialized needs and require expert care.
Advanced Hummingbird Care Tips
Creating a Year-Round Hummingbird Haven
For those in areas with year-round hummingbird populations or looking to attract winter residents, consider these additional tips:
-
Provide shelter: Plant dense shrubs or trees near feeding areas for protection from predators and harsh weather.
-
Offer protein sources: Encourage small insects by maintaining a pesticide-free garden with native plants.
-
Install a heat lamp: In colder climates, a safely installed heat lamp near the feeder can prevent nectar from freezing.
-
Rotate feeding locations: Move feeders periodically to prevent territorial behavior and allow more birds to feed.
Photographing Hummingbirds
For enthusiasts looking to capture these beautiful creatures on camera:
-
Use a fast shutter speed (at least 1/1000th of a second) to freeze wing motion.
-
Set up near a feeder or favorite flower, but be patient and still.
-
Consider using a macro lens for close-up details of feathers and beaks.
-
Experiment with flash photography to capture iridescent feathers, but use it sparingly to avoid disturbing the birds.
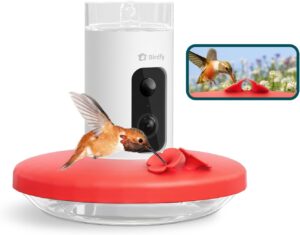
Adding a hummingbird feeder with a camera is a good way to increase your joy of feeding hummingbirds
Conclusion
Feeding hummingbirds is a rewarding experience that brings joy and wonder to your backyard. By creating a welcoming environment with homemade nectar, choosing the right feeders, and maintaining a clean and safe feeding area, you can attract these beautiful birds and enjoy their vibrant colors and fascinating behaviors.
If you found this article helpful please share it with your friends using the social bookmarking buttons on the left side of this page. Help everyone to increase their enjoyment of feeding hummingbirds. Do it for the hummingbirds!
Hummingbird Resources
U.S. Fish and Wildlife Service – Hummingbird Conservation
This site offers detailed information about various hummingbird species, their habitats, and conservation efforts. It also provides resources on how to protect these fascinating birds.
National Park Service – Hummingbird Resources
The National Park Service offers insights into hummingbird species found in national parks, their behaviors, and their role in ecosystems, along with tips for observing them.
Smithsonian National Museum of Natural History – Birds: Hummingbirds
This resource provides educational materials on the role of hummingbirds in pollination and biodiversity, backed by scientific research and exhibits from the Smithsonian.
U.S. Geological Survey – Hummingbird Studies
The USGS offers research on hummingbird migration patterns, population dynamics, and environmental threats, including studies on climate change impacts.

