The Black-eared fairy hummingbird is a South American hummingbird of the Amazon rain forests. It has a fairly large range and is found mainly in Bolivia, Brazil, Colombia, Ecuador, French Guiana, Guyana, Peru, Suriname, and Venezuela. Its natural habitat is subtropical or tropical moist lowland forests.
Description
The Black-eared fairy is a medium-sized tropical hummingbird. The upper parts of the Black-eared fairy are bright green. The lower parts of the bird are white and it has a black mask on it’s face. The bill of the bird is relatively short and straight and is colored black. The graduated tail is blue-black in the center, with white outer tail feathers (i.e. typically appear blue-black from above, white from below). Depending on subspecies, the male has a green throat. The female is similar to the male hummingbird but has a longer tail and doesn’t have a green throat.
The Black-eared fairy hummingbird breeds all year long. The nest is cup shaped and made out of down. The nest is attached to a tree branch anywhere from 3 to 30 meters above the ground. The female will breed for the first time in her 2nd year and will lay 2 eggs which she incubates for about 15 days. The young hummingbirds will fledge in 23 to 26 days.
The Black-eared fairy will catch flies out of the air and also eat them off of plant foliage. Because of it’s short bill, the Black-eared fairy will sometimes pierce a hole at the base of larger flowers to get access to the nectar.
Below is a video of a Black-eared Fairy hummingbird
Here you will learn how to ant proof your hummingbird feeder using an ant moat.
You will also learn how to bee proof your feeder, an easy recipe to make homemade hummingbird nectar, the best way to clean and sterilize your feeder and so much more. At the end of the article you will also find my special free video course that will teach you how to hand-feed hummingbirds and a link to my other free video course that will teach you how to hand-feed your other backyard birds. You will learn everything you need to know to maximize you enjoyment of hummingbirds!
Ants, bees and wasps can become a big problem at your hummingbird feeder. Here you will learn how to keep them away. Ants love hummingbird nectar and they will soon locate your feeder, especially if you are using a feeder that leaks and leaves a trail of nectar for them to follow. Inverted bottle feeders are a good example of feeders that leak nectar. The bottle feeder has the nectar stored in a bottle above the feeding ports. The problem is, once the level of the nectar in the bottle starts to go down, there is an air pocket left in it’s place at the top of the bottle. Heat will cause this air pocket to expand and that will force the nectar out of the feeding ports below the bottle. The outside of the feeder will be covered with nectar as well as the ground below the feeder. This leaves an easy trail for ants to pick up and follow to your feeder.
The alternative is to use the other main type of feeder, the saucer or basin feeder. The saucer feeder is like a dish, that hold the nectar, with a cover over top that has the feeding ports. The nectar is stored below the feeding ports so there is no problem with expansion forcing the nectar up and out of the ports. The ants are a lot less likely to locate a feeder of this type. Most of your better saucer type feeders will also have an ant moat built into the design of the feeder, that will totally ant proof the feeder.
If you have an old leaky, bottle feeder, you can still keep ants away from your feeder. All you have to do is use an add on ant moat that will ant proof your feeder.
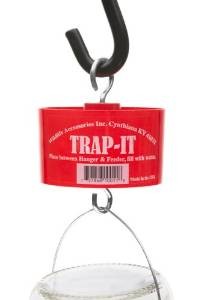
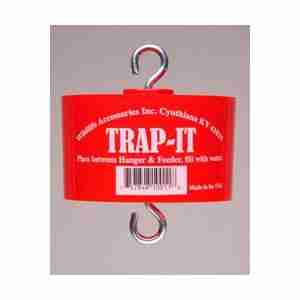
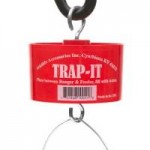
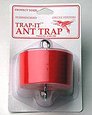
Ant proof your hummingbird feeder
ant moat
Use an ant moat to keep ants off a hummingbird feeder.
An ant moat or ant guard, as they are also called, is the easiest and best way to ant proof your hummingbird feeder. An ant moat is simply a small container that holds water. Since ants cannot swim, the moat provides an effective barrier when it is placed between the feeder hanger and the feeder. As you can see in the picture, one end of the ant moat is attached to the hanger and the other end is attached to the feeder. The ants can crawl down the hanger only as far as the water in the moat. Since they can’t swim, this is as far as the ants can go.
If you choose a red ant moat, the red color will also aid in the attraction of hummingbirds.
If you would like to try to make your own, below is a video on how to make a homemade ant moat.
Now that your feeder is ant proof, you will also want to know how to keep bees and wasps off of your hummingbird feeder
How to bee and wasp proof a hummingbird feeder
Bees and wasps also love the taste of sweet hummingbird nectar. I have had them so thick around my feeder that the hummingbirds couldn’t even get close to feed. Once the bees have found your feeder there are a few tactics you can try to keep them away. I have even posted a video below that shows how one man bee proofed his hummingbird feeder using the plastic mesh from an onion sack.
There are some feeders that come with bee proofing built right into the design of the feeder. You have probably seen thoseyellow plastic bee guardsthat fit over the feeding ports on some feeders. Usually these are found on bottle-type feeders that are prone to leaking, which attracts bees and the yellow color of the bee guards also attracts bees and wasps. These two things together, seem to undermine the whole objective of keeping bees and wasps off your feeder. A much better option is to use what are called “nectar guard tips”. There are feeders that come already equipped with the patented “nectar guard tips“. These tips are made of flexible plastic that fits into the feeding port from underneath. The hummingbird with its long beak can easily feed through them. When the hummingbird withdraws its beak, the tips close and prevent access to bees and wasps. Getting a feeder with “nectar guard tips”, is the best choice to keep bees and wasps off your hummingbird feeder.
Here’s some other options that might help to keep bees and wasps off your hummingbird feeder:
*Try moving the feeder. Sometimes just moving the feeder a short distance from where it is, will be enough to keep the bees from finding it. I guess they’re not very smart compared to hummingbirds.
*Take the feeder down for a while. Sometimes you can take the feeder down until the bees and wasps give up and leave. After they leave, put the feeder back up. You might have to leave it down for several days. The hummingbirds won’t give up looking for the feeder as soon as the bees will, so when you put the feeder back up it shouldn’t be long before the hummingbirds find it again.
*Finally, you can try putting up a feeder just for the bees and wasps. In the bee feeder, fill it with nectar that is sweeter than the hummingbird nectar. Mix the nectar 1 part sugar to 3 parts water instead of 4 parts water. This sweeter nectar should be more attractive to the bees and wasps and hopefully they will leave the hummingbird feeder alone.
Below is a video about how one man bee proofed his feeder using the plastic mesh from an onion sack.
As mentioned before, there are some feeders that come with ant and bee proofing built right into the feeder design.
*will of course, be red in color to attract hummingbirds
*will be a basin feeder that is “non-leaking, so it doesn’t attract insects
* will have raised feeding ports to keep rain water from diluting the hummingbird nectar
*will have a perch for the hummingbirds to sit on, as they feed, so the hummingbirds can conserve their energy
*and will be easy to take apart and clean.
Now that you know how to ant and bee proof your hummingbird feeder, you should also learn how to make your own hummingbird food. Homemade hummingbird food is easy to make and will save you money, if you make it yourself. Your homemade food will also be healthier for the hummingbirds because, unlike a lot of the store bought hummingbird nectar, your homemade nectar will not contain any red food coloring. Food coloring is thought to be harmful to the hummingbirds and it is not necessary to attract hummingbirds if you have a red feeder or a red ant moat. If you don’t have any red, some people attach red ribbons to the feeder to help attract hummingbirds.
How to make hummingbird nectar
The homemade hummingbird nectar recipe is 1 part sugar to 4 parts water.
Ordinary white granulated table sugar, the same sugar you use on your breakfast cereal and water are the only 2 ingredients you will use to make the hummingbird food. Don’t add any other types of sweeteners or any other ingredients. Other types of sweeteners can be harmful to the hummingbirds, so don’t use anything else, just water and sugar. The 1 to 4 ratio will make nectar that is the same as the nectar found in the flower blossoms that hummingbirds feed on.
Homemade Hummingbird nectar instructions:
*to a sauce pan on your stove, add 1 part sugar to 4 parts water
*stir to dissolve the sugar as the mixture comes to a boil
*boil for 2 minutes
*remove from heat and let cool
After the nectar has cooled you can fill the feeder and store any extra nectar in the refrigerator for up to a week. Boiling the nectar will kill and impurities that might be in the sugar and boiling will release the chlorine from the water. Boiling for 2 minutes is long enough. If you boil any longer than 2 minutes you might boil away too much water and change the ratio. You will end up with a sweeter nectar that is more attractive to bees and wasps. Any way we can reduce the attractiveness of the nectar to insect, the better.
Below is a video that shows how to make homemade hummingbird nectar. Most people boil the nectar for 2 minutes, which is longer than the time suggested in the video.
Now you have an ant and bee proof feeder filled with homemade nectar. If you want to be successful at attracting and feeding hummingbirds you must keep fresh nectar in your feeder at all times. You will need to know when to change it so that the nectar is always fresh. If the nectar ferments, your hummingbirds will disappear. When the nectar gets old, the sugar will ferment and cause mold to grow in the nectar and on your feeder. Moldy nectar is bad for the health of the hummingbirds and makes your feeder much harder to clean.
So how do you know when to change the nectar in the feeder?
There are general guidelines you can use that tell you when the time is getting close and the nectar will have to be changed. These guidelines are based on the outside air temperature. The hotter the weather, the sooner the nectar will ferment and the sooner fresh nectar will have to be added.
When to change the hummingbird nectar chart:
High temperatures are Change nectar after this many days
71-75 6 days
76-80 5 days
81-84 4 days
85-88 3 days
89-92 2 days
93+ change daily
These guidelines are approximate and only a visual examination of the nectar will tell you when it’s time to change it. When the nectar gets old it will start to look cloudy. At this point it needs to be changed. If you let it go longer than this this, you will start to see little black specks of mold in the nectar and you might also see black mold growing on your feeder. At this point, when you see mold, you know the nectar should have been changed sooner. Any time the nectar starts to look cloudy change it.
Every time you change the nectar wash out the feeder several times with hot water. The National Audubon Society suggests that once a week you clean your feeder with a vinegar solution. Rinse your feeder with a solution made up of 1 part white vinegar to 4 parts water. After rinsing the feeder out with the vinegar solution, rinse it out 3 times with clear warm water to remove all traces of the vinegar. Then you can refill the feeder with fresh nectar.
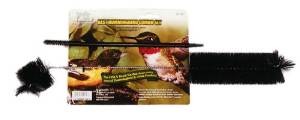
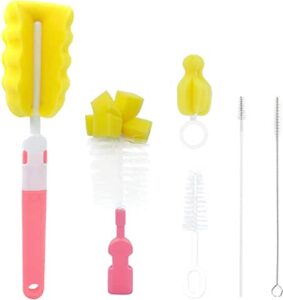
If you find mold growing in the nectar you will have to rinse your feeder with a mild bleach solution to kill the mold and to sterilize the feeder. This bleach solution is made by adding 1/4 cup bleach to 1 gallon of water. Soak your feeder in the bleach solution for 1 hour. If there’s any mold on your feeder you’ll need to brush it off. A set of hummingbird feeder brushes is very helpful in cleaning the mold from your feeder.
Below is a video on cleaning a hummingbird feeder
Here is my special instructional video that will show you an easy way to teach your hummingbirds to feed out of your bare hand.
Here is another video that will show you how to bring your hummingbirds to a window where you can feed them out of your hand.
Now you know all about ant moats for hummingbird feeders. You know how to bee proof your feeder and how to make your own homemade hummingbird food. You know when to change the nectar and how to clean your hummingbird feeder. You even know how to hand-feed your hummingbirds. You now know everything necessary to allow you to get the most possible enjoyment from feeding and watching your hummingbirds!
If you found this article to be helpful, please consider sharing it with others, using the social bookmarking buttons on the left side of this page. Please pass on the knowledge you have learned here and help everyone to increase their enjoyment of hummingbirds. Thank you!
Hummingbird Recipe To Fill Your Hummingbird Feeder
Here you will learn how to make hummingbird nectar, when to change the nectar in your feeder, how to properly clean your feeder, how to keep bees, ants and wasps away from your feeder and at the bottom of this article you will find my video that will also teach you how to hand-feed your hummingbirds.
The hummingbird feeder recipe is 4 parts water to 1 part sugar.
Easy directions for making hummingbird food:
In a sauce pan mix 1 part sugar with 4 parts water and stir to dissolve the sugar as the food mixture comes to a boil.
Boil 2 minutes, then remove from the heat.
Once the nectar mixture is cooled you can fill the feeder
The ingredients are ordinary tap water and white granulated table sugar. No other ingredients are added. Don’t use brown sugar, honey, corn syrup, molasses or artificial sweeteners. The flower nectar that hummingbirds feed on contains sucrose (ordinary table sugar) and that is all that is needed. Other ingredients can prove to be harmful or even fatal to the hummingbirds, so don’t use anything but white table sugar. Do NOT add red food coloring! Food coloring is considered to be harmful to hummingbirds so don’t add it.
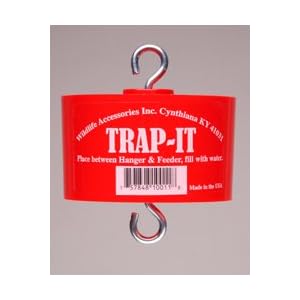
A red feeder is all you need to attract the hummingbirds. Do not use red food coloring in the nectar, it may be harmful to hummingbirds and it isn’t necessary.If your feeder is not red you can tie strips of red ribbon to your feeder or add a red hummingbird feeder ant moatbetween the hanger and the feeder. A red ant moat will help attract hummingbirds and will also keep ants out of your feeder.
ant moat
The nectar mixture is boiled so that the chlorine in the water will be released and any mold or bacteria that might be in the sugar will be killed. This will help your nectar last longer in the feeder and in storage. You can store leftover nectar in the refrigerator for up to 2 weeks. Boiling your homemade hummingbird food for 2 minutes is long enough. Boiling any longer will boil away more water and change the composition of the nectar. The 1 to 4 ratio of sugar to water is the same ratio found in flower nectar. If you boil longer it will change the ratio and make the nectar sweeter This will also make it more attractive to bees and wasps.
Any ratio of 1 to 4 will work. For example, you can use 1 cup sugar to 4 cups water or 1/2 cup sugar to 2 cups water or 1/4 cup sugar to 1 cup water … etc. These are all examples of a 1 to 4 sugar to water ratio. If you make a larger batch of hummingbird nectar, you can keep it in the refrigerator and not have to make it as often.
Video: making hummingbird food
Where to hang a hummingbird feeder
Once your hummingbird food is made and your feeder is filled you will have to find a place to hang the feeder. It’s best to find a shady spot to place your feeder if possible. The nectar will stay cooler and stay fresh longer if it’s in the shade. If you must hang it in the sun, that’s alright, but you’ll have to change the nectar more often so it doesn’t spoil.
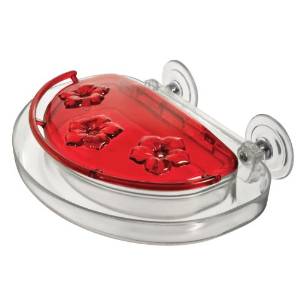
You should also look for a spot near a window so you will be able to watch the hummingbirds while they are at the feeder. You might want to try a window hummingbird feeder to really bring them up close.
window feeder
How to keep your nectar fresh
The outside temperature will determine how long your nectar will stay fresh. The hotter the temperature the more often it will have to be changed. Hummingbirds won’t use a feeder that doesn’t contain fresh nectar. Generally, if the temperature stays below 70 degrees, you can usually get by changing the nectar once a week. As the outside temperature rises above 70 degrees you will have to change it more often to keep he nectar fresh and mold free. You can use the chart below as a general guide line on how often you can expect to have to add fresh nectar to your hummingbird feeder.
When should you change the hummingbird nectar? Here is a chart that tells you approximately when you should change your nectar
High temperatures…………Change nectar after
71-75……………………………6 days
76-80……………………………5 days
81-84……………………………4 days
85-88……………………………3 days
89-92……………………………2 days
93+………………………………change daily
This is only a general guide line and the actual timing may vary according to other factors such as hanging your feeder in the sun or shade, properly boiling your hummingbird nectar and properly cleaning your feeder between fillings.
A visual inspection of the feeder and the nectar will tell you when it has to be changed. If the nectar starts to look cloudy or it contains black spots of mold, it needs to be changed more often. If you wait too long, yeast will start to ferment the sugar and mold and bacteria will start to grow. The mold and bacteria can be harmful to your hummingbirds.
How to clean a hummingbird feeder
If you keep the nectar fresh, rinsing out the feeder with hot water each time you change the nectar should be enough. To maintain a clean feeder you should give it a good cleaning about once a month in a mild bleach solution. To make the bleach cleaning solution for your hummingbird feeder, just add 1/4 cup bleach to 1 gallon of water and soak your feeder for about an hour. When your feeder is done soaking take it out and thoroughly rinse it several times in running water to remove all traces of bleach so the bleach doesn’t harm the hummingbirds. This soaking in a mild bleach solution will help insure that your feeder stays clean and will be attractive to hummingbirds.
Any time your nectar becomes cloudy or has black mold growing in it you will also have to sterilize the feeder with the mild bleach solution. You may also have to use some small hummingbird feeder brushes to remove all traces of the mold from inside the feeder. Remember to rinse thoroughly before filling with nectar.
A good hummingbird feeder that’s easy to take apart and allows easy access to the inside of the feeder, is one that you are more likely to be able to keep clean. This is an important consideration when choosing a hummingbird feeder.
Here is a good video on cleaning a hummingbird feeder.
It shows the different types of hummingbird feeder brushes that are available to aid in feeder cleaning, especially in cleaning mold out of the feeder.
How to keep ants, bees and wasps off of your hummingbird feeder
OK, you’ve got your hummingbird recipe, your feeder is filled and it’s hung in a good location. All that’s left is to keep the bees, wasps and ants off of your feeder. The sweet hummingbird syrup inside your feeder will not only be attractive to hummingbirds, but it will also be very attractive to hummingbird feeder pests, such as ants, bees and wasps. I have seen bees and wasps so thick around my feeder that the hummingbirds couldn’t feed at all. And ants can actually get inside the feeder through the feeder ports, where they will die and contaminate the nectar.
Hummingbird pest can usually be controlled by choosing agood hummingbird feederthat prevents access to such pests. Some feeders come with a built-in ant moat that keeps ants from reaching the nectar. The ant moat or ant guard as it is sometimes called, is filled with water and the ants can’t swim, so they can’t get to the hummingbird food. If you have a feeder that doesn’t have a built-in moat you can always add anant moat between the hanger and the feeder to keep out ants. There are also hummingbird feeders that have bee guards or nectar guard tips right on the feeders, that don’t allow the bees, wasps and other flying insects to reach the nectar.
Using a basin type feeder, rather than a bottle feeder will help keep ants away from your feeder. The air in a bottle feeder will expand and push nectar out of the feeder ports and onto the ground where the ants will find it and eventually find your feeder. A basin feeder won’t do this because all the nectar is below the feeding ports. For best results, the answer is to choose a good hummingbird feeder with all the features that keep pest away from the nectar. This will insure that you get the most enjoyment possible from feeding your hummingbirds and from using the hummingbird recipe.
Bees, wasps and other flying insect can also present a problem at your feeder. You have to be able to prevent them from getting to the nectar. If they can’t reach the nectar they will eventually give up and move on. The best hummingbird feeders, besides having an ant moat to keep out ants, will also have some type of bee guards or nectar guard tips to prevent bees from reaching the nectar.
Here is a helpful video that shows you how to bee proof your feeder using plastic mesh from an onion sack.
Now you know the hummingbird recipe and can make your own hummingbird food. You know where to hang your feeder, when to change the nectar and how to clean your feeder. You also learned how to keep ants and bees out of your nectar and how to hand-feed your hummingbirds. All these things added together will allow you to have the most success at attracting hummingbirds and keep them returning on a regular basis. Enjoy your hummingbirds!
If you found this article helpful please share it using the social bookmarking buttons on the left side of this page. Help everyone to increase their enjoyment of hummingbirds. Do it for the hummingbirds!
In this article on hummingbird food you will learn what hummingbirds actually eat and you will also learn how to make hummingbird food that you can put in your feeder to feed the hummingbirds. And at the end of the article is my special instructional video that will teach you how to hand-feed your hummingbirds.
Making hummingbird food
Making your own hummingbird food is easy, fun and inexpensive. Making homemade hummingbird nectar only requires two ingredients, white table sugar and water. No red food coloring will be added to the nectar. Food coloring might be harmful to hummingbirds and isn’t necessary to attract them to a feeder. If your feeder is red, that’s enough. You can even attach a red ribbon if you want more color to attract hummingbirds. Don’t add any other ingredient. NO brown sugar, honey, corn syrup, molasses or artificial sweeteners. The flower nectar that hummingbirds feed on contains sucrose (ordinary table sugar) and that is all that we will use. Other ingredients can prove to be harmful or even fatal to the hummingbirds, or at the very least will ferment the sugar, so don’t use anything except white granulated table sugar and water.
The recipe for homemade hummingbird nectar is to add 1 part sugar to 4 parts water. This 1 to 4 ratio will produce a homemade nectar that is just like the nectar found in the flower nectar that hummingbirds feed on. For this demonstration we will be using cups, but any 1 to 4 ratio will work. It all depends on how big a batch of nectar you want to end up with.
Place the nectar solution in a pan on the stove and stir the mixture until the sugar is dissolved.
Bring the hummingbird syrup to a boil and let it boil for 2 minutes. The boiling of your hummingbird nectar will release any chlorine that might be in the water and it will also kill any mold spores or bacteria that might be in the sugar. Mold spores or bacteria will cause you nectar to ferment and have to be changed sooner. Once the nectar is done boiling, remove it from the heat and let it cool. Boiling for longer than 2 minutes is unnecessary and will boil away too much water making the nectar sweeter and more attractive to bees and wasps. Boiling the nectar will release any chlorine that might be in the water and boiling will kill any mold spores or bacteria that might be in the sugar. Boiling will help you nectar last longer in your feeder before t needs changed and it will last longer in storage also.
Once cooled the nectar can be added to your feeder. If you have any nectar left over you can store it in the refrigerator for a week or more and use it when necessary.
As I said before, any ratio of 1 part sugar to 1 part water will work. If you want a smaller amount, you can use 1/2 cup sugar to 2 cups water or 1/4 cup sugar to 1 cup water. If you want more nectar for a large amount of feeders use 2 cups sugar to 8 cups water, and so forth. Below is a nice video on homemade hummingbird food
Video: making hummingbird food
Where to hang your hummingbird feeder
Now that you have made some hummingbird nectar and your feeder is full, you will need to choose a spot to hang your feeder. If possible you should look for a cooler spot to hang the feeder so your nectar will last longer. If you can find some shade, that would be better. Heat will cause the sugar to ferment quicker so hanging it in the shade rather than in the sun will keep the nectar fresh longer.
You might also want a spot near a window to hang your feeder. If you can find a shady spot near a window in a room where you spend a lot of time, you will have a very good spot to hang it. The feeder will stay cooler and you will be able to observe your feeder while in the house. You might even want to go with a hummingbird window feeder that attaches right to the window with suction cups. This will give you the best view of your feeder possible.
How to keep your hummingbird nectar fresh
Now that you have your feeder in a good spot and hopefully attracting lots of hummingbirds, you will want to make sure that the nectar is always fresh so that the hummingbirds keep coming back for more. If the nectar goes bad the hummingbirds will quit using your feeder.
Heat from the outside air is what will determine how long the nectar stays fresh before the sugar starts to ferment. The hotter the temperature is the quicker the sugar will ferment and the sooner the nectar will have to be changed. Usually if the outside temperature stays in the 60’s you nectar might last up to a week before needing to be changed. Once the temperature gets hotter, it will need to be changed more frequently. Below is a chart that will give you a general idea about how often the nectar will need changing. Using the chart along with your visual observations will tell you when to change the nectar
High temperatures…………Change after
71-75……………………………6 days
76-80……………………………5 days
81-84……………………………4 days
85-88……………………………3 days
89-92……………………………2 days
93+………………………………change daily
Anytime you notice the nectar becoming cloudy, change it. If you notice it’s cloudy and notice black specks of mold in the nectar or mold on the feeder, you know you have waited too long and need to start changing it sooner. If you wait too long, yeast will ferment the sugar and mold and bacteria, that can be harmful to hummingbirds, will start to grow in the nectar and on your feeder.
How to keep your feeder clean
Every time the nectar is changed, you should rinse out the feeder with hot water, several times. The National Audubon Society suggests to clean your hummingbird feeder once a week by rinsing it out with a solution containing 1 part white vinegar to 4 parts water. After rinsing with the vinegar solution, rinse your feeder out 3 times with running water to remove the vinegar.
If you don’t change the nectar often enough and you find mold growing in your nectar or on your feeder, you will have to clean the feeder with a mild bleach solution to kill the mold and to sterilize the feeder. You may also have to use hummingbird feeder brushes to get all the mold out of your feeder.
To make the bleach solution to sterilize your feeder, mix 1/4 cup bleach in a gallon of water. Submerge your feeder into the solution and soak it for an hour. After an hour remove the feeder and thoroughly rinse it off under running water to remove all the bleach. The bleach could be harmful to the hummingbirds so it’s very important to make sure you rise it all off.
Agood hummingbird feeder that is easy to take apart and easy to clean will make your feeder cleaning a lot easier!
Below is a good video on how to clean a hummingbird feeder . It will show the various feeder brushes that are very helpful in cleaning the feeder.
How to ant proof and how to bee proof your hummingbird feeder
Now you know how to make your own food and how to keep your feeder clean. Next you need to know how to keep insects such as ants, bees and wasps off of your feeder. All these insects will be attracted to the sweet hummingbird nectar just as much as the hummingbirds are. They can become quite a problem at the feeder. Ants will get into the nectar and drown. Then their decomposing bodies will ruin your nectar. Bees and wasp can get so thick at your feeder that the hummingbirds won’t even have a chance to feed.
Controlling pests at the feeder can be fairly simple if you start with a good hummingbird feeder that is designed to keep the insects away. If yours isn’t, there are steps you can take to control the feeder pests.
How to keep ants off a hummingbird feeder
Some feeders have ant moats built right into the design of the feeder. For other feeders you can always add an ant moat in front of the feeder between the feeder hook and the feeder. The ant moat is a barrier that keeps ants away from your feeder and out of the nectar. An ant moat is a container that holds water. The ants cannot swim, so when they reach the ant moat they cannot go any farther. Add an ant moat in front of your feeder and your ant problem will be solved. Add a red ant moat and it will also help to attract hummingbird to your feeder
Ant moatscome in different designs and are made out of more than just plastic. Some are made out of ceramic, copper and brass and will add an attractive appearance to you feeder.
If you would like to try making your own ant moat, here is a video
How to keep bees off a hummingbird feeder
There are several things you can try to keep bees off of your hummingbird feeder, if you have a feeder that isn’t already designed to keep bees away. Of course, the best thing possible is to get a bee proof feeder to begin with. Here’s what you can try with your feeder.
*Try moving the feeder to a different spot.
Sometimes moving it only a short distance will work because the bees aren’t nearly as smart as the hummingbirds and will think it is gone.
*Try taking the feeder down for a few days
Take the hummingbird feeder down until the bees quit looking for it. The hummingbirds won’t give up nearly as easy and will quickly find it again once you put it back up.
*Try giving the bees their own feeder.
Hang up a feeder with a nectar solution with a ratio of 1 part sugar to 3 parts water. Bees are more attracted to sweeter tasting nectar, so they should go after this feeder instead of the hummingbird feeder. Once the bees start using this feeder, give them a few hours and then move it away from the hummingbird feeder and hopefully the bees will follow and leave the hummingbird feeder alone. Good luck!
Here is a video that shows how one man bee proofed his feeder
The best possible way to keep bees, ants and other insects off a hummingbird feeder is to invest in a good feeder that has all the features built into the feeder. There are some feeders out there that are bee and ant proof and a lot more!
What to look for to find the best hummingbird feeder
*get a leak-proof feeder. A leaky feeder will lose nectar onto the outside of the feeder and then drip onto the ground. This is a great way to attract unwanted feeder pasts.
*get a feeder with an ant moat built-in.
*get a feeder that is bee proof.
*get a feeder that has perches so the hummingbirds can rest and conserve energy while they feed. This will also let you get a better view of the hummingbird
*get a feeder that has rain guards to keep rain water from getting into the nectar and diluting it.
*get a feeder that is easy to take apart and easy to clean. If a feeder comes apart easily and all the nooks and crannies are exposed you are much better able to clean it. And more likely to keep it clean.
*get a red feeder to attract hummingbirds.
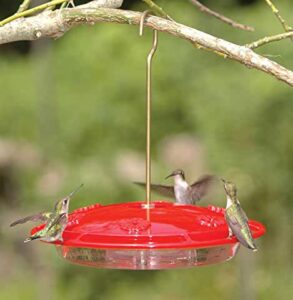
For the most part, hummingbird feeders are divided into two types, basin (saucer feeders) and inverted bottle feeders.
Saucer feeder
The saucer type feeder is like a little dish with a cover on top. There are feeding ports in the top of the saucer’s lid where the hummingbirds can feed. The nectar is in the bowl below the lid. This type of feeder is leak-proof.
Inverted bottle feeder
The bottle style feeders will have a bottle-like container that will screw into the base of the feeder. The nectar is in a bottle, overhead of the base of the feeder. The problem with the inverted bottle style feeder arises when the nectar level starts to go down and causes an air space at the top of the bottle. Hot weather will then cause the air space to expand and force nectar downward and out of the feeding ports. Once nectar is outside the feeder and on the ground it’s an insect magnet.
The best hummingbird feeder will be a saucer/dish type feeder (non-leaking hummingbird feeder) with all the features listed above. I have found one that has everything you could want in a hummingbird feeder.
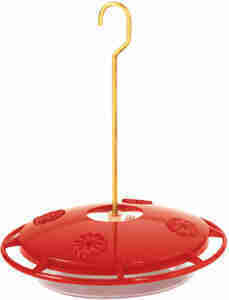
HummZinger Hummingbird Feeder
Hummzinger Ultra hummingbird feeder with ant moat and bee guard tips.
*This feeder has a built-in ant moat that holds water around the base of the hanger so ant can’t get at the nectar.
*It has patented “Nectar Guard Tips” to keep out bees and wasps. The Nectar Guard Tips are plastic flexible membranes that fit into the feeding ports from the underside of the lid. They allow the hummingbird to stick its beak through the port and when the beak is withdrawn the tips close the hole so bees and wasps can’t get in.
*It has red, raised rain guards in the shape of flowers around the feeding ports to keep out rain water.
*It’s a basin type feeder that doesn’t leak and it’s easy to take apart and clean.
*Inexpensive too.
Nectar is by far, not the only food hummingbirds eat. They eat nectar to provide the energy they need to sustain their extremely high metabolic rate. The sugar in nectar is a source of quick energy for the hummingbirds.
Hummingbird food that hummingbirds eat besides nectar
Besides nectar, hummingbirds also need sources of essential vitamins, minerals, amino acids, proteins, oils and fats. To get these into their diet, hummingbirds rely on eating insects. They eat small spiders and will eat the insects out of a spider’s web. And some species of hummingbirds feed on tree sap from holes in trees that other birds have made such as yellow bellied sap suckers. Hummingbirds also eat ants and small insects such as mosquitoes, aphids, gnats, midges, caterpillars, flying ants, weevils, small beetles, white flies and insect eggs.
Remember when your filling your feeder with your homemade nectar, that the nectar is not all they’ll be eating. So try to refrain from using insecticides to keep from harming the hummingbirds.
Here is my instructional video on how to hand-feed hummingbirds. It’s some of the most fun I have ever had. And using my techniques, it was so easy to do.
Here is another technique you can use to hand-feed hummingbirds through a window in your home.
So now you know how to make hummingbird food, when to change the nectar, how to clean a hummingbird feeder, how to ant proof and how to bee proof your hummingbird feeder and how to hand-feed your hummingbirds. You should now be able to get the most enjoyment possible, out of feeding your hummingbirds !
If you found this article helpful in feeding hummingbirds and making hummingbird food, please share it using the social bookmarking buttons on the left side of this page. Help everyone to increase their enjoyment of hummingbirds and do it for the hummingbirds!
Looking to bee proof your existing hummingbird feeder or wanting to buy a bee proof hummingbird feeder?
Here you will learn how to ant and and bee proof your hummingbird feeder, how to make hummingbird food, how to clean your feeder and at the end of this article is my special free video course video on how to quickly be able to hand-feed your hummingbirds.
Feeding hummingbirds with a feeder is a great way to view hummingbirds up close. It’s a lot of fun and very exciting to see and hear them buzzing around a feeder. Bees, wasps and other flying insects can also be seen buzzing around a feeder. That’s not quite so exciting! But luckily, there are easy ways to prevent bees, wasps and flying insects from ruining your hummingbird feeding enjoyment!
A hummingbird feeder filled with sweet nectar is sooner or later, going to attract bees, wasps and other flying insects to the feeder. Bees, like hummingbirds, enjoy the taste of sweet nectar. Fortunately for hummingbird lovers, there are hummingbird feeders that come equipped with built-in barriers that keep bees form reaching the hummingbird food. Since the bees and other insects can’t reach the nectar, after a while the bees will give up and move on.
The HummZinger Ultra hummingbird feeder has patented “Nectar-Guard” tips on the feeding ports of the feeder. These plastic tips keep bees, wasps and other flying insects from feeding at the feeder ports. The bees and wasps won’t be able to access the nectar and contaminate your hummingbird food.
These plastic Nectar Guard tips slide into the feeding ports on the underside of the hummingbird feeder cover. Each tip has a flexible membrane in the center which easily opens up when a hummingbird inserts it’s beak into the feeding port to feed. When the hummingbird withdraws it’s beak the the membrane closes tight to keep bees and wasps out of your feeder.
The HummZinger Ultra is an inexpensive hummingbird feeder that holds 12 ounces of hummingbird food. The feeder has 4 feeding ports and is easy to clean and easy to fill. It’s easy to clean because it comes apart in the middle and gives you complete access to the inside. An easier to clean feeder is a great asset and makes it so much easier to keep your feeder clean.There are no hidden surfaces inside the feeder that are hard to reach or hard to clean.
A clean feeder is very important if you want to be successful at attracting hummingbirds. They won’t come to a dirty feeder and a clean feeder is essential to the health of the hummingbirds. An easy to clean feeder makes it more probable that you will do the necessary maintenance to insure that you have hummingbirds returning to your feeder to feed quite often.
The saucer type design of this feeder makes it a drip proof feeder. Inverted bottle type feeders will develop an air space at the top of the feeder as the volume of nectar goes down. When this air space is heated it will expand and force nectar out of the feeder ports. This dripping nectar will attract ants, bees, wasps and other unwanted guests to the feeder. Because it is drip proof, this hummingbird feeder won’t attract anything but hummingbirds. Another great feature of the HummZinger Ultra feeder is that the feeder has a built in ant moat. The ant moat is a basin around the feeder hanger that you can fill with water. Because ants can’t swim, the ants won’t be able to reach the humming food inside the feeder.
This feeder can be hung or mounted on a pole. All these great features combined with the inexpensive price make it one of the best feeders money can buy. Bee proof, ant proof, leak proof, easy to clean and guaranteed for life. What more could you want from a hummingbird feeder?! Click hereif you want to buy a great bee proof and ant proof hummingbird feeder!
If you already have a feeder that you want to bee proof, here is a video that shows how one guy used plastic mesh from an onion sack to cover the feeding ports of the feeder. The feeder ports were too large and allowed honey bees and yellow jackets easy access to the nectar. He glued the plastic mesh inside the feeder and made the holes too small for bees and wasps, but the nectar ports still allowed hummingbirds to feed without any problems. It’s a good way to have a bee proof hummingbird feeder without having to buy a new feeder.
How to bee proof a hummingbird feeder video
How to keep ants away from a hummingbird feeder
Now that your feeder is bee and wasp proof you might want to go ahead and ant proof your hummingbird feeder too. The best way to ant proof your feeder is to use an ant moat or ant barrier as the are also called. You can either buy an ant moat or make your own. If you’re looking to buy a moat here is a good choice.
You simply hang the ant moat from a branch or feeder hook and hang your hummingbird feeder on the hook beneath the moat. Fill the ant moat with water and you will have a barrier that keeps ants away from your hummingbird food. The ant moat is red so it will help attract hummingbirds to your feeder too.
Click here to see a wide selection of ant moats that are available for your hummingbird feeder. Ant moats are a great investment and will save you lots of aggravation and save you lots of nectar and time!
If you would like to try and make your own ant moat, here is a video to show you how.
When to change the hummingbird nectar
Along with bee proofing and ant proofing your hummingbird feeder, you should also know how to maintain it. This includes knowing when to change the nectar so it is always fresh and also how to clean your feeder each time the nectar is changed. Hummingbirds won’t feed at a feeder that’s dirty and contains spoiled nectar.
Cleaning your feeder will be a lot easier if you change the nectar before it becomes moldy and before mold grows on your feeder. Eventually the sugar in your hummingbird nectar will ferment and if allowed to remain in your feeder, it will eventually become moldy. The temperature of the outside air will determine how long your nectar will stay fresh before it needs to be changed. As a general rule, if the temperature stays below 70 degrees the nectar will need to be changed every week. Once the temp climbs above 70, it will need to be changed more often. Below is a chart that will help you determine how often to change the nectar so it doesn’t become moldy and make feeder cleaning a lot tougher. Also, another good indication is when the nectar becomes cloudy or has black spots growing in it, it needs to be changed more often.
High temperatures…………Change nectar after
71-75……………………………6 days
76-80……………………………5 days
81-84……………………………4 days
85-88……………………………3 days
89-92……………………………2 days
93+………………………………change every day
Cleaning a hummingbird feeder
The bleach solution used to kill mold is 1 cup of bleach to 1 gallon of water
If the nectar becomes cloudy and has black spots of mold in it, you need to change it more often. Once mold has contaminated your feeder, it will have to be sterilized using a mild bleach solution. Mix into 1 gallon of water 1/4 cup of bleach. Soak your feeder in the mild bleach solution for at least an hour. Use some type of bottle brush to thoroughly scrub your feeder, inside and out to remove all traces of mold. Once scrubbed, thoroughly rinse your feeder with running water, several times too remove all traces of bleach so it doesn’t harm the hummingbirds.
A clean hummingbird feeder is essential to keep the birds using your feeder on a regular basis. So, use this bleach solution once a month to help keep your feeder clean and use it anytime your nectar gets moldy. Hopefully, using the chart above will prevent your feeder from becoming contaminated with mold.
Below is a set of hummingbird feeder brushes that will be extremely helpful in cleaning your hummingbird feeder.
These feeder cleaning brushes used in combination with the Hummzinger feeder above, will keep your cleaning chore to a minimum and insure your success at attracting hummingbirds to your feeder.
Hummingbird nectar recipe
1 part sugar to 4 parts water
The only thing left that you need to know is how to make your own hummingbird food. You can make your own hummingbird food and save money as well as trips to the store. The nectar you make yourself, will also be healthier for your hummingbirds because it won’t contain any red food coloring. Red food coloring is not necessary to attract hummingbirds, which is the only reason it’s added in the first place. But more IMPORTANT, red food coloring is thought to be HARMFUL to hummingbirds. So, DONT use it.
Making your own hummingbird food is a simple process. The only 2 ingredients you need are tap water and regular white granulated table sugar. Don’t use any other sweeteners or ingredients such as brown sugar, karo syrup, maple syrup, Jello, Splenda, Sweet’N’Low or Equal. These ingredients don’t have the same chemical make-up as table sugar and can cause illness or even death to hummingbirds. White granulated table sugar and water will make the same sweet nectar that is found in the flowers that hummingbirds feed on.
Here is the Nectar Food Recipe
The nectar food recipe uses a 4 to 1 ratio of water to sugar. For example, 4 cups of water to 1 cup of sugar, 2 cups of water to 1/2 cup of sugar or 1 cup of water to 1/4 cup of sugar. Any of these ratios will make a nectar that is similar to the nectar found in flower blooms that hummingbirds feed on. The only difference is the volume of nectar that you will end up with. If you have nectar left over you can store it in the refrigerator for a week or so and use it as necessary.
First, into a pan on the stove, pour your water, then add the sugar and stir to dissolve the sugar while the mixture comes to a boil. Let the nectar boil for 2 minutes and remove from the heat to cool. When the nectar has cooled you can add it to your feeder. It’s that simple!
Why you might want to boil the water
Boiling the water will release the chlorine from the water and kill any mold or yeast spores that might be in the sugar, which would cause your hummingbird nectar to ferment quicker and have to be changed more often. Don’t boil the nectar for more than 2 minutes. Boiling any longer will boil away too much water and change the ratio of water to sugar. That would result in a sweeter nectar that would be more attractive to bees and wasps.
Now you know how to make your own hummingbird food, how to ant and bee proof your hummingbird feeder and how to maintain the feeder so the nectar is always fresh. You shouldn’t have any trouble attracting hummingbirds and keeping them coming to your feeder!
How to hand-feed hummingbirds instructional video
Here is my video that will teach you how to hand-feed your hummingbirds
Here is another technique you can use to hand-feed hummingbirds through a window in your home.
If you found this article helpful please share it using the social bookmarking buttons on the left side of this page. Help everyone to increase their enjoyment of hummingbirds.
How Long Does A Hummingbird Live? And how to help them live longer
The life span of a hummingbird is considered to be long, for an organism with such a rapid metabolism. Most hummingbirds die during their first year of life. They die mainly during that period between hatching and the time they leave the nest. During this period of their life a hummingbird is very vulnerable.
Those hummingbirds that do survive have the capability to live ten tears or more. Most hummingbirds, among the better known species that occupy North America, the hummingbird life expectancy will be on the average of 3 to 5 years. In the wild, the longest recorded life span of a hummingbird was a female broad-tailed hummingbird. That particular hummingbird was banded when it was an adult, which made it at least 1 year old at the time it was banded. Eleven years later that same female broad-tailed hummingbird was recaptured, making her at least 12 years old.
Several other banded hummingbirds that lived a similarly long life span and similar in size, were a female black-chinned hummingbird with an estimated age of at least 10 years 1 month and a much larger buff-bellied hummingbird that was estimated to be at least 11 years 2 months.
Hummingbirds are captured and fitted with a band that is numbered, then if they are recaptured their age can be determined. Here is a great video on hummingbird banding.
Here is an easy to make hummingbird nectar recipe that is the best food for your hummingbird feeder. It is a basic hummingbird feeder solution that is simple and quick to make. The only ingredients that you will need are white table sugar and water. No red food coloring will be used, because food coloring may be harmful to the hummingbirds and it is not necessary. If your hummingbird feeder has red on it, that will be enough to attract the hummingbirds to your feeder.
The hummingbird food sugar water ratio is 1 to 4. You will use 1 part sugar to 4 parts water. This ratio of 4 parts water to 1 part common table sugar will give you a nectar that is close to the actual concentration of sugar found in the flower nectar that hummingbirds feed on. Using any more sugar will make the hummingbird food sweeter and thus more attractive to bees and wasps, which are a common feeder problem. Plus, the more sugar the hummingbird nectar contains, the quicker the hummingbird food will ferment and have to be changed.
For this example we will be using 4 cups of water and 1 cup of sugar. To make a smaller amount of nectar you could use 2 cups of water and 1/2 cup of sugar. Any excess hummingbird nectar that you have left over can be stored in the refrigerator for up to 2 weeks.
Pour the 4 cups of water into a pan and heat it on the stove. Add the sugar and stir as the solution comes to a boil, until the sugar is dissolved. Boil the hummingbird food for 2 minutes to kill any bacteria in the sugar that might cause your hummingbird nectar to ferment quicker. After 2 minutes of boiling remove the nectar from the heat and cool. Boiling any longer will cause more of the water to evaporate and will change the 4 to 1 ratio resulting in a greater concentration of sugar to water.
Once you homemade hummingbird nectar is cool you can fill your feeder. You only need to as add as much nectar as you think your hummingbirds will use, adding any more will just be wasting it. Store the unused hummingbird food in the refrigerator for up to 2 weeks.
Click on the link for an article on how to clean your hummingbird feeder. This article will also tell you how to determine when it’s time to clean your feeder. If you wait to long to clean the feeder you will end up with a moldy feeder.
Below is a video which will show you how to make the best hummingbird food.
Now that your hummingbird feeder mixture is done, you will need to get a feeder that is easy to take apart and clean, and one that will also protect your homemade hummingbird food mixture from bees ants and wasps.
My favorite choice of hummingbird feeders to use with the homemade hummingbird nectar recipe is
It’s inexpensive and has several features that makes it well worth the price.
The HummZingerhas patented Nectar guard tips which are flexible membranes attached to the feed ports that prohibit entry from flying insects, but allow Hummingbirds to feed as usual. The HummZinger also has a built in ant moat that will stop crawling insects from getting to the nectar. It also has raised flower ports that divert rain.
This mid-size nectar feeder has a 12 oz. capacity and can be hung or post mounted with hardware provided. It has four feeding ports for hummingbirds and is made of unbreakable polycarbonate. Easy to clean.
For ease of cleaning and protection from bees, wasps and ants, this feeder can’t be beat.
If you already have a hummingbird feeder, and you want to protect it from ants and other crawling insects, the ant moat below will do the job.
The first and still the best to protect your Hummingbird and Oriole feeder from ants and other crawling insects. Insert between hanger and feeder and fill with water, providing a barrier to crawling pests. Red color to attract hummingbirds.
In Native legend the hummingbird is said to be a healer as well as a carrier of joyful messages. During times of great pain or great sorrow, if a hummingbird appears it is a sign that the healing will soon begin. Legend has it that if the hummingbird comes to you and hovers above you, it is delivering a message of healing.
Some say the if you wear hummingbird jewelry that the jewelry will make you feel happy and peaceful.
Here is a story about the hummingbird and what it means to Native Americans in the northwest part of the country. The tiny hummingbird is also called Sah Sen in Coastal Native art. It is thought to be a messenger of joy and supposedly is a symbol of good luck as well as representing friendship and playfulness. If a hummingbird is seen prior to a major event such as going hunting or traveling to another village, the sighting is supposed to be a positive sign. The hummingbird’s ability to fly back and forth at great speeds and to hover, is believed to be a special skill the hummingbird has to help guide the people. If the people fall behind, the hummingbird can easily back up to keep the pace.
One of the stories about the hummingbird tells about a warm spring day. Summer was on the way and all the flowers wee in full bloom. A mother and her daughter were wading through the green grass as they enjoyed the beautiful colors of the blooming flowers. As a hummingbird joined them, they stopped to watch as it buzzed and darted from flower to flower.
The child was fascinated by the little hummingbird and asked it’s mother why such a tiny bird would want to fly so fast. And also asked why doesn’t the bird stay at one flower instead of visiting them all? The mother and the child sat down on a small hill overlooking the field and the mother said, “Let me tell you the story of Hummingbird.”
Many years ago there was a fragrant flower that rose every spring to display her beautiful petals and bright colors for all the world’s creatures to enjoy. The people and animals waited anxiously each spring for this special flower to appear. On that day they knew the warm, kind rays of summer had arrived. Raven saw how much joy this flower brought to the world, so the next spring when it appeared, he transformed it into a tiny bird. The bird had the colors of the green spring grass and the flashing red of a setting sun. Raven gave the bird a special gift to fly like sunlight flickering through tall trees. He also gave it a message to take to all the flowers. That’s why today we see Hummingbird buzzing from flower to flower, whispering a message. Hummingbird is thanking each flower for making our world a more beautiful place.
The mother looked at her child and said, “As you grow up, remember that like each flower, each person has gifts to give the world. In return that person will be thanked by the birds, animals and flowers for helping to make our world a better place for every one.”
The above story is as told by Robert James Challenger in the book Eagle’s Reflections and other Northwest Coast Stories available at Hill’s Native Art in Tofino, British Columbia. They have been our valued wholesale jewelry customers for many years and carry a wide selection of art work including hummingbird jewelry and Native American jewelry.
The artisans of copperreflections.com have been making handcrafted jewelry and unique gift ideas since 1985. Inspired by the beauty of wildlife, nature and Native Peoples of North America, each piece is carefully designed and handcrafted especially for you. Our designs are silver plated and diamond cut on copper handcrafted jewelry and unique gift ideas.
Read more by this author, Jennifer Hisir, at Handmade Jewelry Blog by Copper Reflections.
Click the link Hummingbird Jewelryto see a large selection of all kinds of hummingbird jewelry.
My favorite choice of hummingbird feeders is the Hummzinger Ultra
The HummZinger has patented Nectar guard tips which are flexible membranes attached to the feed ports that prohibit entry from flying insects, but allow Hummingbirds to feed as usual. The HummZinger also has a built in ant moat that will stop crawling insects from getting to the nectar. It also has raised flower ports that divert rain.
This mid-size nectar feeder has a 12 oz. capacity and can be hung or post mounted with hardware provided. It has four feeding ports for hummingbirds and is made of unbreakable polycarbonate. Easy to clean.
For ease of cleaning and protection from bees, wasps and ants, this feeder can’t be beat.
When you decide that feeding hummingbirds is something that you would like to try, there are a couple of things you should want to do. First of all you have to have a hummingbird feeder. You’ll be able to buy one or perhaps build your very own home made hummingbird feeder.
Many individuals take pleasure in feeding hummingbirds inside their backyards. Hummingbirds are amazing to observe and hummingbird feeding is really a gratifying hobby for the old and young alike. Hummingbirds normally nourish themselves on nectar which is simple to duplicate, home-made nectar is ideal for bringing in these tiny birds. Here are some instructions on making food for feeding hummingbirds:
Food Instructions For Feeding Hummingbirds:
1. to make hummingbird food, white sugar and water are mixed together at a ratio of one part sugar to four parts water
2. next, bring this hummingbird feed mixture to a boil while stirring the mixture to dissolve all the sugar
3. boil the hummingbird food for about two minutes then let the homemade hummingbird food cool before adding to the hummingbird feeder.
Boiling the hummingbird feeder solution will get rid of any chlorine that might be in the water and kill any impurities that might be in the sugar. This boiling process will allow your hummingbird nectar to last longer before it starts to ferment.
This four to one ratio of water to sugar will produce a hummingbird feeding mixture that is about twenty percent sugar just like the flower nectar hummingbirds naturally feed on.
If you have any of your homemade hummingbird nectar leftover, it can be stored in the refrigerator for up to two weeks.
There are some joys that you can take pleasure in for low cost and birding and feeding hummingbirds is certainly one such enjoyment. Observing hummingbirds is really a clear pleasure. These gorgeous wild birds can be found in beautiful jewel-toned colors and they appear to hover in mid air while they drink nectar out of your backyard garden flowers.
Now that you have the nectar for feeding hummingbirds, now you will need a hummingbird feeder. There are numerous kinds of feeders available for feeding hummingbirds. The vast majority of them are going to have some red colorization to them. For the reason that hummingbirds are drawn to the color red. However if you think that there’s not enough red on your hummingbird feeder then you could fasten a red-colored ribbon around the bird feeder. Red on your feeder or on a ribbon is enough red, to attract hummingbirds. You don’t need to add any red food coloring to the nectar itself. Some say this red coloring is harmful to the hummingbirds, so there’s no need to take a chance.
In addition to the red colorization, hummingbirds enjoy having nectar from various flowers, shrubbery, vines and trees. By putting your bird feeder among the back garden flowers, you’ll have the dual enjoyment of feeding hummingbirds even though there aren’t any flowers blossoming within your backyard garden.
Now despite the fact that hummingbirds adore the color of red they are going to visit your backyard garden if their preferred plants and flowers are there. Having the right flowers in a garden, is a must to be as successful as possible at feeding hummingbirds. Blooming plants like Columbine, Begonias and Holly Hocks, as well as Fuchsias, Coral Bells and Lantana are a few of these. Impatiens, Penstemen, and Petunias along with Geraniums and Flowering Tobacco are also some more favorites that hummingbirds like to feed on.
They also enjoy Azaleas, Flowering Quince, Honeysuckle, Weigela and also the Butterfly Bush. Flowering vines like Morning Glory, Trumpet Creeper and Trumpet Honeysuckle will also attract lots of feeding hummingbirds.
As hummingbirds are extremely territorial birds you’ll have to place other feeders where the hummingbirds won’t see their competition. Should you position the bird feeders close to one another the hummingbirds will fight each other; occasionally to the death in order to guard their favorite flowering plants and feeder.
The very best time to position your hummingbird feeder is around Five to ten days prior to the time the hummingbird season begins. This way should any passing migratory hummingbirds view the bird feeder they will often stop by your backyard. There might be the opportunity of your feeding hummingbirds from another country even. Here is a link that will be helpful in determining when you should put out a feeder. When to start feeding hummingbirds.
The season for hummingbirds starts once the weather conditions starts turning warmer, for that reason it’s best that you understand their traveling times. By doing this you’ll attract hummingbirds to your backyard garden even when there aren’t any great smelling flowers blooming.
Once you’ve started feeding hummingbirds you’ll be amazed at how many hummingbirds will come to your garden and just how colorful and exciting your garden will suddenly become.
To keep the hummingbird nectar fresh you’ll have to change it before the sugar in the homemade hummingbird food starts to ferment.
The outside temperature will determine how long your hummingbird food will last before the sugar starts to ferment. Here is a chart that gives an idea of how long your hummingbird food should last, for feeding hummingbirds, based on the outside air temperature.
High temperatures…………Change nectar after
71-75……………………………6 days
76-80……………………………5 days
81-84……………………………4 days
85-88……………………………3 days
89-92……………………………2 days
93+………………………………change daily
Should you forget to change the hummingbird feed on a timely basis and mold appears, you’ll have to give your hummingbird feeder a thorough cleaning. For feeding hummingbirds, a clean feeder is a must!
You will need to mix a 10% bleach and 90% water solution to soak your feeder in to kill the mold and sterilize your feeder. Soak your feeder for an hour. You may need to use small hummingbird feeder brushes to brush the dead mold off of the inside of your feeder and out of the feeder ports, to thoroughly clean it.
feeder brushes
You may also need to brush the feeder with special hummingbird feeder brushes to remove the dead mold. They come in shapes and sizes especially suited to get into all the little nooks and crannies where mold might be hiding. For feeding hummingbirds, you can’t allow mold to be in your feeder.
Once your feeder is clean, remove all the bleach water by rinsing it in running water several times.
There are feeders that you can buy that will make the task of cleaning a feeder a lot easier. Try to find a feeder that is easy to take apart and allows you to get inside the feeder to all those hard to reach areas that will need cleaning.
My favorite choice of hummingbird feeders to use with the homemade hummingbird feed recipe, for feeding hummingbirds, is
It’s inexpnsive and has several features that makes it well worth the price.
The HummZinger has patented Nectar guard tips which are flexible membranes attached to the feed ports that prohibit entry from flying insects, but allow Hummingbirds to feed as usual. The HummZinger also has a built in ant moat that will stop crawling insects from getting to the nectar. It also has raised flower ports that divert rain.
This mid-size nectar feeder has a 12 oz. capacity and can be hung or post mounted with hardware provided. It has four feeding ports for hummingbirds and is made of unbreakable polycarbonate. Easy to clean.
For ease of cleaning and protection from bees, wasps and ants, this feeder can’t be beat for feeding hummingbirds.
If you don’t have a feeder with an ant moat built-in, you can get an add on ant moat like this one that is great for feeding hummingbirds, to hang your feeder from.
Good luck with your hummingbirds and I hope you enjoyed this article on feeding hummingbirds
A good hummingbird book, will contain lots of valuable information on hummingbirds. A hummingbird book will give facts such as hummingbird habitat, all the different hummingbird species, where the hummingbirds are found through out the world and how to identify the different hummingbirds. A hummingbird book will also have pictures of the different hummingbirds so you will be able to identify which hummingbirds you have in your particular area. A hummingbird book will tell what hummingbirds eat, how hummingbirds sleep, how they fly and information on their life span can also be found in a good hummingbird book.
Below is a link to a great hummingbird book collection, containing all the best hummingbird books available. Just click on the link hummingbird bookand it will take you to Amazon.com, where you may read more about the hummingbird book and even purchase the books if you so choose.