Here you will learn how to ant proof your hummingbird feeder using an ant moat.
You will also learn how to bee proof your feeder, an easy recipe to make homemade hummingbird nectar, the best way to clean and sterilize your feeder and so much more. At the end of the article you will also find my special free video course that will teach you how to hand-feed hummingbirds and a link to my other free video course that will teach you how to hand-feed your other backyard birds. You will learn everything you need to know to maximize you enjoyment of hummingbirds!
Ants, bees and wasps can become a big problem at your hummingbird feeder. Here you will learn how to keep them away. Ants love hummingbird nectar and they will soon locate your feeder, especially if you are using a feeder that leaks and leaves a trail of nectar for them to follow. Inverted bottle feeders are a good example of feeders that leak nectar. The bottle feeder has the nectar stored in a bottle above the feeding ports. The problem is, once the level of the nectar in the bottle starts to go down, there is an air pocket left in it’s place at the top of the bottle. Heat will cause this air pocket to expand and that will force the nectar out of the feeding ports below the bottle. The outside of the feeder will be covered with nectar as well as the ground below the feeder. This leaves an easy trail for ants to pick up and follow to your feeder.
The alternative is to use the other main type of feeder, the saucer or basin feeder. The saucer feeder is like a dish, that hold the nectar, with a cover over top that has the feeding ports. The nectar is stored below the feeding ports so there is no problem with expansion forcing the nectar up and out of the ports. The ants are a lot less likely to locate a feeder of this type. Most of your better saucer type feeders will also have an ant moat built into the design of the feeder, that will totally ant proof the feeder.
If you have an old leaky, bottle feeder, you can still keep ants away from your feeder. All you have to do is use an add on ant moat that will ant proof your feeder.
Ant proof your hummingbird feeder
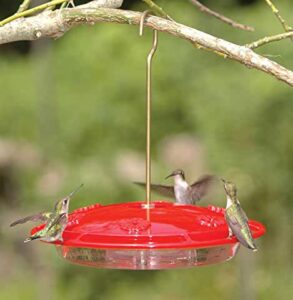
Use an ant moat to keep ants off a hummingbird feeder.
An ant moat or ant guard, as they are also called, is the easiest and best way to ant proof your hummingbird feeder. An ant moat is simply a small container that holds water. Since ants cannot swim, the moat provides an effective barrier when it is placed between the feeder hanger and the feeder. As you can see in the picture, one end of the ant moat is attached to the hanger and the other end is attached to the feeder. The ants can crawl down the hanger only as far as the water in the moat. Since they can’t swim, this is as far as the ants can go.
If you choose a red ant moat, the red color will also aid in the attraction of hummingbirds.
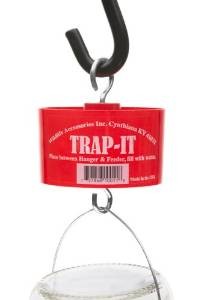
Ant moats come in a variety of designs and materials. Some are very attractive and add a nice appearance to your feeder.
If you would like to try to make your own, below is a video on how to make a homemade ant moat.
Now that your feeder is ant proof, you will also want to know how to keep bees and wasps off of your hummingbird feeder
How to bee and wasp proof a hummingbird feeder
Bees and wasps also love the taste of sweet hummingbird nectar. I have had them so thick around my feeder that the hummingbirds couldn’t even get close to feed. Once the bees have found your feeder there are a few tactics you can try to keep them away. I have even posted a video below that shows how one man bee proofed his hummingbird feeder using the plastic mesh from an onion sack.
There are some feeders that come with bee proofing built right into the design of the feeder. You have probably seen those yellow plastic bee guards that fit over the feeding ports on some feeders. Usually these are found on bottle-type feeders that are prone to leaking, which attracts bees and the yellow color of the bee guards also attracts bees and wasps. These two things together, seem to undermine the whole objective of keeping bees and wasps off your feeder. A much better option is to use what are called “nectar guard tips”. There are feeders that come already equipped with the patented “nectar guard tips“. These tips are made of flexible plastic that fits into the feeding port from underneath. The hummingbird with its long beak can easily feed through them. When the hummingbird withdraws its beak, the tips close and prevent access to bees and wasps. Getting a feeder with “nectar guard tips”, is the best choice to keep bees and wasps off your hummingbird feeder.
Here’s some other options that might help to keep bees and wasps off your hummingbird feeder:
*Try moving the feeder. Sometimes just moving the feeder a short distance from where it is, will be enough to keep the bees from finding it. I guess they’re not very smart compared to hummingbirds.
*Take the feeder down for a while. Sometimes you can take the feeder down until the bees and wasps give up and leave. After they leave, put the feeder back up. You might have to leave it down for several days. The hummingbirds won’t give up looking for the feeder as soon as the bees will, so when you put the feeder back up it shouldn’t be long before the hummingbirds find it again.
*Finally, you can try putting up a feeder just for the bees and wasps. In the bee feeder, fill it with nectar that is sweeter than the hummingbird nectar. Mix the nectar 1 part sugar to 3 parts water instead of 4 parts water. This sweeter nectar should be more attractive to the bees and wasps and hopefully they will leave the hummingbird feeder alone.
Below is a video about how one man bee proofed his feeder using the plastic mesh from an onion sack.
As mentioned before, there are some feeders that come with ant and bee proofing built right into the feeder design.
A good hummingbird feeder will have:
*the “nectar guard tips” to keep out bees
*will have a built in ant moat to keep out ants
*will of course, be red in color to attract hummingbirds
*will be a basin feeder that is “non-leaking, so it doesn’t attract insects
* will have raised feeding ports to keep rain water from diluting the hummingbird nectar
*will have a perch for the hummingbirds to sit on, as they feed, so the hummingbirds can conserve their energy
*and will be easy to take apart and clean.
Now that you know how to ant and bee proof your hummingbird feeder, you should also learn how to make your own hummingbird food. Homemade hummingbird food is easy to make and will save you money, if you make it yourself. Your homemade food will also be healthier for the hummingbirds because, unlike a lot of the store bought hummingbird nectar, your homemade nectar will not contain any red food coloring. Food coloring is thought to be harmful to the hummingbirds and it is not necessary to attract hummingbirds if you have a red feeder or a red ant moat. If you don’t have any red, some people attach red ribbons to the feeder to help attract hummingbirds.
How to make hummingbird nectar
The homemade hummingbird nectar recipe is 1 part sugar to 4 parts water.
Ordinary white granulated table sugar, the same sugar you use on your breakfast cereal and water are the only 2 ingredients you will use to make the hummingbird food. Don’t add any other types of sweeteners or any other ingredients. Other types of sweeteners can be harmful to the hummingbirds, so don’t use anything else, just water and sugar. The 1 to 4 ratio will make nectar that is the same as the nectar found in the flower blossoms that hummingbirds feed on.
Homemade Hummingbird nectar instructions:
*to a sauce pan on your stove, add 1 part sugar to 4 parts water
*stir to dissolve the sugar as the mixture comes to a boil
*boil for 2 minutes
*remove from heat and let cool
After the nectar has cooled you can fill the feeder and store any extra nectar in the refrigerator for up to a week. Boiling the nectar will kill and impurities that might be in the sugar and boiling will release the chlorine from the water. Boiling for 2 minutes is long enough. If you boil any longer than 2 minutes you might boil away too much water and change the ratio. You will end up with a sweeter nectar that is more attractive to bees and wasps. Any way we can reduce the attractiveness of the nectar to insect, the better.
Below is a video that shows how to make homemade hummingbird nectar. Most people boil the nectar for 2 minutes, which is longer than the time suggested in the video.
Now you have an ant and bee proof feeder filled with homemade nectar. If you want to be successful at attracting and feeding hummingbirds you must keep fresh nectar in your feeder at all times. You will need to know when to change it so that the nectar is always fresh. If the nectar ferments, your hummingbirds will disappear. When the nectar gets old, the sugar will ferment and cause mold to grow in the nectar and on your feeder. Moldy nectar is bad for the health of the hummingbirds and makes your feeder much harder to clean.
So how do you know when to change the nectar in the feeder?
There are general guidelines you can use that tell you when the time is getting close and the nectar will have to be changed. These guidelines are based on the outside air temperature. The hotter the weather, the sooner the nectar will ferment and the sooner fresh nectar will have to be added.
When to change the hummingbird nectar chart:
High temperatures are Change nectar after this many days
71-75 6 days
76-80 5 days
81-84 4 days
85-88 3 days
89-92 2 days
93+ change daily
These guidelines are approximate and only a visual examination of the nectar will tell you when it’s time to change it. When the nectar gets old it will start to look cloudy. At this point it needs to be changed. If you let it go longer than this this, you will start to see little black specks of mold in the nectar and you might also see black mold growing on your feeder. At this point, when you see mold, you know the nectar should have been changed sooner. Any time the nectar starts to look cloudy change it.
Every time you change the nectar wash out the feeder several times with hot water. The National Audubon Society suggests that once a week you clean your feeder with a vinegar solution. Rinse your feeder with a solution made up of 1 part white vinegar to 4 parts water. After rinsing the feeder out with the vinegar solution, rinse it out 3 times with clear warm water to remove all traces of the vinegar. Then you can refill the feeder with fresh nectar.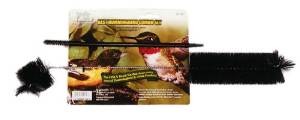
If you find mold growing in the nectar you will have to rinse your feeder with a mild bleach solution to kill the mold and to sterilize the feeder. This bleach solution is made by adding 1/4 cup bleach to 1 gallon of water. Soak your feeder in the bleach solution for 1 hour. If there’s any mold on your feeder you’ll need to brush it off. A set of hummingbird feeder brushes is very helpful in cleaning the mold from your feeder.
Below is a video on cleaning a hummingbird feeder
Here is my special instructional video that will show you an easy way to teach your hummingbirds to feed out of your bare hand.
Here is another video that will show you how to bring your hummingbirds to a window where you can feed them out of your hand.
I also have other free videos on hand-feeding different backyard birds and squirrels, click the link Hand-feeding backyard birds and squirrels to watch the videos.
Now you know all about ant moats for hummingbird feeders. You know how to bee proof your feeder and how to make your own homemade hummingbird food. You know when to change the nectar and how to clean your hummingbird feeder. You even know how to hand-feed your hummingbirds. You now know everything necessary to allow you to get the most possible enjoyment from feeding and watching your hummingbirds!
If you found this article to be helpful, please consider sharing it with others, using the social bookmarking buttons on the left side of this page. Please pass on the knowledge you have learned here and help everyone to increase their enjoyment of hummingbirds. Thank you!
Resources


