Learn to make hummingbird food and bee and ant proof your feeder. Learn when to change the nectar, how to clean a hummingbird feeder, how to hand-feed hummingbirds and so much more!
Make your own hummingbird food and you will have the added joy of watching your hummingbirds feed on nectar that you have made with your own 2 hands!
If you make your own hummingbird food you will also save money and have hummingbird nectar that is better for your hummingbirds. Because there is no need to add any of the red food coloring that is found in most store bought hummingbird food, your nectar will be better for the hummingbirds. There is evidence that red food coloring used to attract hummingbirds can be harmful to them.
If you have a red feeder you do not need red food coloring anyway and if your feeder is not red, just tie some red ribbon on it to attract hummingbirds.
To make your own hummingbird food all you need is 2 ingredients …tap water and white granulated table sugar.
To make your own hummingbird food you will also need the hummingbird food formula.
The formula is 4 parts water to 1 part sugar. A ratio of 4 to 1 will closely match the nectar that hummingbird get when they feed from flower blooms.
Make your own hummingbird food instructions:
- First you will need to add the 4 parts water to a pan and on your stove top, bring the water to a boil
- While the water is coming to a boil, stir in the 1 part sugar and continue stirring until the sugar is completely dissolved
- When the hummingbird food mixture starts to boil, continue boiling for about 2 minutes
This 2 minute boiling will get rid of any chlorine that might be in the water as well as killing any mold spores or bacteria that might be in the sugar. Boiling will help your nectar keep longer before the sugar starts to ferment, once it is out in the heat.
- After boiling for 2 minutes you can take the hummingbird nectar off the heat to cool, before adding to your hummingbird feeder.
Any excess hummingbird nectar can be stored in the refrigerator for as long as 2 weeks. Just be sure to check it and if it starts to look cloudy throw it out.
Here is an instructional video on how to make your own hummingbird food.
The video suggests boiling for 30 seconds to a minute but most people boil for 2 minutes.
Here’s a special aid for making hummingbird food that makes it simpler to make and simpler to store the hummingbird food. You can get one for yourself by clicking here.
Now that you know how to make your own hummingbird food, the next thing you have to do is make sure you keep the hummingbird food in your feeder fresh. Hummingbirds will not use a feeder that doesn’t contain fresh nectar.
Changing your hummingbird nectar once in a while is the way to keep it fresh. How often to change the nectar can be seen by the chart below, which is based on how hot the outside temperature is.
How often to change your nectar chart:
High temperatures…………Change nectar after
71-75……………………………6 days
76-80……………………………5 days
81-84……………………………4 days
85-88……………………………3 days
89-92……………………………2 days
93+………………………………change daily
The above chart will give you a general idea of how long your nectar might last. But, you will have to keep an eye on the nectar to know for sure when it’s time to put in fresh nectar. When you notice that the nectar is starting to appear cloudy, it needs to be changed. If you can see tiny black specks in the nectar, this is mold and it tells you that the nectar should have been changed sooner.
If you change the nectar before it becomes moldy you can simply rinse it out with hot water each time before refilling. The National Audubon Society suggests that you clean your feeder once a week with a vinegar solution. Add 1 part white vinegar to 4 parts water and rinse out the feeder. Follow this by rinsing out the feeder 3 times with clear warm water to remove the vinegar solution. Then you can fill the feeder with fresh nectar.
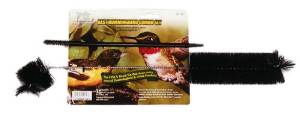
If the nectar has become moldy, rinsing with hot water will not be enough, you will have to clean it with a mild bleach solution to sterilize the feeder and to kill the mold. The bleach solution is made by adding 1/2 cup of bleach to 1 gallon of water. Soak the feeder in the bleach solution for an hour.  Chances are that mold will also be growing on your feeder. You may need to use some hummingbird feeder brushes to dislodge the mold from the feeder. Be sure to check the feeding port holes and all the little nooks and crannies. When the feeder is done soaking in the bleach solution, you need to rinse it out 3 or 4 times with clear water to make sure all traces of the bleach have been removed.
A good video that describes how to clean a hummingbird feeder.
And talks about hummingbird feeder brushes.
Check out this link on how to clean your hummingbird feeder.
How to keep bees, ants and wasps away from your hummingbird feeder
Now that you know how to make your own hummingbird food and how to keep your feeder clean, you’ll also want to know how to keep insects away from your feeder. The sweet nectar will be attractive to a lot of insects as well as hummingbirds. You must keep them from finding your feeder and if they do find it, you must be able to keep them out of the hummingbird food.
A lot of feeders will leak nectar and leave a trail that will lead insects right to the feeder. Bottle type feeders are bad about leaking nectar. This type of feeder has a bottle that holds the nectar located above the feeding ports. When the level of the nectar in the bottle starts to go down an air space is left behind at the top of the bottle. Heat will cause this air space to expand and drive nectar out of the feeding ports located below in the base of the feeder.
The other main type of hummingbird feeder is a basin feeder. A basin feeder is a non-leaking hummingbird feeder. The basin feeder is like a bowl that holds the nectar, with a lid that covers the bowl, that has the feeding ports. The nectar is located below the feeding ports so expansion won’t force it out. Also, the nectar is located far enough below the ports that insects have a hard time reaching it, but hummingbirds have no problem getting to the nectar with their long tongues.
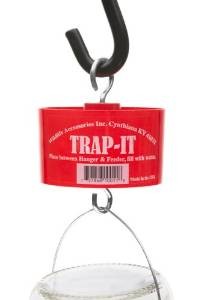
How to ant proof a hummingbird feeder
If ants find your feeder there is still a good way to keep them out of the nectar. A devise called an ant moat, will ant proof your hummingbird feeder. An ant moat is simply some kind of cup that holds water. When the moat is hung in front of your feeder it keeps the ants from reaching the feeder because the ants can’t swim. Ant moats are usually made out of plastic, metal or ceramic and come in many attractive designs. Use a moat to ant proof any hummingbird feeder
If you would like to make your own ant moat here is a video
How to bee and wasp proof a hummingbird feeder
Bees and wasps can be harder to keep away from your feeder unless you have a feeder with bee protection built into the feeder. More about that later.
If bees and wasps have located your feeder there are a few things you can try. First, you can try to move the feeder a short distance to a different location. Bees and wasps are not very smart and they might think the feeder is gone when they don’t find it in the previous location. If that doesn’t work you can take the feeder down and leave it down until the bees and wasps leave. They won’t spend a lot of time searching for the feeder and will leave. Hummingbirds on the other hand won’t give up as easily and should find it shortly after you hang the feeder back up. One other option some people use is to give the bees and wasps their own feeder. They will make the nectar sweeter so it will be more attractive to bees and wasps and hopefully they will leave the hummingbird feeder alone. Instead of a 1 to 4 ratio, try a 1 to 3 ratio of sugar to water. You can even just put it in a bowl or dish and set it somewhere for them to use.
There are feeders that have yellow bee guards over the feeding ports to keep out bees and wasps, but the yellow color will attract bees and wasps and these are usually found on the bottle feeders that leak and attract bees anyway. The color and the leaking compromises their effectiveness.
I found a video below that shows how one man was able to bee proof his hummingbird feeder using some plastic mesh from an onion sack.
When it comes to keeping bees and wasps out of your hummingbird feeder, the best option is to buy a hummingbird feeder that is already bee and wasp proof. Some feeders come with patented “nectar guard tips” that keep bees and other flying insects away from the hummingbird nectar. The tips are flexible plastic that let the beak of a hummingbird slide through, but close up when the hummingbird withdraws it beak and won’t let bees and wasps reach the nectar.

The Hummzinger Ultra is a non-leaking hummingbird feeder that has “nectar guard tips” to make it bee and wasp proof, plus it also has a built in ant moat that keeps ants out of the nectar. It’s easy to take apart and clean and has raised feeding ports to keep out rain water. The perch around the feeder makes a place for the hummingbirds to sit so that they can conserve energy as they feed. This is the perfect feeder to use with your homemade hummingbird food.
This feeder will solve your ant, bee and wasp problems.
Once you have hummingbirds coming to your feeder you might like to enjoy the ultimate hummingbird thrill. Below I have posted 2 videos that will teach you how to hand-feed your hummingbirds. There is also a link to my other videos that will teach you how to hand-feed your other backyard birds.
Hand-feed your hummingbirds how-to video
Here is another technique you can use to hand-feed hummingbirds through a window in your home.
If you want to watch my other free videos on hand-feeding birds and squirrels, click the link how to hand-feed your backyard birds and squirrels.
Now you know a recipe for how to make your own hummingbird food, you know how to determine when it’s time to change the nectar so it’s always fresh and you know the proper ways to clean your hummingbird feeder and even how to ant and bee proof your feeder and last but not least you know how to hand-feed your hummingbirds. You know everything needed to get the most enjoyment possible out of your hummingbird feeding experience.
I hope you will find the information in this article helpful and it helps to insure that your hummingbirds keep coming back to your feeder for you to enjoy! If you like the article, please share it using the social bookmarking buttons in the left hand column of this page. Pass on the knowledge so more people can enjoy their hummingbirds. Thank you!
Resources
Smithsonian Migratory Bird Center -hummingbird article

